Java is one of the most confusing and frustrating add-ons for Mac and here we show you the easiest way to uninstall Java from El Capitan, Sierra and High Sierra. The truth is, there’s actually no way to fully remove Java from Mac but you can easily completely disable it. The instructions provided here show how to disable Java from El Capitan OS X 10.11, macOS 10.12 Sierra and macOS 10.13 High Sierra but it works for all versions of OS X including OS X 10.6 Snow Leopard, OS X 10.7 Lion, OS X 10.8 Mountain Lion, OS X 10.9 Mavericks and OS X 10.10 Yosemite. If you’ve got here because you keep getting a Java SDK error message in El Capitan or macos Sierra, there is probably an application installed on your Mac that requires Java or a website or game (such as Minecraft) that you’re trying to access that requires it. You can find instructions here how to install Java on El Capitan & Sierra or you can simply uninstall the application that keeps prompting you to use Java if you don’t need it anymore. Once you’ve identified the application or websites that keep demanding Java, you can use the following instructions to rid your Mac of Java for good.
How To Uninstall Java From El Capitan, Sierra & High Sierra
The annoying fact is that there is no way to 100% remove Java from your Mac. Once you’ve installed it, it installs deep inside OS X and it’s there for good so the best advice is don’t install Java on your Mac unless you 100% need it! However, the good news is that you can completely disable it in just one move so that it can’t cause any further problems on your Mac. Note that the official Java uninstall instructions for Mac from Oracle only disable Java – they do not actually remove Java from your Mac. They are also a bit complicated to follow if you’re new to Macs as it requires using Terminal commands in OS X.
First we start with a quick and easy way to disable Java in El Capitan, Sierra & High Sierra. Then we show you how to use Terminal to remove as much of Java as possible from your Mac.
Follow these instructions to uninstall Java from El Capitan & Sierra.
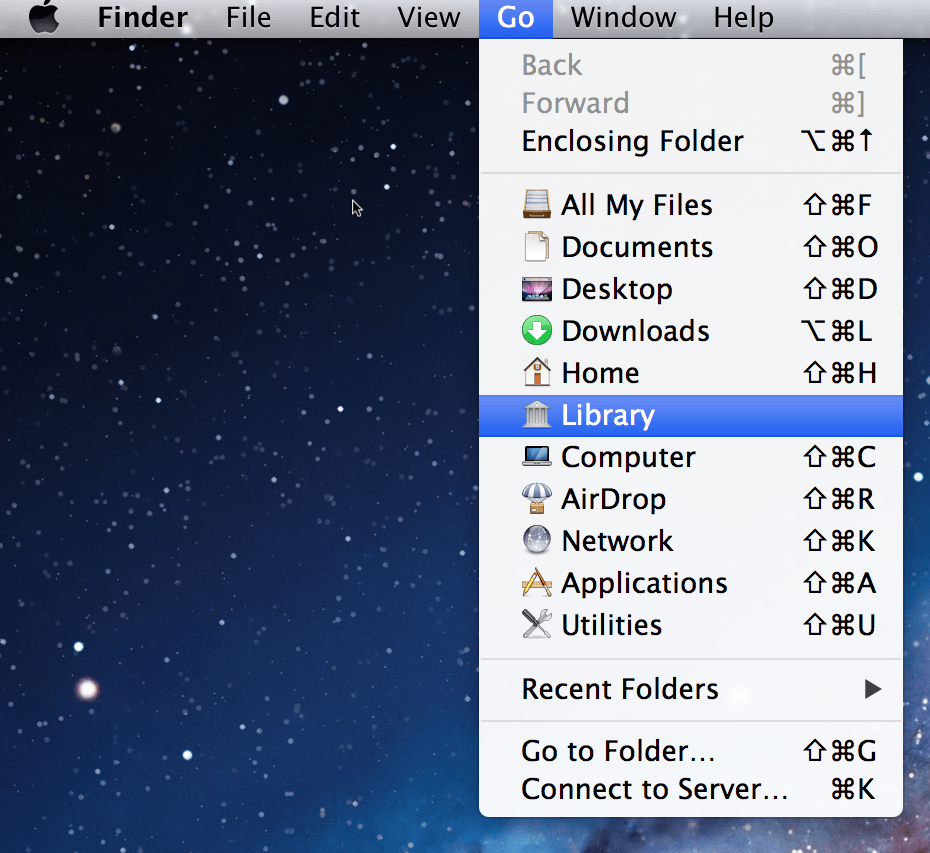
- Go to the root Library folder in Library/Internet Plug-Ins and delete everything related to Java. To access your root Library folder, open Finder and click on the “Go” menu at the top. Hold down the “Alt” key (also known as the “Option” key) and you will see the Library folder appear:

- Once you’re in the Library folder, delete absolutely everything related to Java. If you also had the JDK (Java Development Kit) installed, you also need to navigate to /Library/Java/JavaVirtualMachines/ and delete anything that you see. Then go back to your Mac desktop and click on your Macintosh HD and go to your /System/Library folder and delete everything related to Java there too.
This instantly disables Java on your Mac and prevents it from infecting your Mac in any way via Java applets in websites or apps. Note that you should quit and restart any browsers you had open and you can surf safe in the knowledge that Java can’t do any harm to your Mac.
How To Uninstall Java Using Terminal
If you’re confident using Terminal on your Mac or the above method doesn’t work for some reason, you can remove more traces of Java with a few simple commands. However, first you need to disable a new layer of protection to OS X 10.11 that Apple has added called “Rootless SIP”.
Here’s how to uninstall Java from El Capitan & Sierra using Terminal in OS X.
- Firstly you need to disable Rootless SIP in OS X. Restart your Mac when the screen turns black hold down ⌘R until the Apple logo appears.
- Select the “Utilities” menu and then “Terminal”. In Terminal type: csrutil disable
- Hit Return and then restart OS X. Your Mac will then restart with SIP disabled and you can try installing Java again.
- You can then use Terminal to remove Java by typing the following in Terminal:
sudo rm -fr /Library/Internet\ Plug-Ins/JavaAppletPlugin.plugin and press Enter
sudo rm -fr /Library/PreferencePanes/JavaControlPanel.prefpane and press Enter
You can also remove the Java JDK by typing:
sudo rm -fr /System/Library/Java/JavaVirtualMachines/1 .6.0.jdk and press Enter
If this doesn’t work, you can try:
cd /Library/Java/JavaVirtualMachines and press Enter
ls and press Enter
sudo rm -rf jdk1.8.0_25.jdk and press Enter
Note: The 1.8.0_25.jdk part should be replaced by whatever Java version you have installed if you have a different version to 1.8. To check which version of Java you have installed simply type: java -version in Terminal:
When you’ve done all this, it’s a good idea to re-enable Rootless SIP protection on El Capitan & Sierra. All you have to do is follow the same instructions as for disabling it except instead of csrutil disable you type: csrutil enable
Even after this, there will be traces of Java files on your Mac in other locations (such as /usr/bin) but you really don’t need to worry about them as removing them can mess up OS X. You can double check whether Java still exists in your system by typing java -version in Terminal and it will show you exactly which version of Java you have installed. Note that Java version numbers are a bit confusing because what are installed on your system as Java 1.6, 1.7 and 1.8 are known more commonly as Java 6, Java 7 and Java 8 respectively.
Note that if you’re trying to install Java 6 on Mac (called Java 1.6 by Oracle) and you keep getting the error message:
A newer version of Java is already installed
Make sure that you are downloading the correct version of Java 6 from the Apple website which currently is Java for OS X 2015-001.
If you have any questions or problems disabling Java on your Mac this way, let us know in the comments below. If you found this tutorial helpful, you may also find our guide on how to uninstall Office 2016 for Mac useful too.


