Doing a Factory Reset on a Mac is a great way to remove and delete everything, especially if you’re looking to sell, give-away or trade in your Mac, MacBook Air or MacBook Pro.
Factory resetting a Mac is a bit more complicated than resetting other Apple devices such as Apple Watch, HomePod or AirPad.
However, it has been made a lot simpler in the latest Apple Silicon Macs thanks to something called the T2 Security Chip.
If you’ve got an older Intel Mac without the T2 Security Chip, the process is more complicated as you need to sign-out of services such as iCloud, de-authorize accounts and unpair Bluetooth devices.
Here we show you all the ways to do a Factory Reset on a Mac including on both Intel and Apple Silicon Macs.
Table of Contents
Why Factory Reset & Erase A Mac?
If you’re planning on getting rid of your Mac, then doing a factory reset of it or erasing the hard drive is a good idea for many reasons.
Most importantly it protects any data that was stored on your Mac’s hard drive from getting into the wrong hands and preserves your privacy.
It also prevents any problems in the future if your Mac is connected to various services such as iCloud, iMessage that won’t allow you to be logged into more than one Mac at a time.
It also means that the new user receives a fresh new Mac with a clean hard drive and no pre-installed data or applications.
Alternatively, performing a factory reset of a Mac is useful if you want to reinstall macOS due to problems you may have been having with the Mac running slow or crashing frequently.
Before You Start
Before you factory reset your Mac, we strongly recommend backing up your Mac with Apple Time Machine.
This means that if anything goes wrong, or you realize you’ve lost valuable data or files, you can easily restore your Mac to how it was before the factory reset in just a few clicks.
Although you can use Time Machine without an external hard drive to backup a Mac, we also recommend using an external hard drive in case your Mac hard drive fails or corrupts.
Note that backing-up your Mac to iCloud isn’t enough. iCloud can’t back-up everything on your Mac and restore it instantly in the way Time Machine can.
How To Factory Reset A Mac
The way to reset a Mac depends on the type of Mac you have, whether it has a T2 security chip inside it and the version of macOS that you’re using.
There are two types of MacBooks out there: the ones manufactured from 2018 onwards that have a T2 security chip inside and the ones made earlier than don’t.
All the latest Apple Silicon Macs have the T2 security chip inside.
Intel Macs made in 2018 and 2019 also have the T2 security chip inside.
The full list of Macs which have a T2 chip are:
- iMac (Retina 5K, 27-inch, 2020)
- iMac Pro
- Mac Pro (2019)
- Mac Pro (Rack, 2019)
- Mac mini (2018)
- MacBook Air (Retina, 13-inch, 2020)
- MacBook Air (Retina, 13-inch, 2019)
- MacBook Air (Retina, 13-inch, 2018)
- MacBook Pro (13-inch, 2020, Two Thunderbolt 3 ports)
- MacBook Pro (13-inch, 2020, Four Thunderbolt 3 ports)
- MacBook Pro (16-inch, 2019)
- MacBook Pro (13-inch, 2019, Two Thunderbolt 3 ports)
- MacBook Pro (15-inch, 2019)
- MacBook Pro (13-inch, 2019, Four Thunderbolt 3 ports)
- MacBook Pro (15-inch, 2018)
- MacBook Pro (13-inch, 2018, Four Thunderbolt 3 ports)
If you’re unsure whether your Mac has one, you can check here whether your Mac has a T2 security chip inside.
If your Mac is from 2017 or earlier and you’re not running macOS Ventura or Monterey, then factory resetting your Mac is a bit more complicated but we’ll also show you how.
With this mind, here’s how to factory reset a Mac based on the model of Mac you’re using.
How to Factory Reset a Macbook With T2 Chip (macOS Ventura)
With MacBooks made after 2018 that are running macOS Ventura or later, it’s very easy to Factory Reset them with the Erase Assistant feature.
Here’s how to erase the hard drive and factory reset them.
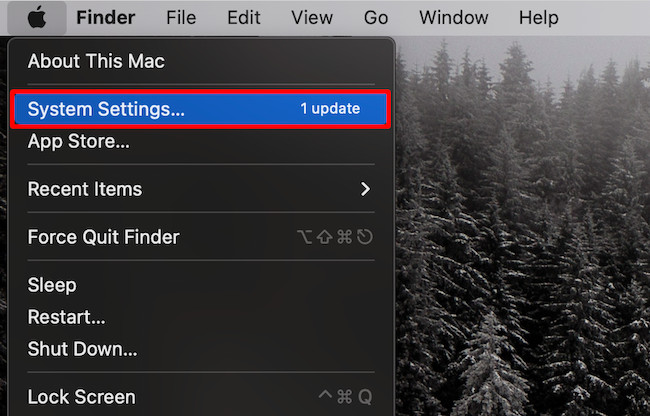
- To access your System Settings on a Mac, first, go to the top-left corner of your screen. There, you’ll see the Apple menu icon.

- Click it and then choose System Settings.
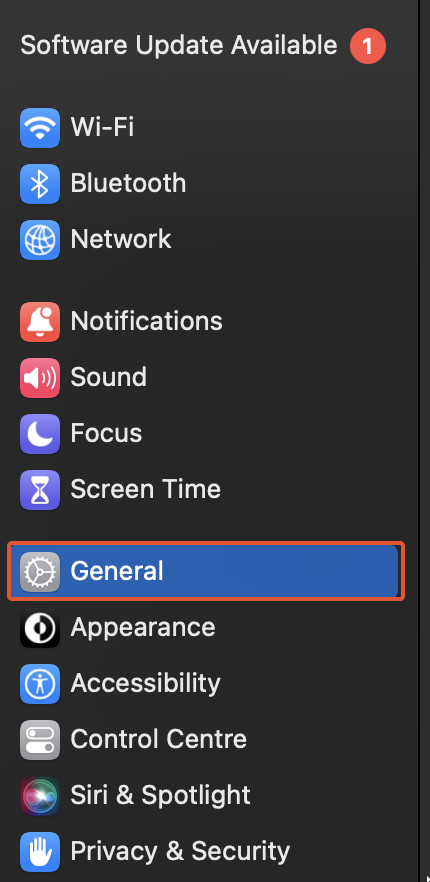
- Next, click on General in the sidebar.
- On the right side of the General page, you will see the options for Transfer or Reset.
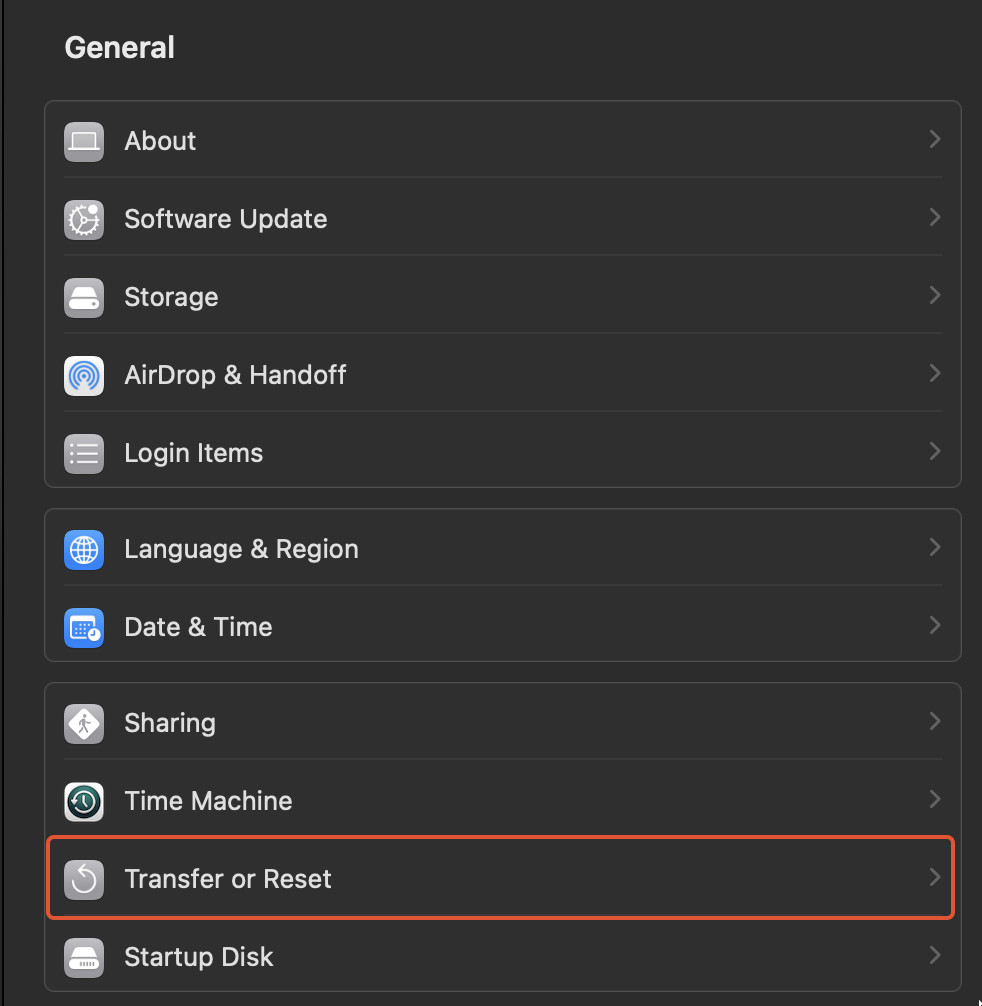
- To erase all content and settings, select Erase All Content and Settings
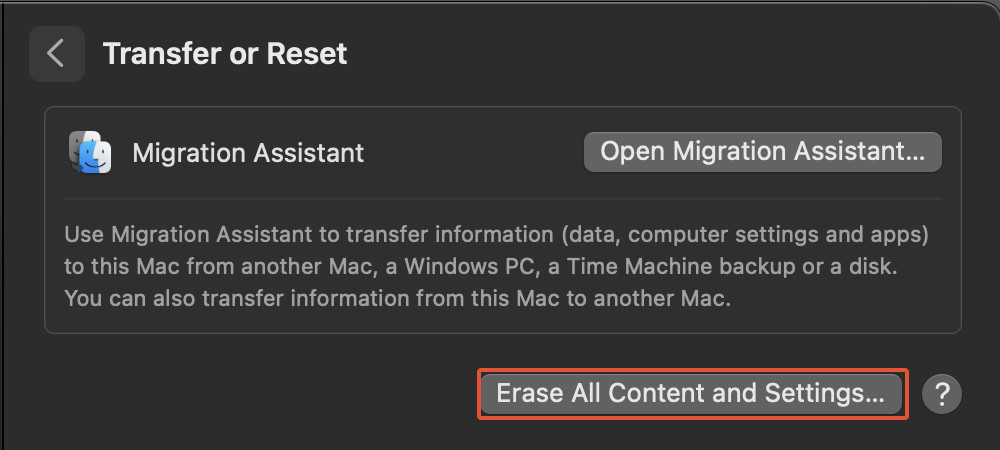
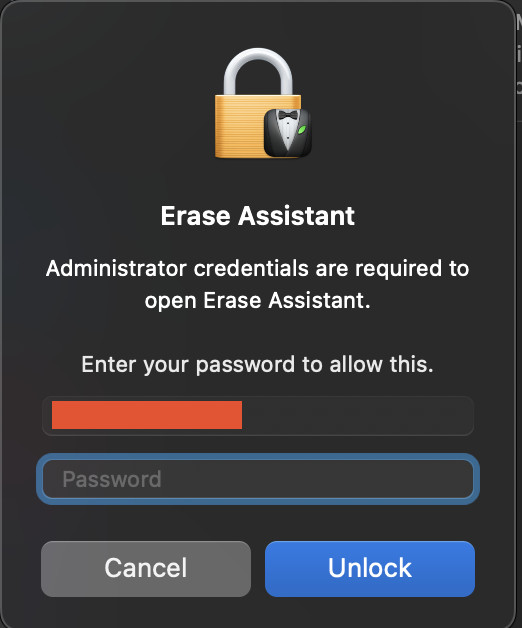
- When you attempt to erase your Mac, the assistant will prompt you to enter your admin password, which is the same password that you use to log in to your Mac. After entering it, click Unlock to proceed.
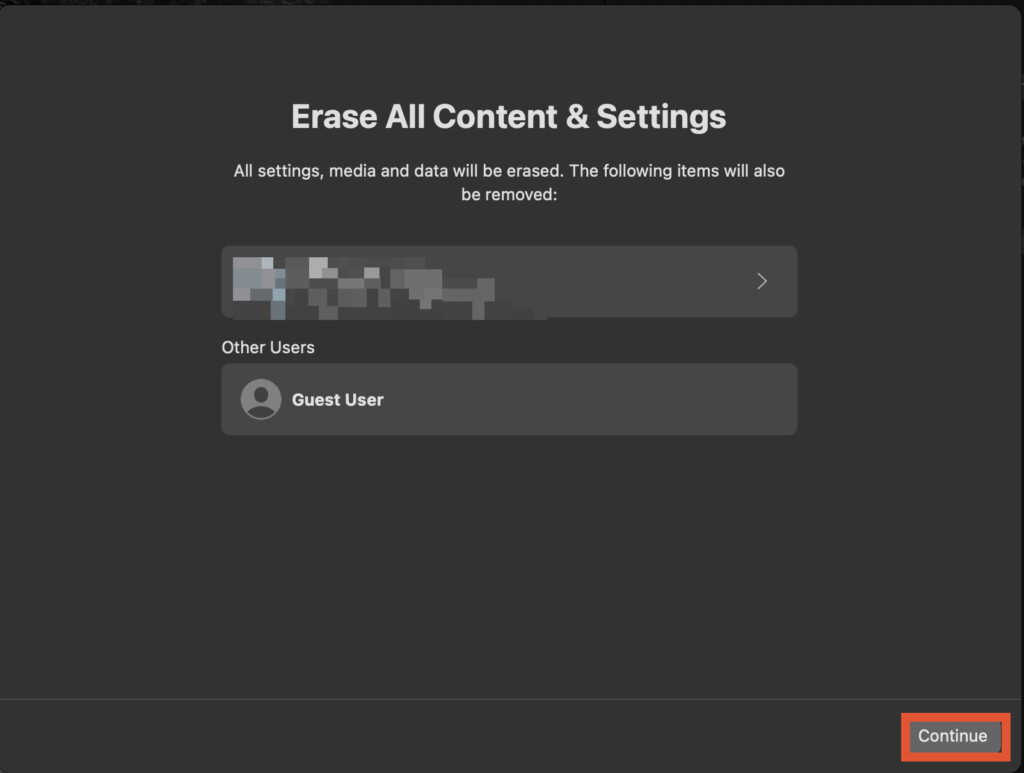
- To confirm the removal of all of your Mac’s settings, media, data, and other items in the macOS Erase All Content & Settings window, click Continue.
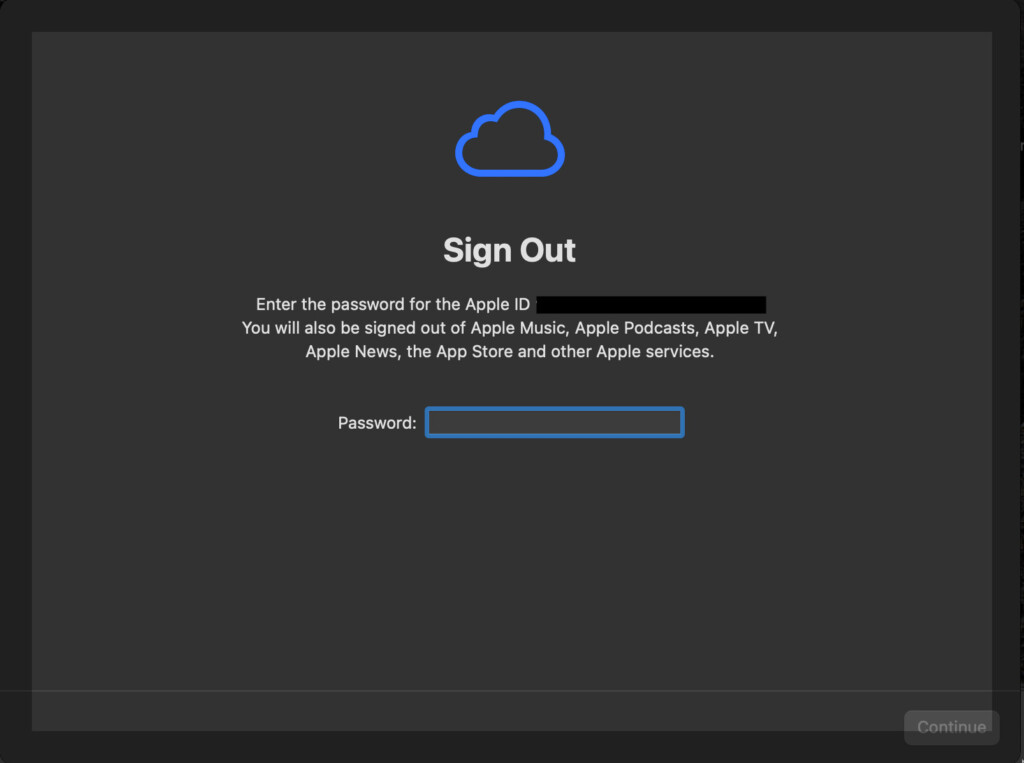
- Sometimes, you might get a prompt to log out of your Apple ID. If this occurs, enter the password of your Apple ID and click Continue.
- To confirm the Factory Reset, click on Erase All Content & Settings. When you confirm, your Mac will restart and once everything has been removed, and you’ll have to set it up as if you’re doing it the first time.
If you’re still using macOS Monterey, the steps to factory reset a Mac are almost the same when compared to Ventura, except for the first two.
Here’s how to Factory Reset a Mac with a T2 security chip running macOS Monterey:
- Choose System Preferences by going to the top left side of the screen where the Apple Menu icon lies.
- From the System Preferences Menu, choose Erase All Content and Settings.
- Follow steps 3 to step 9 from the macOS Ventura Factory Reset method to erase everything in macOS Monterey.
How To Factory Reset an Intel Mac Without A T2 Chip
If you’ve got an Intel Mac made in 2017 or earlier then it won’t have a T2 chip and you’ll have to use Disk Utility to Factory Reset your Mac.
Disk Utility can erase all of your data from the Mac and restore it to its original factory settings.
Before you do this however, you need to sign-out of various services that you may be signed into. Before erasing your Intel Mac’s hard drive, you need to do the following.
- Sign-out of Find My Mac: Go to System Preferences and click on your name in the Apple ID or iCloud section. Scroll down to Find My Mac and switch it off.
- Sign-out of iMessage: Open Messages on your Mac and click on Settings or Preferences. Click on the iMessage tab and sign-out.
- Sign out of Apple Music & iTunes. Open Apple Music and iTunes and log out to de-authorize your Mac to use those services. Click on Account > Authorizations > De-authorize this computer to make sure the process is complete.
- Sign out of Apple TV on your Mac. Click on Account > Authorizations > De-authorize this computer.
- Sign-out of iCloud. Go to System Preferences and click on your name in the Apple ID or iCloud section. When prompted if you want to keep a copy of everything deselect this option. Click Continue for iCloud to sign you out.
When you’ve done this, you also need to unpair any Bluetooth devices you may have been using with your Mac such as speakers, headphones or phone.
To unpair a Bluetooth device with your Mac go to System Preferences > Bluetooth and unpair your devices.
Be aware that if you’re using a Bluetooth keyboard and mouse, it’s not a good idea to unpair them from your Mac unless you can plug them in via USB as you’ll need them to complete the rest of the factory reset process.
Finally, if you use FileVault to encrypt your Mac’s hard drive, you need to switch off FileVault before erasing the hard drive. Otherwise, the person who receives your Mac (if you’re selling it or giving it away), won’t be able to use the Mac without your FileVaault password.
To deactivate FileVault, go to System Preferences > Security & Privacy > FileVault and click the lock to enter your password and deactivate it.
Once you’ve done all this, follow these instructions to Factory Reset your Intel Mac by wiping the hard drive.
- To Factory Reset your Mac using Disk Utility, shut down your MacBook.
- Turn on your MacBook and immediately press and hold the Command (⌘) and R keys until you see the Apple logo appear in front of you
- The startup options window will appear before you. Choose Options and click Continue.
- Then select your user account, entering your password if prompted.
- Select Disk Utility from the Utilities window and then click on Continue.
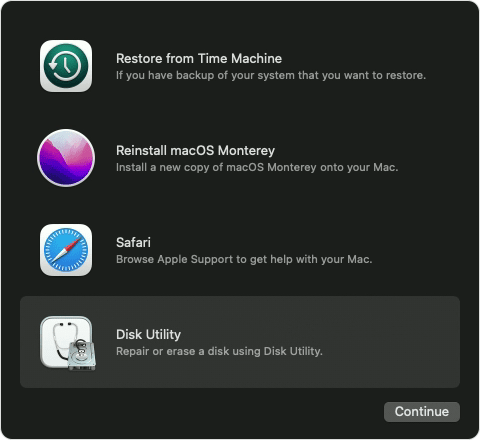
On the sidebar of the Disk Utility window, navigate to the Internal section and ensure that you see the storage named Macintosh HD.
- Once you see the option, click on Macintosh HD, which will be in the sidebar. After that click the Erase option in the toolbar. You’ll need to specify a name and format as follows: For the Name, choose “Macintosh HD”, and for the Format, choose “APFS”.
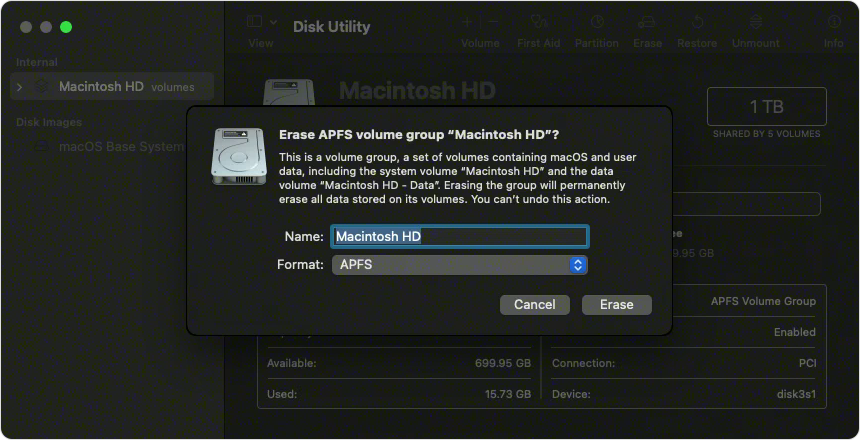
- Then click on the Erase option. If you see an Erase Volume Group button instead, click that button instead.
- Enter your iCloud ID if prompted. Finally, when asked to confirm the Factory Reset, click Erase Mac and Restart.


