If you want to backup your iPhone or iPad to your Mac, here we show you how to save all the data on your iOS device to your MacBook, iMac, Mac Mini or Mac Studio hard drive including the latest Apple Silicon Macs.
Creating a backup for your iPhone or iPad on a Mac not only secures your data but also makes it easy to restore if your phone is lost, stolen or you want to transfer everything to a new device.
It also means that you won’t lose your precious photos and videos if your iPhone or iPad crashes or breaks.
There are many ways to backup an iPhone or iPad to a Mac such as with a cable, wirelessly or via iCloud.
Here we show you all the ways to perform a backup of your iPhone or iPad to your Mac which work on the latest versions of macOS including Sonoma and Ventura.
You May Also Like:
Table of Contents
- How To Backup an iPhone to Mac Using USB
- Backing Up an iPhone to Mac Without a Cable
- Backing up an iPhone to iCloud on Mac
- How To Backup an iPhone to a Mac and Transfer to a New Phone
- Backing up an iPhone to Mac With an External Drive
- Backing up an iPhone to Mac Without Photos
- Backing up an iPhone to Mac With iTunes
- Encrypting an iPhone Backup on Your Mac
- Where Are iPhone Backups Stored on a Mac?
How To Backup an iPhone to Mac Using USB
The simplest way to backup your iPhone or iPad is via a USB cable using Finder by doing the following:
- Connect your iPhone to your Mac and open Finder on your Mac. If you’re not sure where Finder is, it’s the smiley Mac face in the Dock on your Mac or you can search for it using the Spotlight magnifying glass on your Mac.
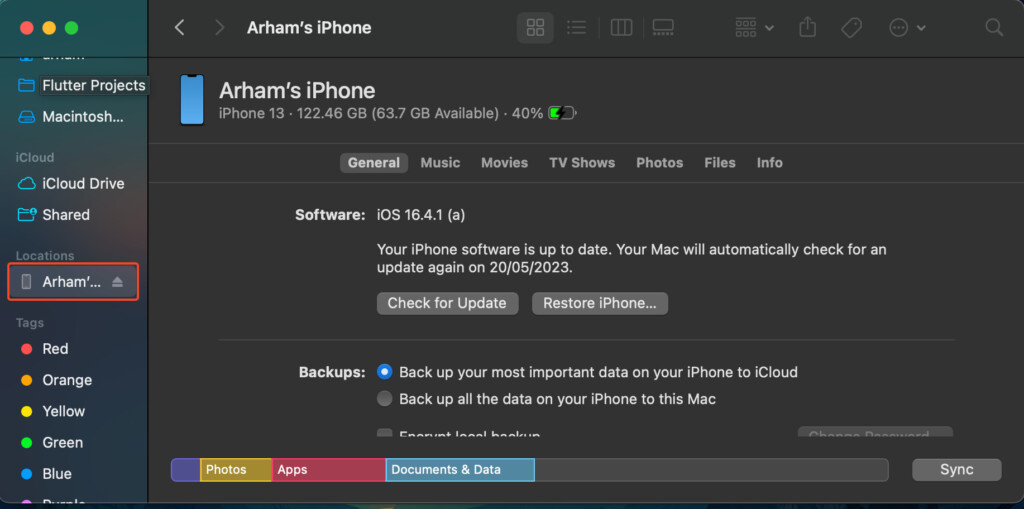
- Tap on your iPhone’s name, displayed in the left-hand panel under Locations.
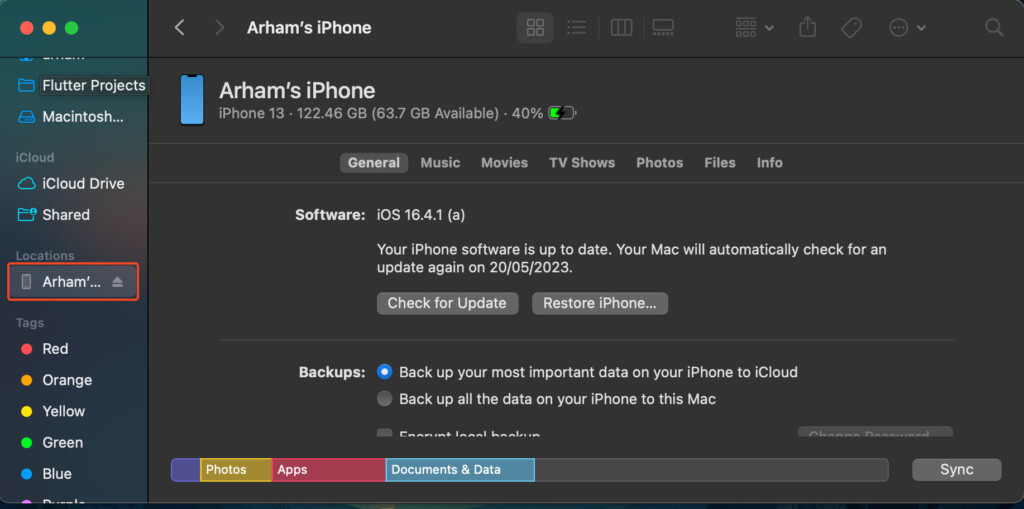
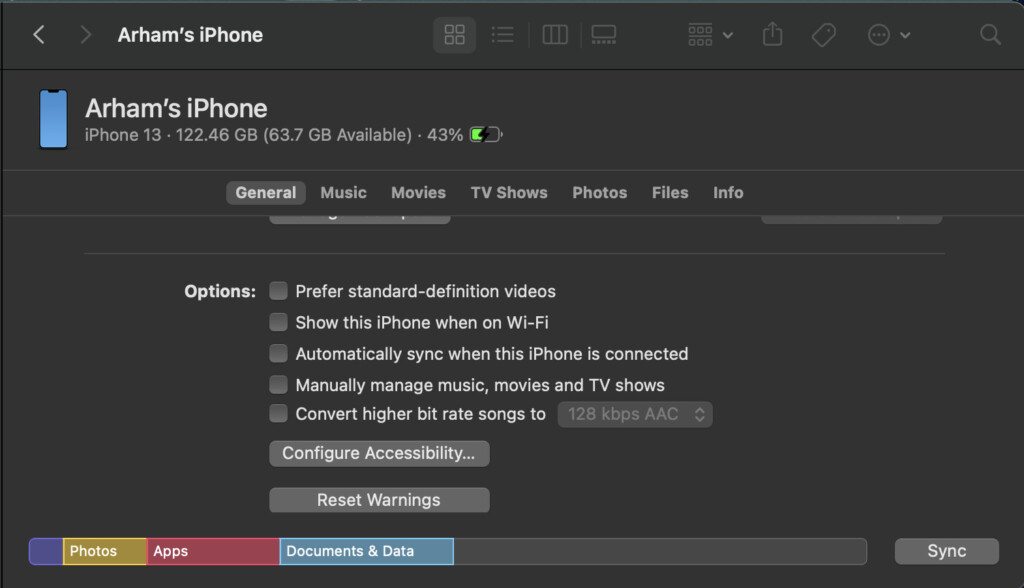
- First, make sure to check or uncheck the boxes under Options depending on what you would like to back up to your Mac.
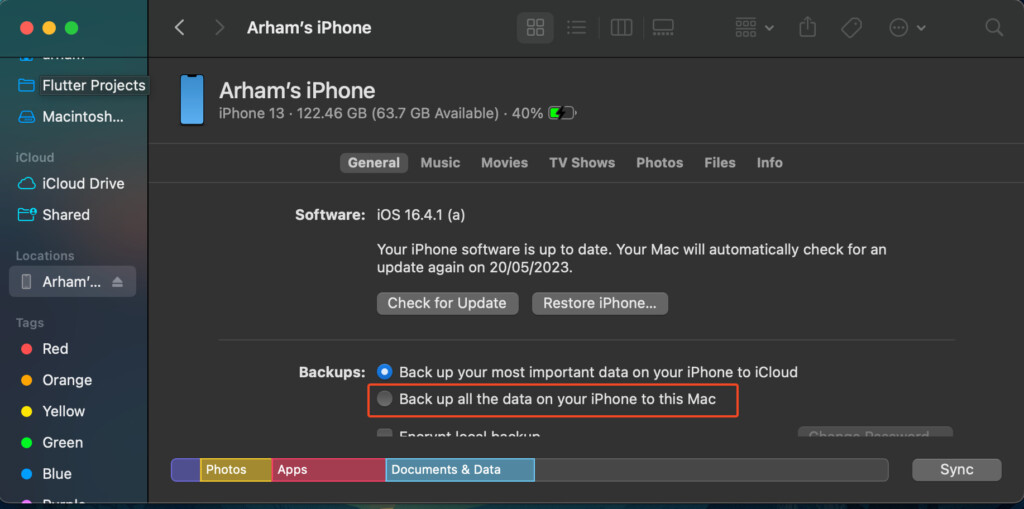
- In the window that appears, just check the Back up all of the data on your iPhone to this Mac option.
- We also recommend going for the Encrypt local backup option for your backups since this provides an extra layer of security for your passwords and personal data.
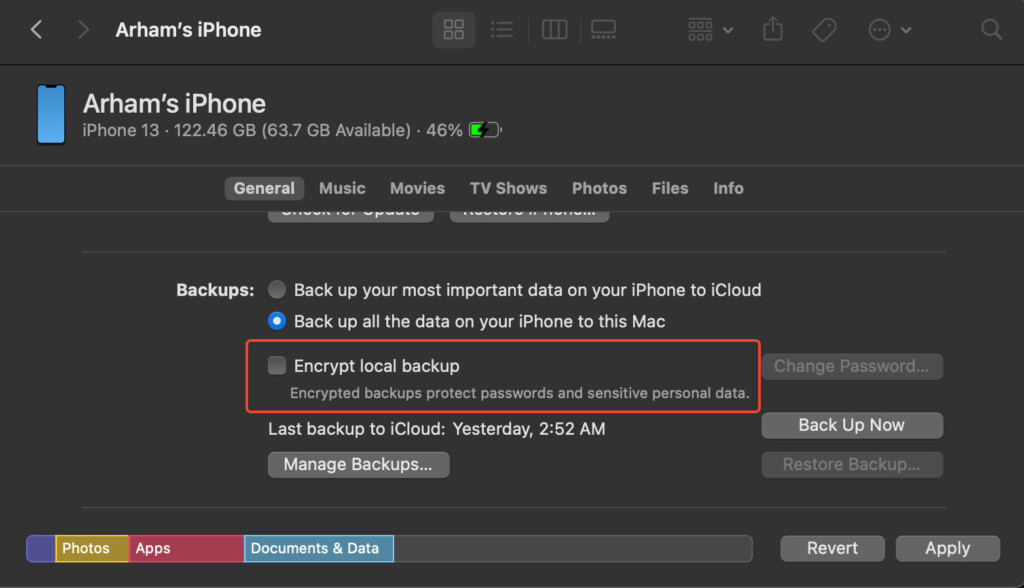
- Finally, tap on Back Up Now and wait for a dialogue to appear.
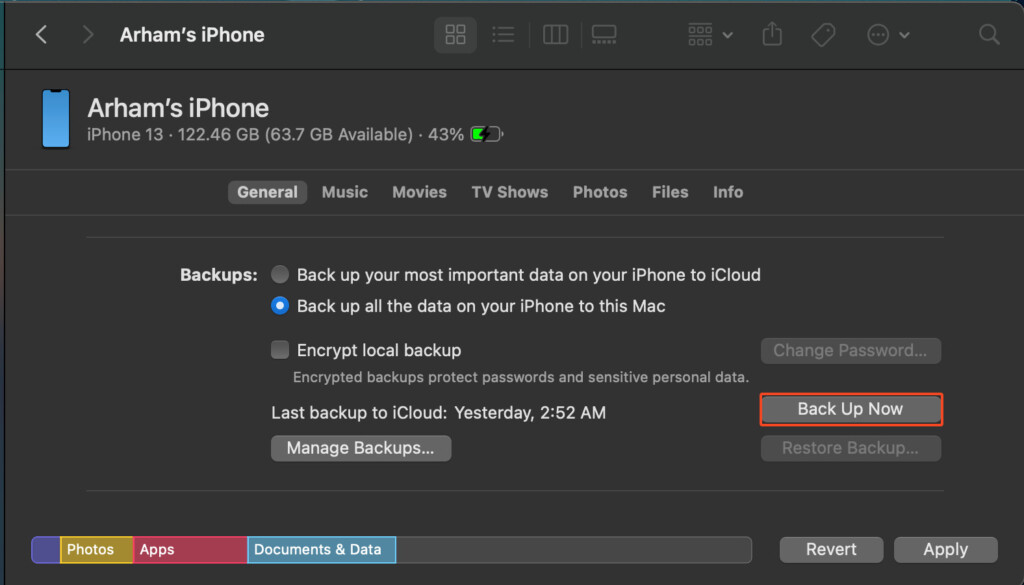
- Enter a password for the backup, and your iPhone should start backing up to your Mac with a progress bar displayed at the bottom of the window.
Backing Up an iPhone to Mac Without a Cable
If you don’t have a cable to connect your Mac to your iPhone or iPad, you can also backup wirelessly using Airdrop.
Here is how to back-up different files to your Mac from your iPhone wirelessly.
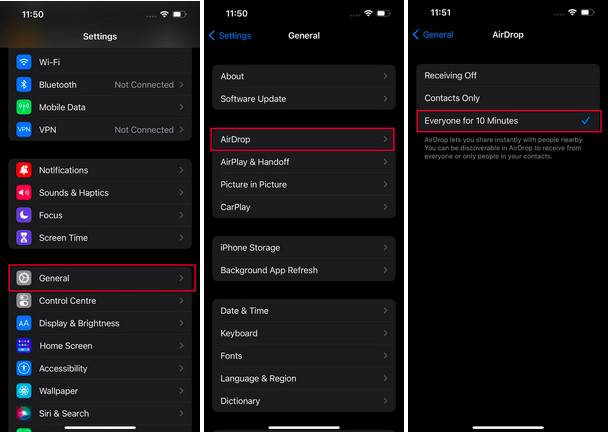
- First, head into your iPhone Settings → General → AirDrop and set it to Everyone for 10 minutes. This should allow you to AirDrop your files to your Macbook for the next 10 minutes.
- Now open your MacBook and click the Settings icon in the top bar.
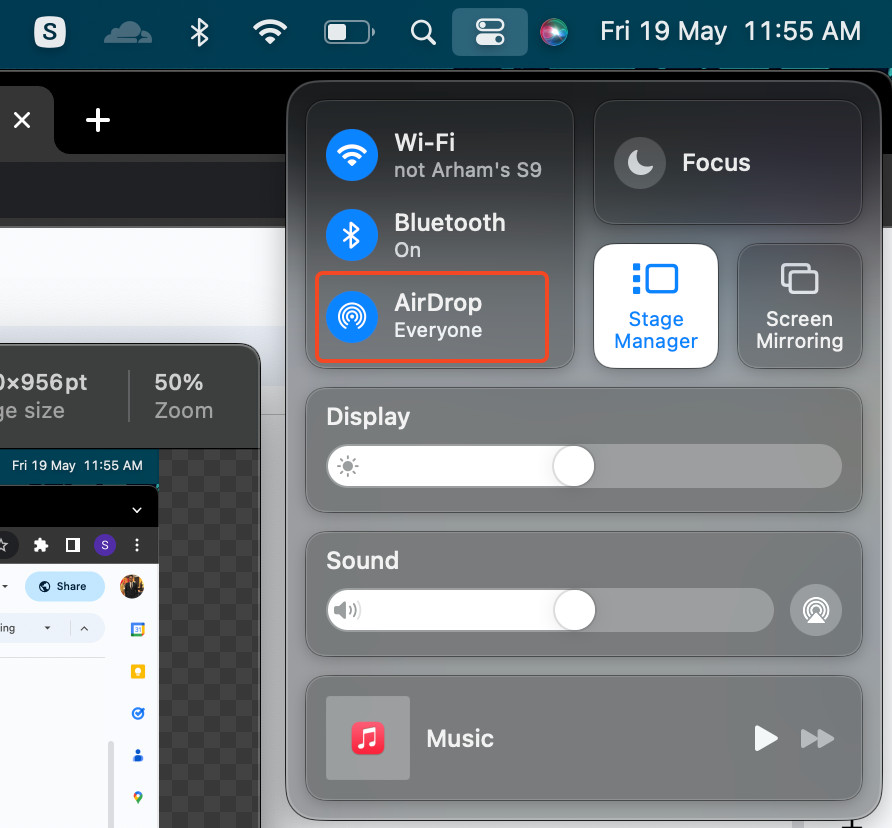
- Head into AirDrop and select Everyone.
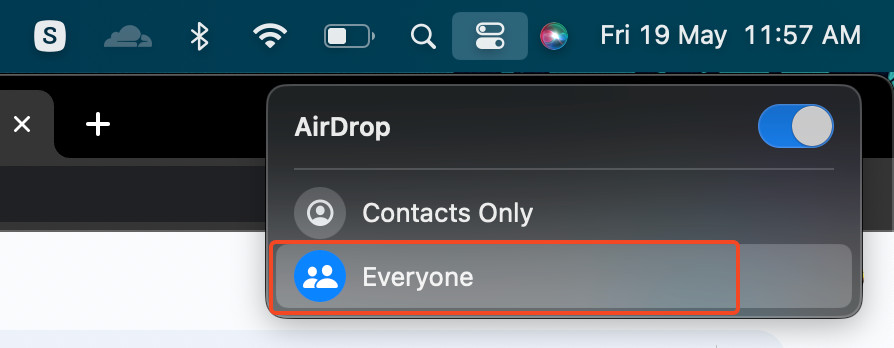
- Now click on the file you want to back up to your Mac and choose the Share button on the top right side of the screen. Select AirDrop from the options and choose your MacBook’s name to transfer the files.
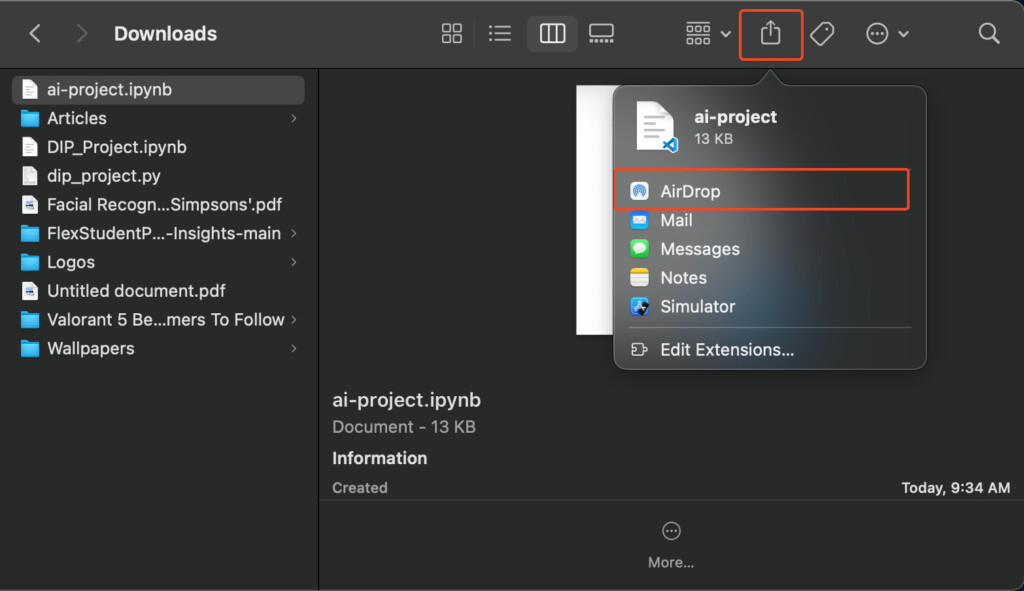
- Tap on the permission prompts that appear on your MacBook to save to your files or photos from the iPhone or iPad.
Backing up an iPhone to iCloud on Mac
If you’re happy to backup everything on your iPhone to the Cloud, or want to have a secondary backup solution in case something happens to your Mac, then you can backup your iPhone to iCloud from your Mac.
Follow these simple steps to back up your iPhone to iCloud on your Mac:
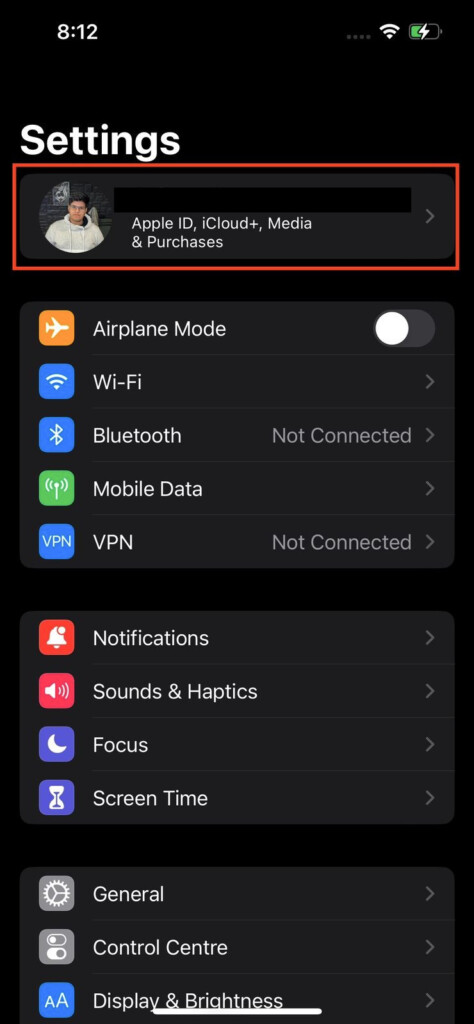
- Head into Settings on your iPhone or iPad and tap on your name.
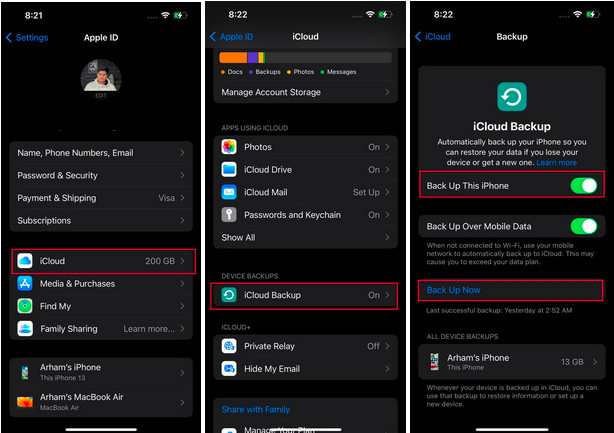
- From there, go into iCloud → iCloud Backup → Back Up This iPhone to back up your iPhone’s data.
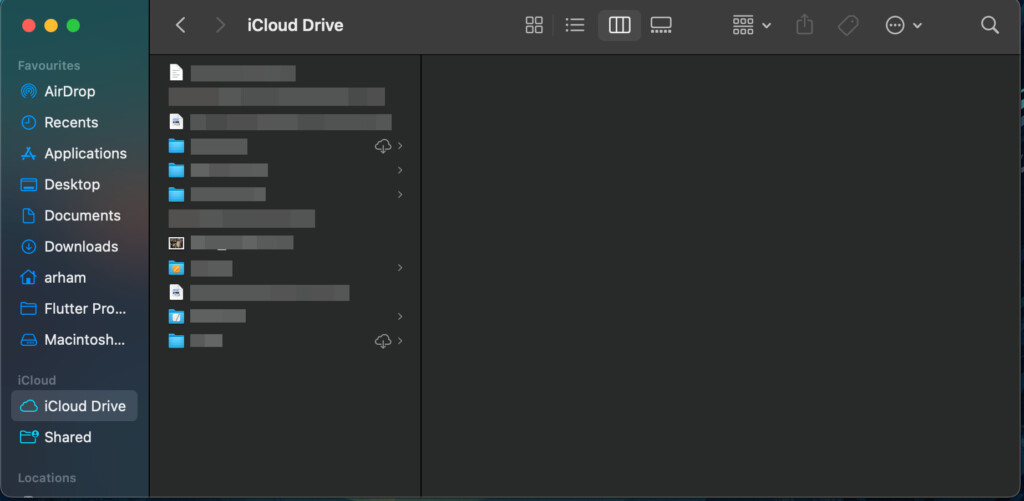
- You can access all the backed-up data on your iPhone or iPad through your MacBook by opening up iCloud Drive on your MacBook via Finder.
How To Backup an iPhone to a Mac and Transfer to a New Phone
If you want to backup your iPhone to your Mac before you get a new phone so that you can then transfer the data to a new iPhone, follow these instructions.
- Use any of the above-mentioned methods to transfer your files to your MacBook from your old phone. If you want to transfer all your files, we recommend using a USB cable for the safest and most efficient transfer.
- Once you have all the files on your Mac, connect your new Phone to your Mac using a USB cable.
- Open Finder on your MacBook and select your new Phone’s name from the left sidebar under Locations.
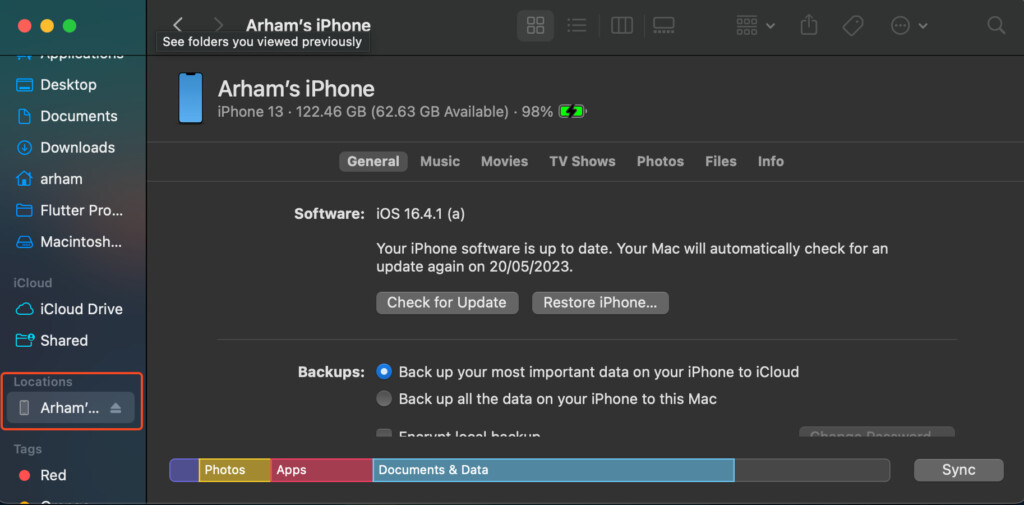
- Navigate to the Files tab, and you should be able to see different applications available on your iPhone.
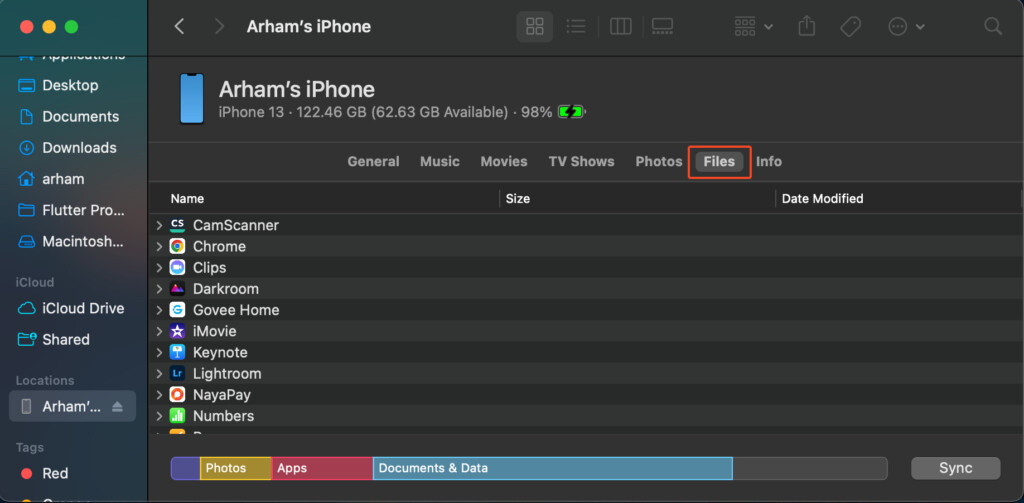
- Now, simply drag and drop files from your MacBook Finder to the appropriate apps on your iPhone.
Backing up an iPhone to Mac With an External Drive
If you don’t want to use such a large amount of precious hard drive space on your Mac to backup your iPhone then you can also use an external hard drive instead.
If you haven’t got an external drive and are unsure which one to get, check out our guide the to the best external hard drive for Mac.
If you’ve got an external drive but it doesn’t work with your Mac, check out our guide on how to format an external drive for Mac.
Here’s how to backup your iPhone to an external drive on a Mac:
- Connect your external hard drive to your MacBook.
- Create a folder named Backup anywhere on your Mac.
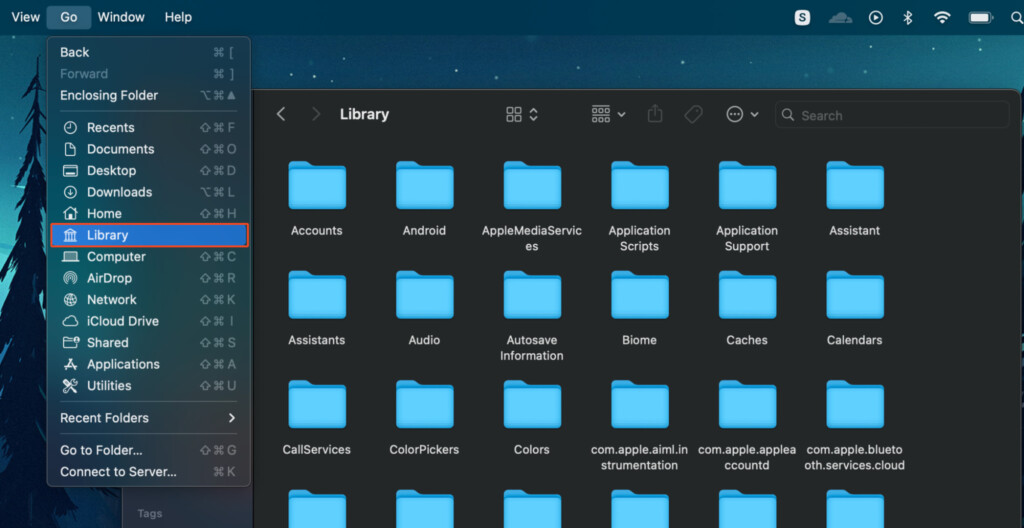
- Open up Finder, select the Go menu from the top bar and hold down the Option button to reveal and select the Library folder.
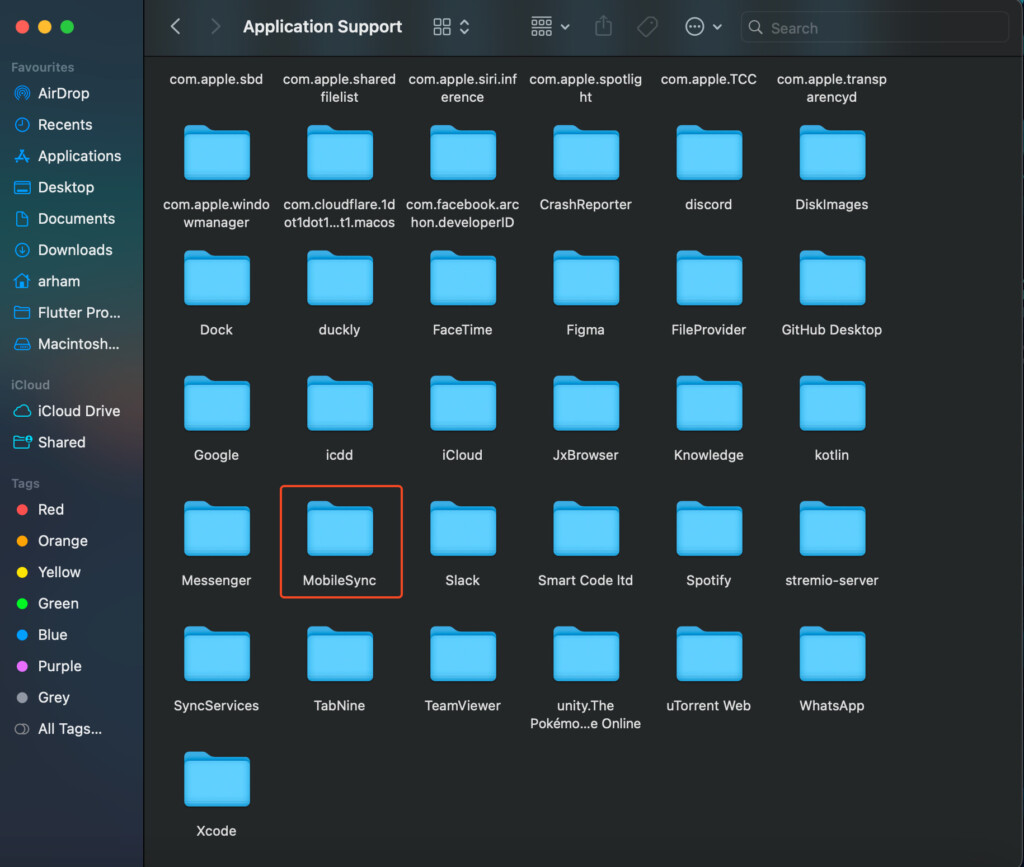
- Now, head over to Application Support → MobileSync.
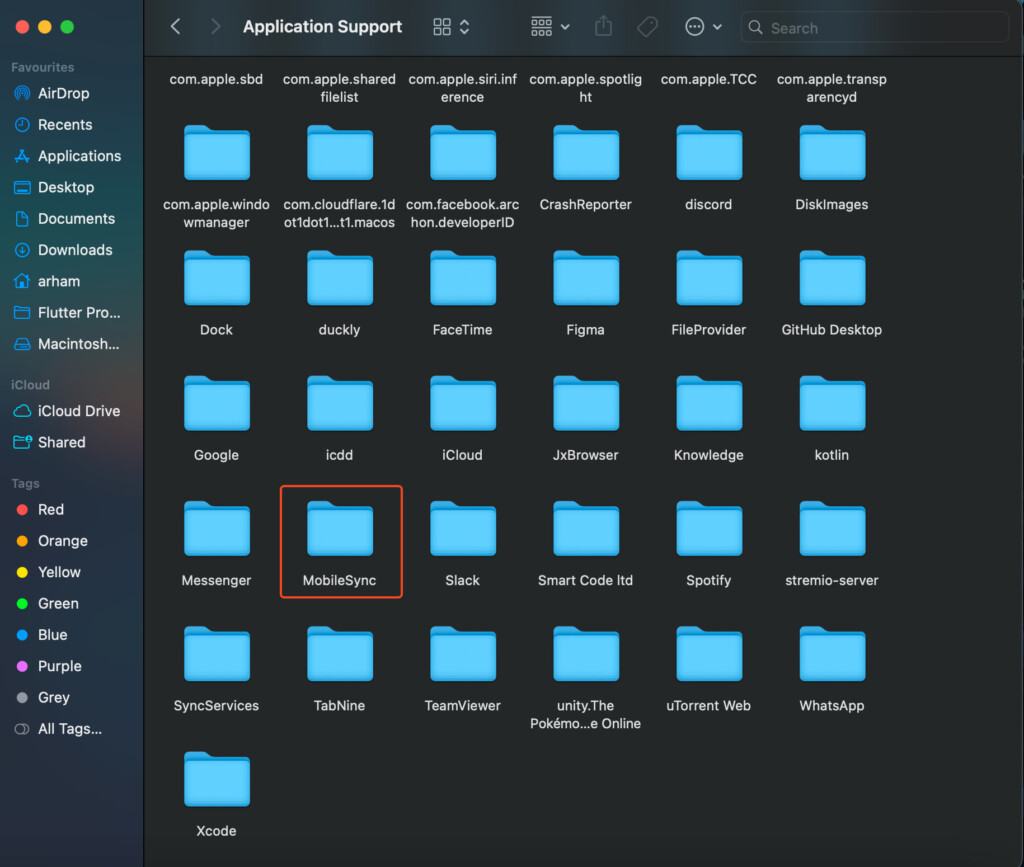
- Look for and copy the Backup folder from MobileSync to the Backup folder that you just created in Step 2.
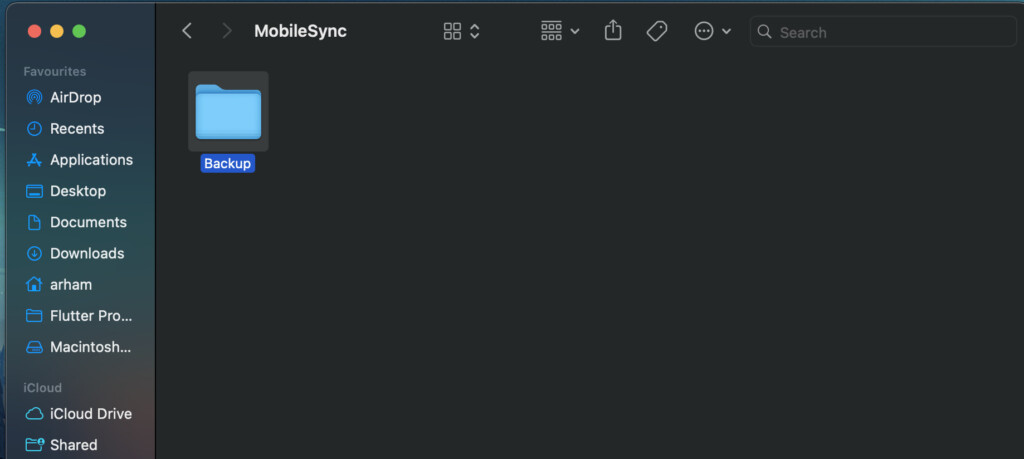
- Next, you can delete the Backup folder in MobileSync on your Mac if you do not want to keep your iPhone backup on your Mac anymore.
- Now, open up the Terminal application on your Mac by searching for “Terminal” in spotlight and type in ln -s. Don’t press enter right now.

- Drag the Backup folder you created and the MobileSync folder into the Terminal app and now press Enter. This will create a link between these two folders.
- Finally, you can perform a backup of your iOS device using a USB cable (see above) and you’ll find all your backup stored in the external hard drive rather than your Mac.
Backing up an iPhone to Mac Without Photos
If you already have your photos saved on iCloud and do not want to waste valuable space on your Mac by saving them again, just follow these simple steps to exclude photos them from any future backups:
- Open up Settings on your iPhone and click on your username.
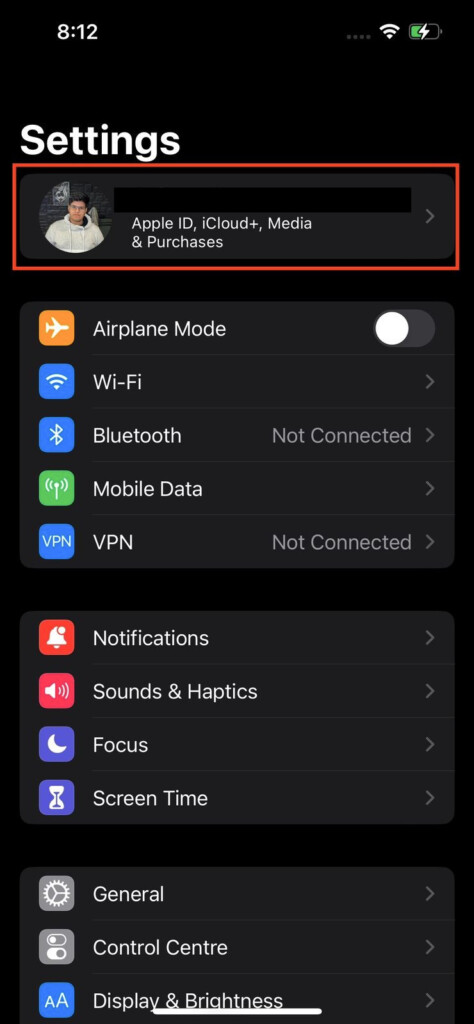
- Go to iCloud → Photos.
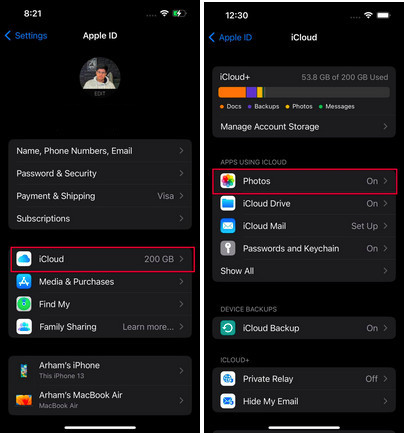
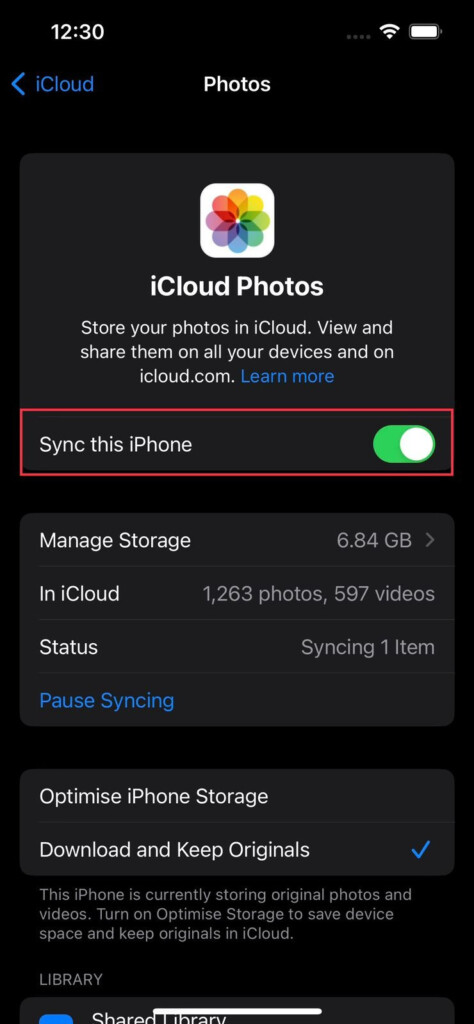
- Turn-off backup for Photos, and your device will not back up your photos in the future.
Backing up an iPhone to Mac With iTunes
If you have an iTunes subscription, all your music will be synced across all your devices automatically, and you do not need to do anything.
However, if there is some kind of an error that is causing this not to work, just follow these simple steps to force iTunes to backup an iPhone or iPad to your Mac.
Note: Previously, Apple allowed you to backup all your iPhone data to your MacBook using iTunes. However, this feature has been removed and now only your music is synced automatically via iTunes.
- Connect your iPhone to your MacBook using a USB cable.
- Open up Finder and click on your device’s name in the left sidebar under Locations.
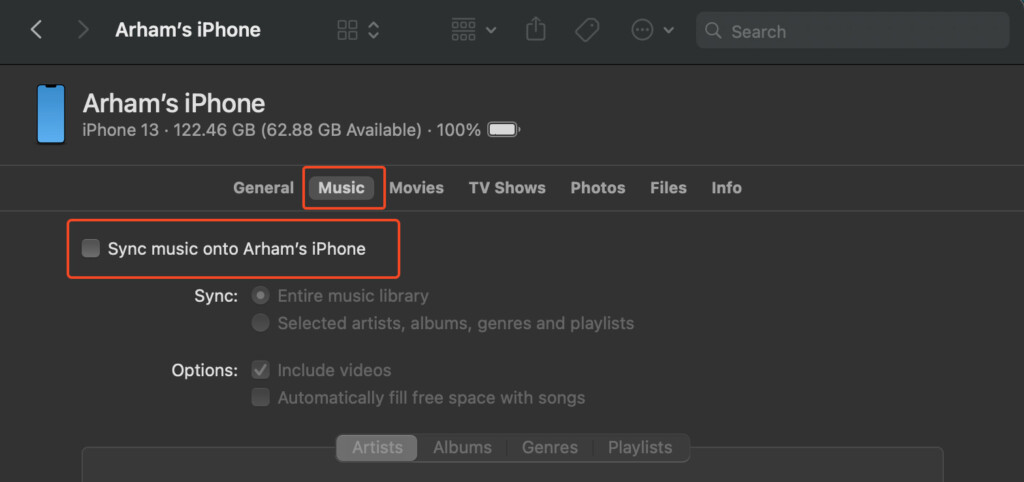
- Click on Music and select Sync Music onto [device name].
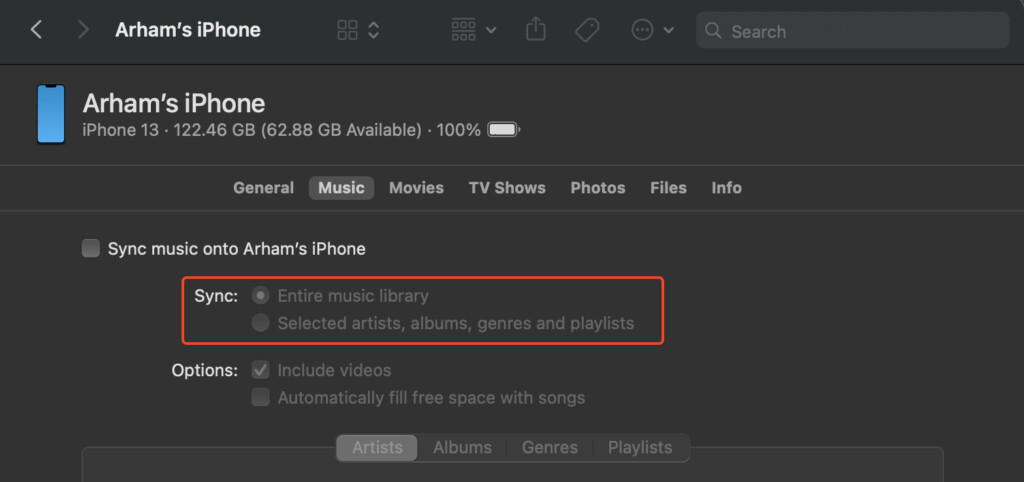
- Depending on what you want to backup, choose either the Entire music library or Selected artists, albums, genres, and playlists.
- Tap on Apply, and your selected music will be backed up to your MacBook.
Encrypting an iPhone Backup on Your Mac
When you are backing up your iPhone or iPad to your MacBook using Finder, as soon as you press on the Back Up Now option, as mentioned above, you will be given the option to encrypt the Backup.
Simply click on the Encrypt Now option, and a dialogue box will open for you where you can write your password for that backup. Type in your password and continue to create an entirely encrypted backup for your iPhone.
Where Are iPhone Backups Stored on a Mac?
If you can’t seem to find the backups you did for your iPhone, just follow these simple steps:
- Open up Finder, select the Go menu from the top bar and hold down the Option button to reveal and select the Library folder.
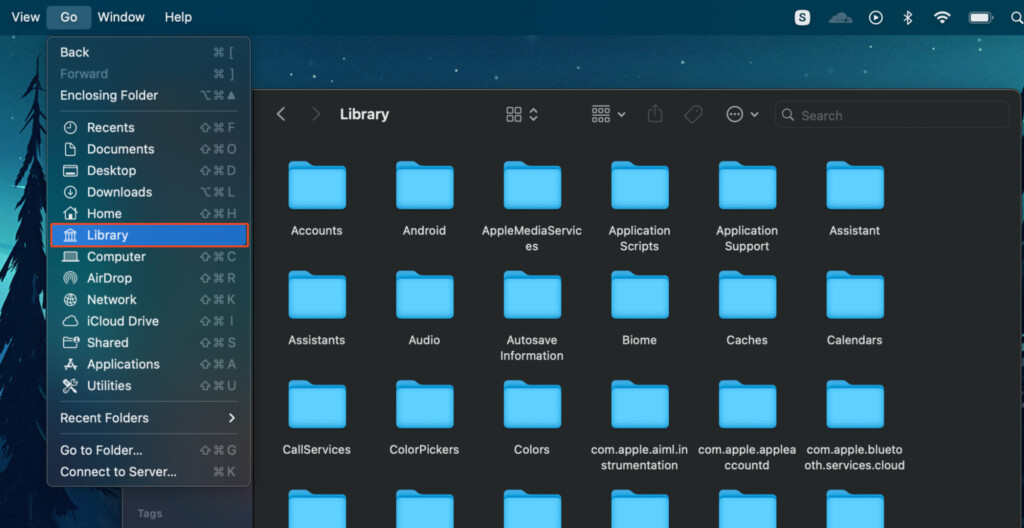
- Scroll through your Library to find the MobileSync folder embedded in the Application Support folder.
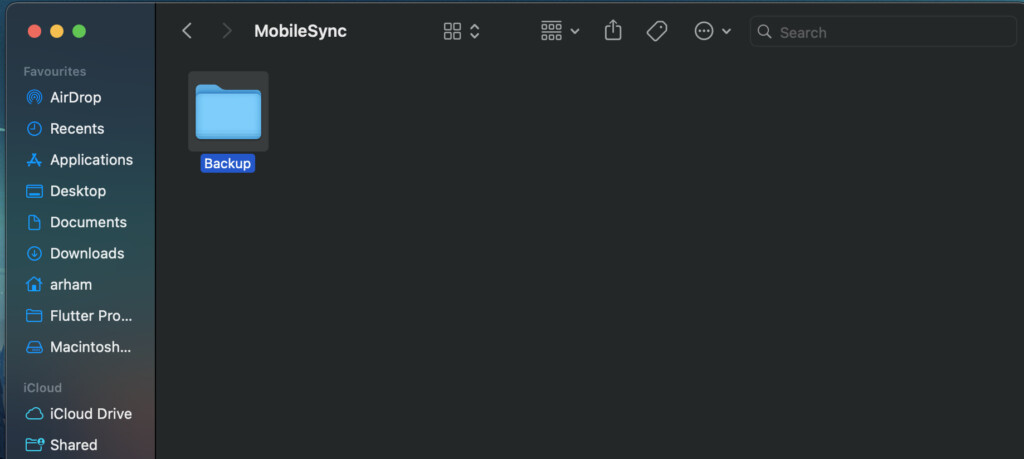
- Here, the folder named Backup contains all the backups you have done for your iPhone.
Discover more from MacHow2
Subscribe to get the latest posts sent to your email.


