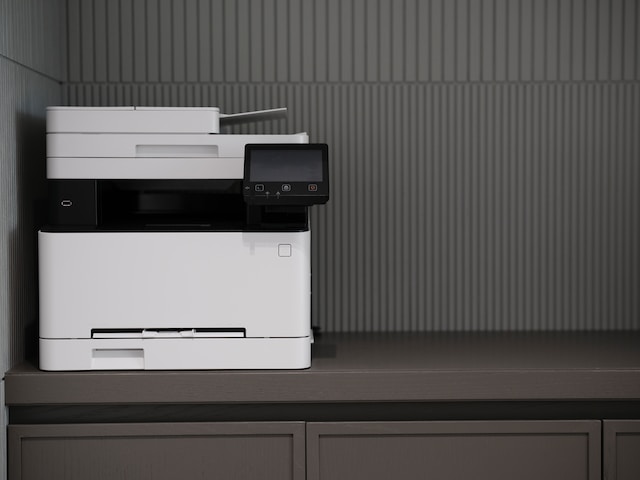
There are several different ways to connect a printer to a Mac including wirelessly, via cable, via bluetooth and on a network via an IP address.
Here we’ll show you all the ways to connect a printer to your Mac including on the latest Apple Silicon Macs and the latest versions of macOS including Sequoia and Tahoe.
You May Also Like:
Contents
Do Macs Use Printer Drivers?
Most printers nowadays plug-and-play with Macs. That means that you don’t need to manually find and download drivers for them yourself as macOS does it automatically when you connect the printer to your Mac.
As a general rule, the most important thing to look for in the best printers for Macs is whether they support Apple AirPrint.
AirPrint means that you don’t have to download any drivers and you don’t even need any cables to make the printer work with your Mac or other Apple devices such as iPad or iPhone.
With AirPrint, you can connect your printer to any WiFi network and your Mac can send print jobs to it wirelessly.
If you don’t want to connect a printer wirelessly to your Mac, all printers will connect to your Mac via USB cable if you don’t want to use WiFi to connect your printer.
Generally only older printers require you to download drivers on a Mac nowadays. Apple has an archived list of which older printers require drivers to work with Macs.
However, some printers that have specific software that only work with the printer may also require additional drivers if you wish to use the software on a Mac.
Sometime this isn’t as straightforward as it should be though as printer manufacturers tend to be very slow to update drivers for new versions of macOS as has happened with some HP printers.
How to Add a Printer Wirelessly
Wirelessly connecting your Mac to a printer is the easiest of way to connect a printer to a Mac via AirPrint since it does not require any cables..
It also means that multiple devices such as Mac, iPad and iPhone can use the printer too.
The only requirement is that your Mac, printer and any other devices you want to print from are connected to the same WiFi network.
Almost all new printers nowadays are capable of wireless connectivity although some older printers do not support it.
Here is how to set-up a wireless printer:
- Ensure your printer is connected to your WiFi network and is also in the list of Apple’s supported printers.
- Ensure that your Mac is connected to the same WiFi network as your printer.
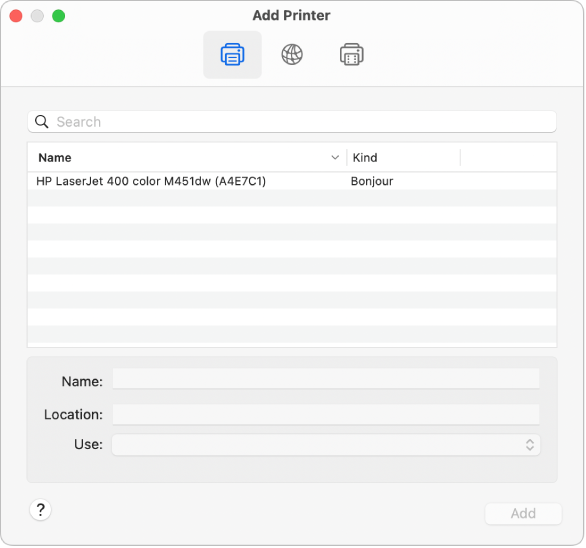
- Head into Finder and search for Printers and Scanners.
- Hit the Add Printer, Scanner, or Fax button under the list of printers on the right-hand side.
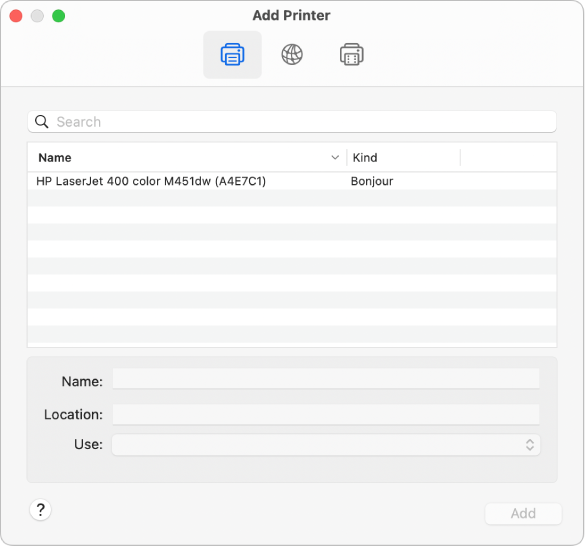
- Select your printer under the Default (printer symbol) tab.
- If necessary, select the appropriate drivers for your printer, click Add, and your printer will be added to your Mac.
For more on wireless printing, check out how to print using AirPrint on Mac.
How to Connect a Printer with USB
If you want to connect a printer with a cable, here’s how to connect a printer to your Mac with a USB cable.
- Connect your printer’s USB cable’s type B end to the printer and the other end to your Mac’s USB port. If you want to connect it to one of your Thunderbolt ports then you’ll either need a USB to Thunderbolt converter to stick on the end that goes into your Mac or buy a USB type B Thunderbolt cable.
- Once you have your printer connected, a prompt may appear asking you whether you would like to download and install the software for that printer.
- Click on Install, and you might get an extra dialogue if your Mac is not connected to a power source. Just hit Continue on Battery Power to resume assuming that you have at least more than 10% of your battery power left.
- Once the driver for the printer has been installed, head into Finder and type printers and scanners and select the top result.
- Look and tap on your printer from the ones listed under Printers.
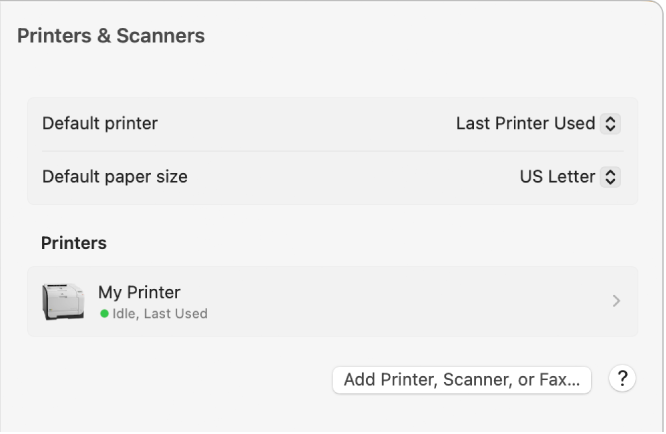
- If your printer is not listed, you must hit the Add Printer, Scanner, or Fax button and manually add your printer.
- If your printer still does not show up in the list of printers and scanners shown, you might need to download the printer’s driver from its website manually. You can do this by searching for the exact model and name of the printer in your browser.
- Finally, hit Add to connect to your printer.
How to Add a Network Printer with an IP Address
If you’re in an office or want to access a printer on a corporate network, you can add a network printer to a Mac by using the IP address of the printer.
Here is how to connect a printer using an IP address:
- Tap on the Apple icon on the top left side of the screen and hit System Settings.
- Search for and select Printers and Scanners.
- Click on Add Printer, Scanner, or Fax and head into the IP (globe symbol) options.
- In the box that appears, type in your printer’s IP address in Address.
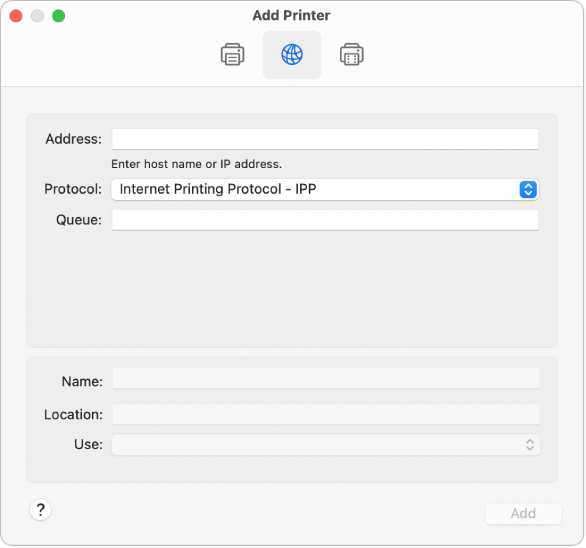
- Finally, choose the appropriate driver from the Use drop-down list. You may have to install the necessary drivers from the official printer manufacturer website if you do not have them already installed.
How to Add a Bluetooth Printer
Connecting a printer to a Mac via Bluetooth also avoids having to use a cable.
Here’s how to set up a Bluetooth printer on a Mac.
- Ensure your printer is ready to connect with Bluetooth. You may have to activate Bluetooth on your printer depending on the model and should refer to the printer manual for this.
- Click on the Apple icon on the top left corner of the screen and head into System Settings.
- Search and select Printers and Scanners.
- In the window that opens, click on Add Printer, Scanner, or Fax button.
- Under the Default (printer symbol) tab, select your printer from the printer list, and after you have all the necessary drivers installed, tap Add.
How To Add A Printer To A Mac Connected To A Windows PC
If you want to connect to a printer that’s been shared from a Windows computer to a Mac, you can do so by following these instructions.
- Make sure that the owner of the printer has configured it to be “shared” in Windows and has a name (e.g. “Windows Printer”). If there is a username and password you will need them to access the printer.
- Go to the Apple logo in the top left of your screen and select System Settings > Printers & Scanners.
- Click the Add Printer button on the right.
- Choose the printer from the network browser by clicking on the workgroup and then select the print server. You may have ti enter the username and password of the print server at this stage.
- Click on the Use menu and select the printer software for the windows PC printer you want to connect to. If the exact model you want to to use isn’t on there then select the closest match and click Add.
How to Remove an Unused Printer
If you need to delete any unused printers to clear up the number of printers and scanners you have on your Mac, just follow these instructions:
- Click the Apple icon in the top right corner and head into the System Settings option.
- Scroll down to or just search for Printers and Scanners.
- From the list of printers, Right-click or Control-Click on the printer you want to remove and tap on Remove printer.
- Confirm your actions by selecting Remove Printer once more.
What to Do If You Can’t Add a Printer
If you can’t seem to add a printer to your Mac or if the printer just does not show up in the list of available printers, ensure that the printer you are trying to connect is in Apple’s list of supported printers.
If it is on the list, try one of the following:
- If the printer is not AirPrint compatible, ensure that you have the necessary drivers installed for the printer you are trying to connect
- If you are trying to connect a printer through a wireless network, ensure that your Mac is connected to the same network as your printer.
- If there are multiple printers on the network, make sure you are trying to connect to the right one.
- If you are connecting via cable, make sure that the cable is firmly connected in both the printer and Mac.
- Make sure that the printer is powered on and displays the online or ready to print status
- Try adding the printer from another device such as iPad or iPhone and if it works, then the problem is probably related to your Mac setup, drivers or version of macOS.
- If you’ve recently updated macOS, it could be due to a driver issues in which case try one of these fixes.
Finally, if nothing else seems to be working, a quick restart of your printer and Mac may fix the problem.


