

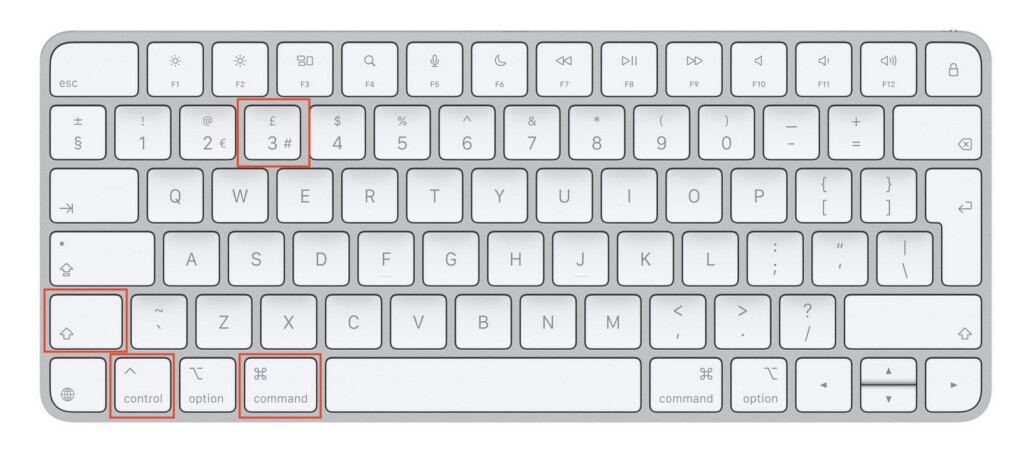
The quickest way to copy a screenshot straight to your Mac Clipboard is to hold Control while using the normal screenshot shortcut.
- Press Control–Shift–Command–3 to copy the entire screen.
- Press Control–Shift–Command–4 to copy a selected area.
- Press Control–Shift–Command–4, then Space bar, to copy one window or menu.
You can then paste the image into Messages, Mail, Slack, Word, Pages, Notes, Photoshop or another compatible app with Command–V. No screenshot file needs to be saved to your Desktop first.
These shortcuts work in macOS 27 Golden Gate, macOS Tahoe and earlier versions of macOS. Golden Gate itself runs on Apple Silicon Macs only, but the same screenshot commands work on Intel Macs running their latest compatible version of macOS.
For every other way to capture your screen, including scrolling screenshots and screenshots with a Windows keyboard, see our complete guide to taking screenshots on a Mac.
For more handy tips, check out our ultimate guide to Mac keyboard shortcuts.
Screenshot-to-Clipboard shortcuts at a glance
| What you want to copy | Keyboard shortcut | What happens |
|---|---|---|
| Entire screen | Control–Shift–Command–3 | Copies a full-screen image to the Clipboard. |
| Selected area | Control–Shift–Command–4 | Turns the pointer into crosshairs so you can drag around the area you need. |
| One window, the Dock or a menu bar | Control–Shift–Command–4, then Space bar | Turns the pointer into a camera; click the item to copy it. |
| A screenshot you have already saved | Open it in Preview, then press Command–A and Command–C | Copies the image so you can paste it elsewhere. |
| A screenshot copied earlier on Tahoe or Golden Gate | Command–Space, then Command–4 | Opens Spotlight’s Clipboard history, where you can copy it again. |
On an Apple keyboard, the Control key is usually labelled Control or ⌃. It is different from the Command key, which has the ⌘ symbol.
1. Copy a screenshot directly to the Clipboard
For most people, this is the best method. The only difference between taking an ordinary Mac screenshot and copying one to the Clipboard is the extra Control key.
Copy the entire screen
Press Control–Shift–Command–3.
Your Mac copies everything currently visible on the screen. Click where you want the image to go, then press Command–V to paste it.
This is useful when you need to show an entire browser window, an error message, your Desktop or a full app layout.
Copy part of the screen
Press Control–Shift–Command–4.
The pointer changes into crosshairs. Click and drag around the part of the screen you want, then release the mouse button or trackpad.
The selected area is copied immediately. Press Esc before releasing the button if you want to cancel. If you need to reposition the selected area while dragging, hold the Space bar.
This is usually the quickest way to share a section of a webpage, a chart, a photo or an on-screen error.
Copy one window, menu bar or the Dock
- Press Control–Shift–Command–4.
- Press the Space bar.
- Move the camera pointer over the window, menu bar or Dock you want.
- Click it to copy the screenshot.
To capture a window without its drop shadow, hold Option while clicking.
2. Use the Screenshot app, then copy the floating thumbnail
The built-in Screenshot app is useful when you want to choose the area visually, use a timer, include the pointer or mark the image up before pasting it.
- Press Shift–Command–5 to open Screenshot.
- Choose whether to capture the entire screen, a window or a selected portion.
- Click Capture.
- When the small thumbnail appears at the bottom-right of the screen, Control-click it.
- Choose Save to Clipboard, then paste with Command–V.
You can also drag the floating thumbnail directly into a document, email, note or Finder window without using the Clipboard at all.
It is worth knowing that Options > Save to in Screenshot controls where a screenshot file is saved. If you specifically want a screenshot copied to the Clipboard, use the Control-key shortcut in the first method or Control-click the floating thumbnail after capturing it.
3. Copy a screenshot you have already saved
If you took the screenshot without holding Control, you can still copy it as an image.
- Find the screenshot in Finder and open it in Preview.
- Press Command–A to select the whole image.
- Press Command–C to copy it.
- Switch to the app you
This is also the better option if you want to crop, resize or annotate the image in Preview before pasting it.
For a detailed walkthrough of the built-in editor, see our guide to taking a screenshot on a Mac.
4. Retrieve an earlier screenshot from Clipboard History in Golden Gate
One useful modern change is that macOS Tahoe and macOS Golden Gate can keep Clipboard history in Spotlight. This is handy if you copied a screenshot, then copied something else before you had a chance to paste it.
- Press Command–Space bar to open Spotlight.
- Press Command–4, or click the Clipboard button beside the search field.
- If prompted the first time, allow Clipboard results to appear in Spotlight.
- Find the screenshot you want, select it and press Command–C.
- Go back to the app you are using and press Command–V.
Clipboard history can include images, text, links and files. On a shared Mac, be cautious with screenshots that contain passwords, banking details or private messages. You can manage its duration or clear it in System Settings > Spotlight under the Clipboard options.
5. Copy a screenshot to the Clipboard with Terminal
Terminal is useful if you are automating a task, writing a script or simply prefer a command-line method.
- Use screencapture -c to copy the whole screen to the Clipboard.
- Use screencapture -i -c to select part of the screen interactively and copy it.
The -c option means “copy to Clipboard” and -i means “interactive selection”.
If Terminal or another automation tool cannot capture the screen, check System Settings > Privacy & Security > Screen & System Audio Recording and give that app permission where appropriate. For more help with command-line tasks, see our guide to opening Terminal on a Mac
What has changed in macOS Golden Gate?
The standard screenshot shortcuts have not changed in macOS 27 Golden Gate. Shift–Command–3, Shift–Command–4 and Shift–Command–5 still take normal screenshots, while adding Control copies the result to the Clipboard.
Golden Gate does add two related features worth knowing about:
- Clipboard History in Spotlight: You can recover a recently copied screenshot instead of losing it as soon as you copy something else.
- Siri AI (Beta) screen questions: On compatible Macs, Command–Shift–Space bar asks about the active window and Command–Shift–6 asks about a selected part of the screen. These are Siri features, not normal screenshot shortcuts, and they do not replace the Clipboard methods above.
For the wider release changes, see our macOS versions guide.
How to check that the screenshot copied successfully
The simplest check is to click into Notes, Mail or another image-friendly app and press Command–V.
You can also open Preview and choose File > New from Clipboard. If the screenshot opens as a new image, it copied correctly.
If the image pastes into Preview but not the app you originally chose, the problem is usually that the destination field does not accept images. Try attaching the screenshot, dragging in the floating thumbnail or pasting it into a different part of the app.
Why is my screenshot saving to the Desktop instead of the Clipboard?
You probably used the normal screenshot shortcut without the Control key:
- Shift–Command–3 saves the whole screen as a file.
- Shift–Command–4 saves a selected area as a file.
Add Control to either shortcut to copy the image instead. On older Macs without Clipboard History, paste it before copying anything else, because the next copied item can replace it.
If a shortcut does not work at all, go to Apple menu > System Settings > Keyboard > Keyboard Shortcuts > Screenshots and check that it has not been changed or disabled. Our Mac keyboard shortcuts guide has more useful combinations.
Why can’t I paste the screenshot?
Try these checks:
- Make sure you held Control while taking the screenshot.
- Try File > New from Clipboard in Preview to confirm that the image is there.
- Paste into Notes or Mail. If it works there but not in the original app, that app or text field may not accept images.
- On Tahoe or Golden Gate, check Spotlight Clipboard History with Command–Space, then Command–4.
- If you are working through a remote-desktop connection or virtual machine, make sure Clipboard sharing is enabled in that app.
For help with the last point, see our guides to remote desktop software for Mac and virtual machines for Mac.
Can you screenshot protected video on a Mac?
Not always. Streaming services and protected video apps can block screenshots or return a black image because of copyright protection. The Clipboard shortcut does not bypass those protections.
Do you need a third-party screenshot tool?
For copying an ordinary screenshot, no. macOS does this quickly with the built-in shortcuts.
A third-party tool can be worthwhile if you regularly need scrolling screenshots, advanced annotation, a dedicated image library or a more elaborate sharing workflow. Before installing one, see our comparison of the best screenshot tools for Mac.
FAQ
What is the shortcut to copy a screenshot to the Clipboard on a Mac?
Press Control–Shift–Command–3 to copy the whole screen, or Control–Shift–Command–4 to copy a selected area. For a window, press Control–Shift–Command–4, press the Space bar, then click the window.
Can I copy a Mac screenshot without creating a file?
Yes. Hold Control while using the relevant screenshot shortcut. The screenshot goes directly to the Clipboard, so you can paste it with Command–V without first creating a Desktop file.
Does this work on an Intel Mac?
Yes. The screenshot shortcuts are the same on Intel and Apple Silicon Macs. macOS Golden Gate itself requires Apple Silicon, so Intel Macs will use the same commands in Tahoe or an earlier compatible macOS version.
Can I set Screenshot to copy everything to the Clipboard by default?
The most reliable way is to hold Control as part of the screenshot shortcut. If you use the Screenshot app, take the capture normally, then Control-click its floating thumbnail and choose Save to Clipboard.
Can I paste a Mac screenshot on my iPhone or iPad?
If Universal Clipboard is set up on your Apple devices, you can copy the screenshot on your Mac and paste it on a nearby iPhone or iPad signed in to the same Apple Account. Wi-Fi, Bluetooth and Handoff need to be enabled.
If you want to do more than copy a still image, including screen recording and scrolling captures, see our full Mac screenshot guide.