

If you’re one of the many Intel Mac users that can’t install macOS Sonoma or Sequoia because your Mac is unsupported, here we show you how to install the latest versions of macOS on unsupported Macs.
The release of Sonoma in September 2023 was a big disappointment for many older Intel Mac users as it was the first version of macOS to drop support for most Intel Macs.
This means older Intel Macs are no longer able to update macOS beyond Ventura via the Mac App Store.
However, the good news is a tool call the Open Legacy Patcher has now been updated so that you can now install macOS Sonoma and later (including Sequoia) on unsupported Intel Macs.
Open Legacy Patcher now allows 83 unsupported Intel Macs to install macOS Sonoma and later.
Intel Macs that can now install more recent versions of macOS using the Open Legacy Patcher are:
- 2008-2019 12-inch and 13-inch MacBooks
- 2009-2017 11-inch and 13-inch MacBook Air
- 2008-2017 13-inch to 17-inch MacBook Pro
- 2009-2017 Mac mini
- 2007-2018 20-inch to 27-inch iMac
- 2008-2018 Mac Pro
- 2008-2010 Xserve
One current limitation of the Open Legacy Patcher is that the T1 Security chip is not supported in the 2016/17 Touch Bar MacBook Pros and we don’t recommend using Open Legacy Patcher to install the latest versions of macOS on those Macs.
Note that if you have one of the following Intel Macs, you don’t need to use the Open Legacy Patcher as Sonoma supports them natively and you can update your Mac immediately via the Mac App Store:
- MacBook Pro: 2018 and later
- MacBook Air: 2018 and later
- Intel Mac mini: 2018 and later
- iMac: 2019 and later
- iMac Pro: 2017
- Mac Studio: 2022 and later
- Mac Pro: 2019 and later
The following Macs supported Sequoia:
- MacBook Air from 2020 and later
- MacBook Pro from 2018 and later
- Mac mini from 2018 and later
- iMac from 2019 and later
- iMac Pro from 2017
- Mac Pro from 2019 and later
- Mac Studio from 2022 and later
If you have an Apple Silicon Mac then you don’t need to worry – the latest versions of macOS work on all Apple Silicon M-series Macs.
Contents
Why Update To Sonoma or Sequoia?
Apart from missing out on all the new features in the latest version, the biggest argument for updating to the latest versions of macOS is security.
Apple only issues security updates for the last three versions of macOS so once you are three versions behind the latest release of macOS, your Mac will have security vulnerabilities.
It’s also important to be aware that you cannot install security and performance updates for Sonoma and Sequoia from the Mac App Store after you’ve installed it on an unsupported Mac.
However, you can install the updates by downloading them to a USB stick and installing them manually.
A Word of Warning
Apple does not endorse install newer versions of macOS on unsupported Macs for security and performance issues.
It may even be against Apple’s terms and conditions to install an unsupported version of macOS on an older Mac so be aware of this before proceeding.
You use tools like Open Legacy Patcher at your own risk and bear in mind that you may find macOS unstable or buggy at times.
We therefore strongly recommend backing up your Mac with Time Machine first before installing a recent version of macOS on an unsupported Mac.
How To Install Sonoma & Sequoia on Unsupported Macs
In this tutorial, we’ve installed Sonoma but the process should work for Sequoia and later versions of macOS too.
It also works for installing older versions of macOS including Ventura, Monterey and Big Sur.
To install macOS Sonoma on an unsupported Intel Mac, just follow these instructions.
- First and foremost, we strongly recommend backing-up your Mac with Time Machine so that you can revert to your older version of macOS if anything goes wrong.
- Download the Open Core Legacy Patcher for macOS Sonoma. Scroll to the bottom of the page to find the OpenCore-Patcher-GUIapp.zip file.
- Unzip the file and open the OpenCore-Patcher app and the following menu will appear.
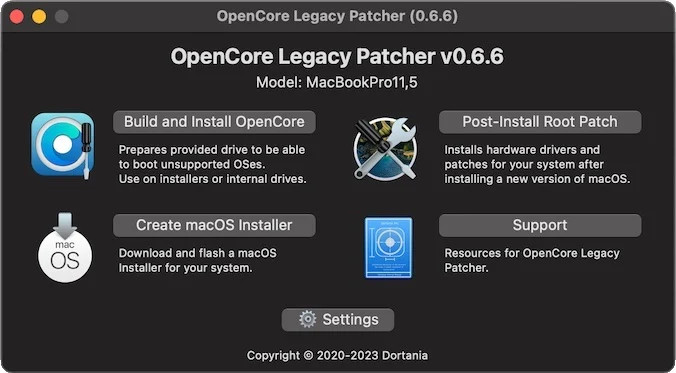
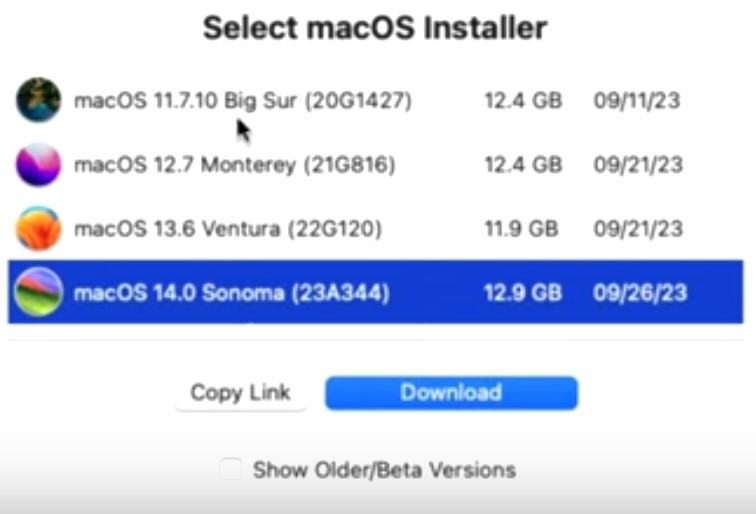
- Click on “Create macOS Installer” first and then click on “Download macOS installer”. OpenCore Legacy Patcher will then automatically highlight the macOS Sonoma installer from Apple. Click on “Download”. The installer is 12.9GB so it might take some to download.
- Once it has downloaded, it will also then validate the macOS Sonoma installation file to make sure there are no errors on it. Once the validation is complete, OpenCore Legacy Patcher will prompt you for your Mac admin username and password to extract the installer to your external drive.
- Once the installer has extracted, you’ll then be prompted to “Create macOS installer”. Click on “Yes”. Then click on the option “Install macOS Sonoma”.
- You’ll then be prompted to “Select Local Disk” where you must select your external drive to install it to. You’ll be prompted again for your Mac username and password. If you can’t see the drive you want to install it to, remember that the external hard drive must be formatted for a Mac otherwise it won’t be recognized by macOS.
- OpenCore Legacy Patcher will then proceed to create the macOS Sonoma installer file. On an external Thunderbolt drive or external SSD drive this will go quite quickly but on older drives it will take a while to create.
- When the creation process completes, you will see a “Successfully created the macOS installer!” message with a message below saying “Installer created successfully, would you like to continue and install OpenCore to this disk?”. Click on “Yes”.
- You’ll then see a message saying “Finished building your OpenCore Configuration. Would you like to install OpenCore now?” Click on “Install to disk”.
- When prompted which disk to use, select the external drive connected to your Mac. You’ll be prompted for your Mac admin username and password again to install.
- You’ll then see the message “Reboot to apply” – click on “Reboot”. You must hold down the Option (Alt) key when you reboot to bring up your Mac’s boot menu.
- When you Mac restarts, you’ll see the boot menu. Select “EFI Boot” from the options that appear on the black reboot menu screen and then click on the arrow underneath.

- The boot screen will then give you the option to install macOS Sonoma. Select “Install macOS Sonoma” to install it on your unsupported Mac and click the arrow underneath it.
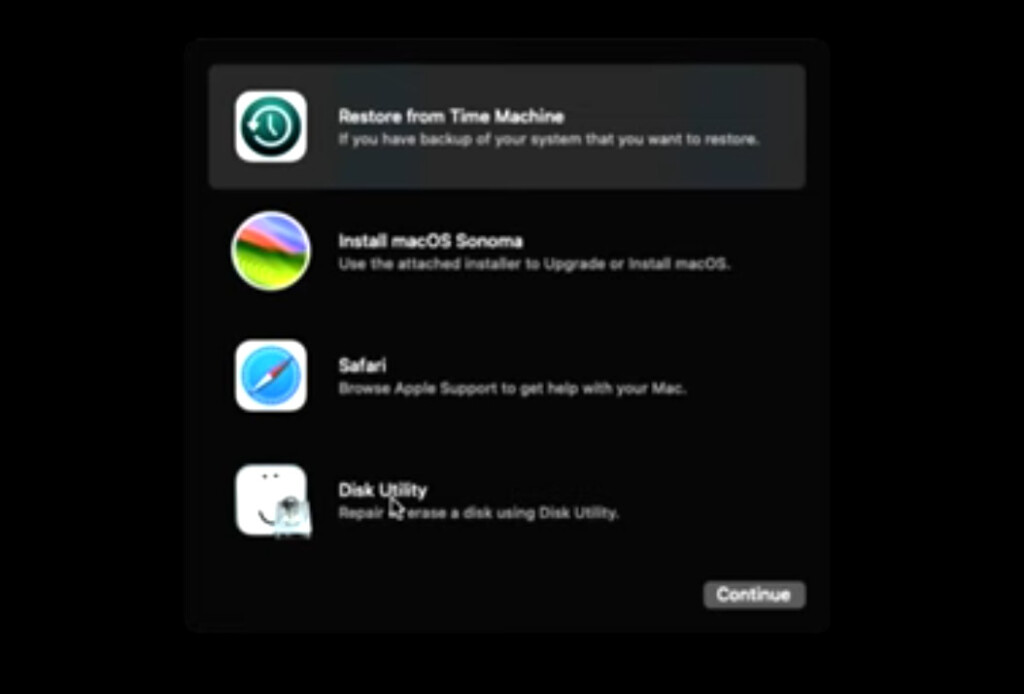
- The macOS Sonoma installer will then proceed and you need to select the language you want it to be in e.g.”English”. You’ll then be taken to the macOS Sonoma recovery mode screen.
- Click on Disk Utility and then “Continue”. This is where you will choose to select to erase your entire Mac internal drive and install macOS Sonoma on it. This is why it’s very important to have a backup of your Mac.
- In Disk Utility, click on View and then select “SATA SSD Media”. The click on “Erase” at the top of the screen with the settings “APFS” and “GUID Partition Map”. You can put whatever you want in the “Name” field. Then Click “Erase”.
- Once done, quit Disk Utility aand you will be taken back to the macOS Sonoma recovery screen above. Select the option “Install macOS Sonoma” and click “Continue”.
- Click “Continue” again and Agree to the terms and conditions. Click on the internal Macintosh hard drive on the far left start installing macOS Sonoma on your unsupported Mac. Click Continue and then you’ll see a status countdown as it installs macOS Sonoma.
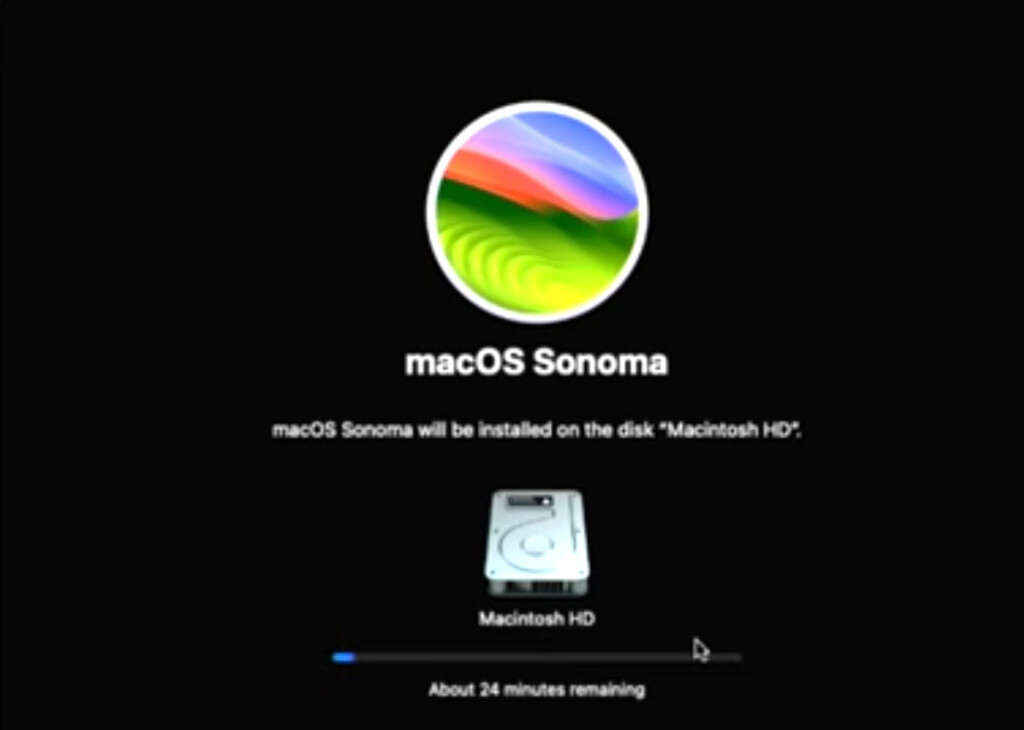
- During this process, macOS Sonoma may reboot several times. You do not have to do anything or click anything during this time.
- The macOS startup screen will eventually appear in different languages meaning you have successfully installed macOS Sonoma on your unsupported Mac.
- When your macOS Sonoma desktop appears, you will see a message from OpenCore Legacy Patcher asking if you want to move it from your external drive to your Mac’s internal hard drive. Click on “OK”.

- On the next prompt that appears, click on “Install to disk”. Select the “SATA SSD” which is your Mac’s internal hard drive. You’ll have to enter your Mac username and password again to complete this.
- You’ll then be prompted to reboot to complete the installation. Eject the external drive that is connected to your Mac and then click on “Reboot” but make sure you hold down the Option (Alt) key.
- Select the “EFI Boot” option again on the macOS Sonoma boot screen. Click on “Macintosh HD”.
Your default boot drive for macOS Sonoma and Open Core Patcher is now your internal drive and you have finished the installation of Sonoma on an unsupported Mac.
How To Install macOS Sonoma Updates On Unsupported Macs
After installing Sonoma on an unsupported Mac this way, you must not allow it to run minor or major updates automatically.
We strongly recommend waiting a few days after Apple has released updates for macOS Sonoma before following these instructions and check OCLP’s known issues page which will contain information about any potential update issues.
To install minor and major updates on an unsupported Mac running Sonoma, follow these instructions.
- Backup your Mac using Time Machine or other backup software.
- Open the OpenCore Patcher app to see if there are any updates available. Download the GUI-Offline update if one is available. This is essential to prevent breaking your macOS Sonoma installation.
- Go to the Apple logo in the top right of your screen and select System Settings > General > Software Update.
- Once the update has installed, your Mac will reboot automatically.
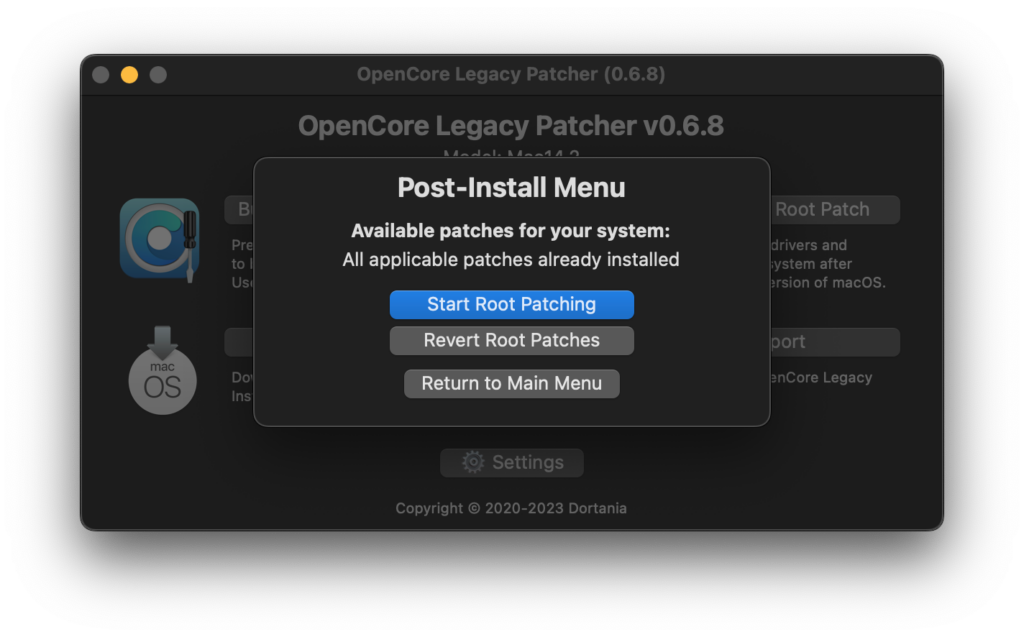
- When it has rebooted, open OpenCore Legacy Patcher and select the option Post Install Root Patch. Then select the option Start Root Patching.
- You’ll be prompted for your Mac admin username and password so that OCLP can have root access in order to install the patch.
You have now updated macOS Sonoma on an unsupported Mac. Repeat this process for all future updates of macOS.
If you want to donate to the OCLP project for providing this software to install and update macOS on supported Macs, you can donate here.