
By default, Macs can only read NTFS (New Technology File System) external drives but they can’t write to them.
This can be really annoying if you frequently switch between using an external drive with Windows and macOS.
Fear not however as there are workarounds to enable full read-write access to NTFS drives on a Mac.
We’ve looked at both free and paid options and answer some frequently asked questions to help you decide the best option for you.
Contents
What is NTFS?
NTFS is a file system developed by Microsoft for Windows operating systems.
It is widely used due to its support for large files and advanced data protection features. However, macOS only natively supports read-writing in the HFS+, APFS, exFAT and FAT32 formats.
macOS can read NTFS drives but it can’t write to them meaning you can’t delete or add anything to the drive from a Mac.
Here then are some solutions to enable read-write access when using NTFS drives on a Mac.
1. Use a Virtual Machine
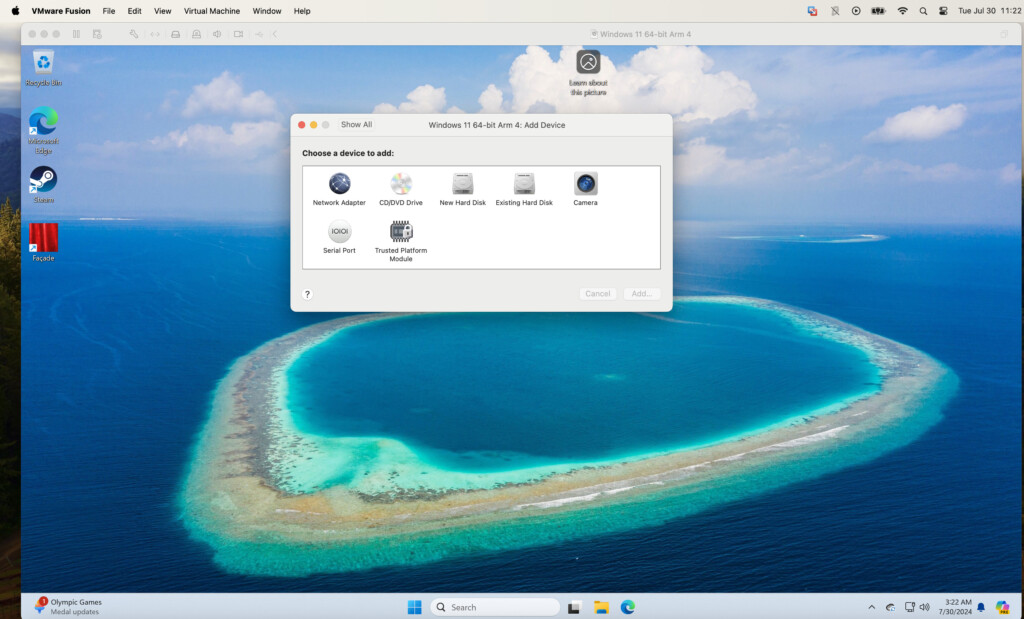
A virtual machine allows you to run Windows virtually on your Mac alongside macOS.
Nowadays, they support connecting of external drives too so they provide an easy way to access NTFS drives on a Mac.
You can transfer any data on an NTFS drive into Windows on your Mac and then simply drag and drop it into Windows.
The most popular virtual machines for Mac are Parallels (subscription only) and VMware Fusion (free) but there are others available.
Check out our guide to the best virtual machines for Mac for more.
Pros:
- Gives you easy access to Windows on a Mac
- Allows you to drag and drop NTFS file contents to Windows and then your Mac
- Allows you to run other Windows apps and games
Cons:
- Some virtual machines require a subscription
- Requires a lot of hard drive space
2. Install Boot Camp (Intel Macs only)

If you’ve got an Intel Mac, you can use Boot Camp to install Windows on your Mac in a separate partition on your hard drive.
This allows you to boot your Mac in Windows just as if you were using a PC and it will then recognize your NTFS external hard drive.
This takes some time to setup compared to using a virtual machine and it only works on Intel Macs not Apple Silicon Macs with M-series chips.
For more, check out our guide on how to install Windows with Boot Camp.
Pros:
- Free to install Windows
- Allows you to connect an NTFS drives as if you have a Windows PC
- Allows you to run other Windows apps and games
Cons:
- Only works on Intel Macs
- Requires a lot of hard drive space
- Increasingly dated way of running Windows on a Mac
3. Third-Party Software
There are several third-party applications that allow read/write access to NTFS drives on macOS.
These apps are usually the most popular solution as they are easy to use and don’t require any technical knowledge.
All of these apps have been updated to work on Apple Silicon Macs too and you can try a free trial first.
Bear in mind however that future updates to macOS may break their functionality.
Here’s a selection of the best ones.
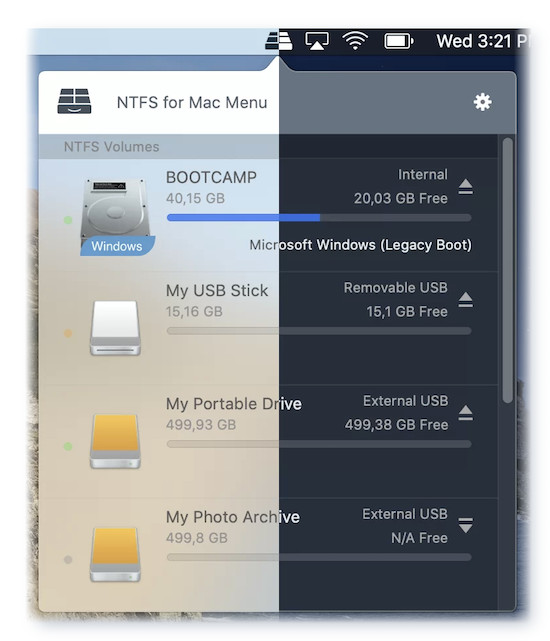
Tuxera NTFS for Mac
- Price: $15 (£12.65) for a single license
- Features:
- Full read and write access to NTFS drives
- Data integrity and error-checking mechanisms
- Compatible with the latest macOS versions
- Free updates
- Pros: Reliable, includes additional tools for disk management, one time purchase
- Cons: Paid software
Paragon NTFS for Mac
- Price: $29.95 (£26.22) for a single license
- Features:
- Full read and write access to NTFS drives
- High-speed data transfer
- Easy installation and use
- Free updates within the same version
- Pros: Reliable, fast, easy to use, one time payment
- Cons: Paid software
iBoysoft NTFS for Mac
- Price: $19.95 per year
- Features:
- Full read and write access to NTFS drives
- Easy setup and use
- Free updates within the subscription period
- Pros: Includes free trial, Easy to use
- Cons: Ongoing subscription cost
4. Use Fuse & Terminal (Monterey or Earlier)
You can also enable NTFS read-write access on a Mac by installing Homebrew with macFuse. macFuse allows you to extend your Mac’s file integration capabilities to handle NTFS.
This only works on macOS Monterey or earlier but there is also an alternative method of using Terminal to enable NTFS write access in later versions of macOS (see next option below).
Note that these methods require some knowledge of using Terminal and we don’t recommend it for beginners. They can also be unstable and cause problems accessing data on your hard drive if done incorrectly.
Here’s how to use macOS Terminal with FUSE for and NTFS-3G:
- Install Homebrew:
/bin/bash -c “$(curl -fsSL https://raw.githubusercontent.com/Homebrew/install/HEAD/install.sh)”
- Install FUSE for macOS:
brew install –cask macfuse
- Install NTFS-3G:
brew install ntfs-3g
- Mount NTFS Drive:
Unmount the NTFS drive: first with:
sudo umount /dev/diskXsY
Then remount the drive with write access with:
sudo /usr/local/bin/ntfs-3g /dev/diskXsY /Volumes/NTFS -olocal -oallow_other
Pros:
- Free in macOS
- Doesn’t require third party software
Cons:
- Requires use of Termina
- Not officially supported by Apple
- Risk of data loss
5. Use Terminal To Enable NTFS Support (Ventura or later)
If you’re using macOS Ventura or later, you can use Terminal to force NTFS read-write access on a Mac including on Apple Silicon Macs.
Note that this is an experimental feature which is not supported by Apple and can result in data loss if not done correctly.
Here’s how to enable NTFS read-write access in macOS Ventura or later:
- Open Terminal.
- Run the following command to list the NTFS partitions:
diskutil list
- Create a directory for the NTFS volume:
sudo mkdir /Volumes/NTFS
- Manually mount the NTFS drive with write access:
sudo mount -t ntfs -o rw,auto,nobrowse /dev/diskXsY /Volumes/NTFS/
Pros:
- Free to do
- No additional software needed
Cons:
- Requires some Terminal experience.
- Can be unstable and risky
- Not officially supported by Apple
Going Forward: Use exFAT instead of NTFS
To prevent these problems in future, we strongly recommend formatting your external drive in exFAT format instead of NTFS.
exFAT is recognized natively by both macOS and Windows so it’s ideal for working between macOS and Windows.
To do this, follow these instructions on how to format an external drive on a Mac.
Note that doing this, will erase all data on the disk so make sure you’ve saved any data on your NTFS drive first!
FAQ
Why can’t my Mac write to NTFS drives by default?
macOS does not support NTFS write functionality out-of-the-box due to licensing and compatibility issues.
Is it safe to use third-party NTFS drivers?
Yes, using third-party NTFS software like Paragon, Tuxera, and iBoysoft is safe and reliable. They may be broken by updates to macOS however.
Can I use free methods without risking data loss?
Free methods, such as using FUSE for macOS and NTFS-3G, come with some risks. They require technical knowledge and may not be as reliable as paid options.
How do I uninstall NTFS drivers from my Mac?
To uninstall NTFS software, follow the specific instructions provided by the software developer. Usually, you can find an uninstall option in the application’s settings or you can follow these instructions to fully uninstall apps on a Mac.
Are there any alternatives to NTFS for cross-platform compatibility?
Yes, using exFAT is a good alternative. It is natively supported by both macOS and Windows and allows for read and write access on both operating systems.
Do any of these app support read/write for NTFS on macOS Sequioa?
The only app that claims to support macOS Sequioa already is iBoysoft NTFS for Mac. However, we have not tested or verified this yet.
Are there any other ways to share files on an NTFS drive between Windows and macOS?
You can also use Cloud storage services to share files stored on NTFS drives between macOS and Windows without the need to connect an external drive. However, these are only for sharing, not writing or editing the files.