

Adobe Acrobat is the best PDF editor for Mac and here we show you to install Adobe Acrobat on Apple Silicon Macs.
Table of Contents
Does Adobe Acrobat Work On Apple Silicon Macs?
Since September 2021, Adobe Acrobat works natively on Apple Silicon ARM Macs such as the M1 MacBook Pro, M2 MacBook Pro, M2 Mac Studio, M2 Mac Mini and M3 Macs.
“Natively” means that the software works directly with the Apple Silicon ARM64 chip architecture without the need for any translating software in between.
Previously, Adobe Acrobat still worked on Apple Silicon Macs but only via Rosetta in macOS which automatically translates Intel apps “on the fly” to work with Apple Silicon chips but it isn’t as efficient as a native version.
According to Adobe, the native version of Adobe Acrobat for M-chip Macs runs approximately 1.5 times faster than the Intel version using Rosetta and is more stable.
One Time Purchase Version of Adobe Acrobat For Macs
Note that the latest version of Adobe Acrobat Pro DC is subscription only but you can still buy Adobe Acrobat as a one time purchase, .
The one time purchase option is only for the 2020 version of Adobe Acrobat Pro which also works on Apple Silicon Macs thanks to Rosetta.
The basic version of Adobe Acrobat Reader DC meanwhile is still free to use but it won’t let you edit PDFs on a Mac like Adobe Acrobat Pro does.
You May Also Like:
How To Install Adobe Acrobat On Apple Silicon Macs
To install the native version of Adobe Acrobat for M-series chips, follow these instructions.
- If you haven’t already installed it, download and install Adobe Acrobat For Mac. Note that you may be asked if you want to install Rosetta when you install Adobe Acrobat on an Apple Silicon Mac for the first time but you can decline this and it will still install but some features won’t work.
- In the File Menu at the top of the screen go to Acrobat > Preferences.
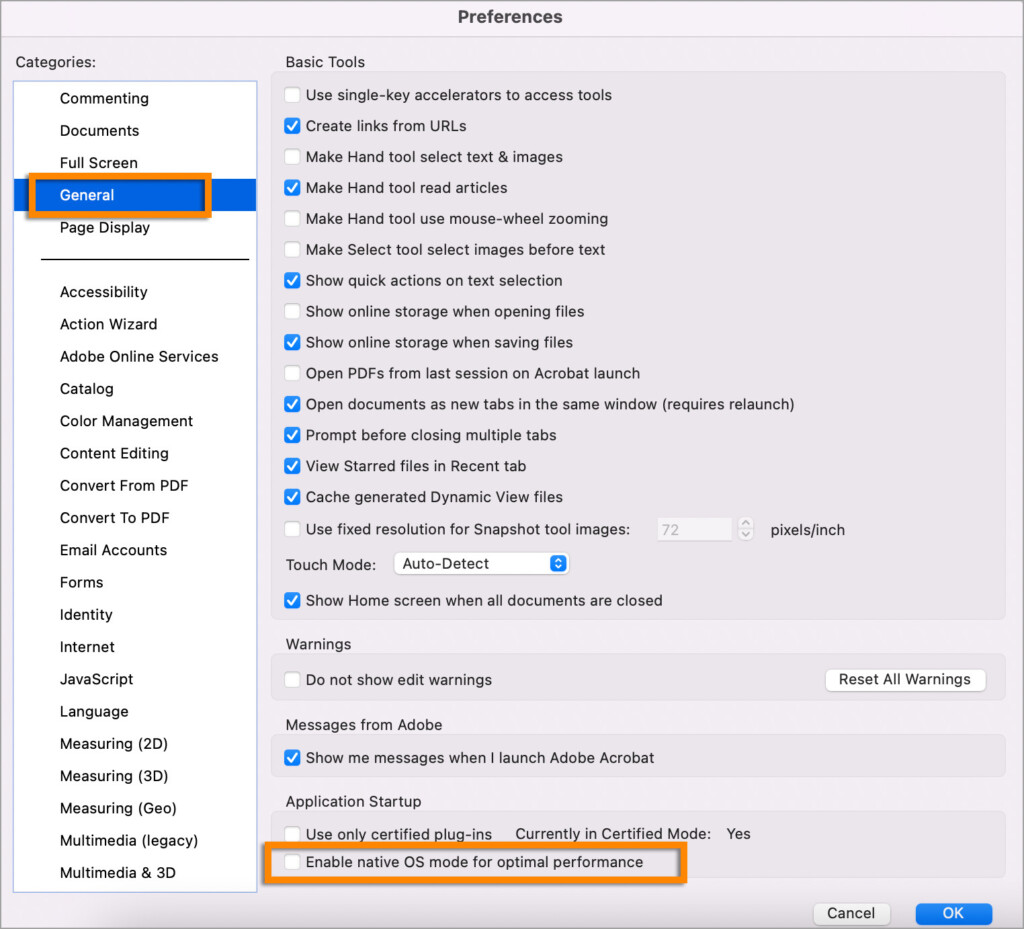
- On the left of the Preferences window, select General and make sure that the box “Enable native OS mode for optimal performance” is selected.
- Click OK to save and quit the preferences.
- Close Adobe Acrobat on your Mac and then re-open it.
Adobe Acrobat will now run the native Apple Silicon version on your Mac.
Problems Running Adobe Acrobat On M-chip Macs
There are some slight differences to be aware of between the Intel and Apple Silicon native version of Adobe Acrobat For Mac.
The following hardware and features do not work with the native Apple Silicon M-series version of Adobe Acrobat For Mac:
- Twain based document scanners and photo scanners
- Third party plugins
- Serial number deployments
- Catalogs, Scan, HTML2PDF: Catalogs, Scan and WebCapture do not work with the native Apple Silicon version
- The “Find” feature works in the Apple Silicon version but is not fully functional
The only way to use these features or hardware with the M-chip version is to disable the native OS mode in Adobe Acrobat’s Preferences which will force it to run the Intel version of Adobe Acrobat For Mac using Rosetta.
To enable the Intel version of Adobe Acrobat running via Rosetta on an Apple Silicon Mac, you simply go back to Preferences and uncheck the box “Enable native OS mode for optimal performance“.
You will of course also need to make sure that Rosetta is installed on your Apple Silicon Mac to use these features too.
If you’re not sure whether Rosetta is installed on your Mac, follow these instructions on how to install Rosetta on a Mac.