
If you want to know how to install Windows on a Mac without Apple Boot Camp, here we show you how to install Windows 10 or Windows 11 on a Mac without Boot Camp.
Why Not Use Boot Camp?
Until the release of Apple Silicon M1 Macs, Boot Camp was one of the most popular ways to install Windows on a Mac, especially for gaming.
However, Boot Camp has quite a few disadvantages when it comes to installing and running Windows on a Mac.
One of them is that you can only boot your Mac in Windows on macOS using Boot Camp. You can’t run them at simultaneously like you can with a virtual machine.
Another big problem is that the latest M1, M2 and M3 chip Macs do not support Boot Camp so you can’t install Windows on an Apple Silicon Mac with it.
Boot Camp also requires a lot of hard drive space on your Mac to install and run Windows plus games or applications that you want to use with it.
The best way to install Windows on a Mac is using a virtual machine such as Parallels which is easily the best alternative to Boot Camp.
You can also read more about the best virtual machines for Mac here.
However, if you want to keep your Mac and Windows files truly separate or don’t have enough hard drive space on your Mac’s internal hard drive, then an even better way to install Windows on a Mac is by using an external hard drive to run Windows.
This also has the advantage that Windows does not take-up any of your hard drive space on your Mac’s hard drive as it’s all stored and run on an external drive.
The other great thing is you can install Windows on a Mac for free nowadays.
You only have to buy an activation key for Windows 10 or Windows 11 if you want to remove a small watermark from them and customize them.
Can You Install Windows on an Apple Silicon Mac Without Boot Camp?
Unfortunately the following instructions to install Windows on a Mac without Boot Camp only work on Intel Macs.
M-chip Macs have advanced security protection that won’t allow you to boot from an external drive.
However, you can still install Windows on an Apple Silicon Mac without Boot Camp by using Parallels instead.
How To Install Windows Without Boot Camp
With this in mind, here’s how to easily install Windows on a Mac without Boot Camp for free.
1. Get an External Hard Drive
The first thing you’ll need to install Windows without Boot Camp is an external hard drive.
If you don’t already have one, there are several Mac compatible external hard drives that work best and we strongly recommend choosing a Solid State Drive (SSD) which is much quicker than a mechanical hard drive because it has no moving parts.
Speed is extremely important when trying to run Windows from an external drive on your Mac.
The best SSD external drive for Mac is the Samsung T7 Portable SSD which is available with up to 2TB of storage space which is more than enough to run Windows from and install Windows updates, games and apps.

Remember that you’ll need to format the external drive for your Mac before your Mac will recognize it.
We also recommend either using a second external hard drive or pen drive to transfer the Boot Camp support files from your Mac to Windows during the installation process.
2. Get an External Keyboard & Mouse
You’ll also need access to an external keyboard and external mouse as the first time your MacBook boots into Windows, the keyboard and Trackpad on your Mac will not work because there will be no drivers.
Any USB connectable keyboard or mouse will work but don’t get one that only has Bluetooth connection as Windows will not be able to use your Mac’s Bluetooth card initially.
3. Download a Windows ISO File
A Windows ISO is a Windows file that allows you to create a bootable drive to run Windows 10 or 11.
You can download both a Windows 10 and Windows 11 ISO from the Microsoft Software Download site.
For a Windows 11 ISO, you can also use the Crystal Fetch app on the Mac App Store to download one.
You can get find out more on how to download a Windows ISO on your Mac here.
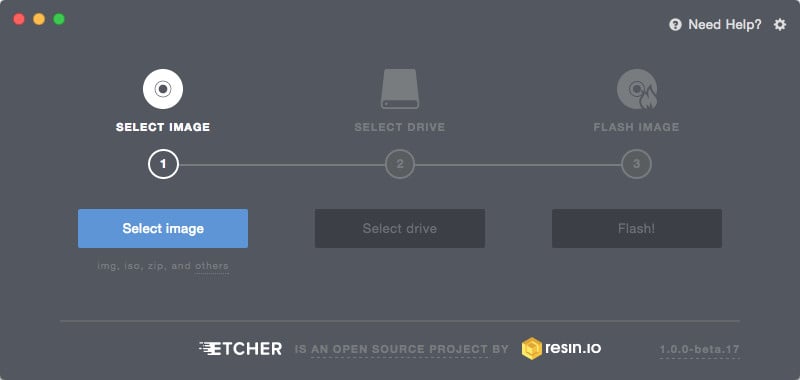
4. Download Etcher
Etcher is a clever utility that allows you to mount and install a bootable version of the Windows ISO on an external hard drive.
There are many utilities to create an external boot drive on Windows such as WinToUSB and Rufus. However, many of them are PC only but Etcher also works on Mac.
There are also other disk boot utilities such as UNetbootin and Disk Utility X but they haven’t been updated to work with the latest versions of macOS Sonoma and Ventura.
Etcher works on the latest versions of macOS Sonoma and is very easy to use.
5. Disable T2 Chip Security
Now you’ve got the essential equipment, you need to start preparing your Mac.
On your MacBook, you then need to disable the security features of the Apple T2 chip.
The T2 chip prevents you from booting your Mac from an external drive so you need to disable this feature in the Mac Startup Security Settings.
If you don’t disable the T2 chip, you will receive a “cannot verify the drive” error message when you connect your external drive.
It’s only possible to disable this on Intel Macs which is why this way of installing Windows without Boot Camp does not work on Apple Silicon Macs.
To access your Mac’s Startup Security Settings switch on your Mac and hold down the Command and R keys until you see the Apple logo.
In the recovery space that appears, go to Utilities > Startup Security Utility from the Menu Bar. You must then check the boxes:
- Under Authentication select “No security”
- Under Secure Boot select “Allow booting from external media”
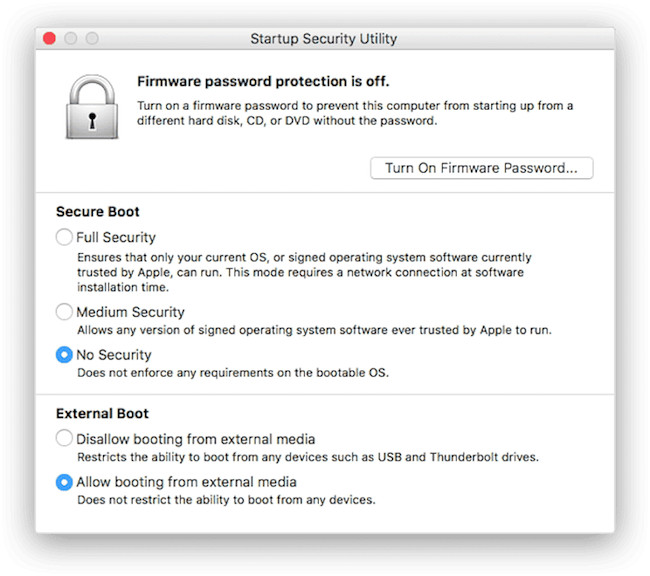
Then close the security settings and go to the Apple logo to shut down your Mac as normal.
6. Download Windows Support Drivers
At this point, you need access to download the Windows Support Software which provide drivers to run Windows on a Mac.
Normally Boot Camp does this automatically but since we’re not using Boot Camp to install Windows here, you can also download the Windows Support Software from Apple.
You then need to drag and drop the Windows Support Software you’ve downloaded onto an external drive such as a USB pen drive.
If you have any problems downloading the Windows Support Software check here.
7. Create a Windows Boot Drive
Open the Etcher USB boot utility that you downloaded earlier and make sure your external hard drive that you want to install Windows on is connected.
Simply select the Windows ISO image that you downloaded earlier, select the external drives and Etcher will create a bootable Windows drive on it.
The installation process should take around 10-15 minutes to complete.
Finally, you need to copy the Boot Camp support files you downloaded earlier onto the root of the external drive and shut down your Mac.
8. Boot Windows From Your External Drive
Finally, you can now boot Windows on your Mac from the external drive.
To do this, switch on your Mac and hold down the Option key when you see the Apple logo.
Select the external drive with Windows on to boot from.
Because Windows doesn’t have the drivers to use your Mac’s keyboard or Trackpad, you need to connect your external keyboard and mouse to a USB port on your Mac.
When the keyboard and mouse are connected, browse to the C drive in Windows and go to the Windows Support folder.
Launch the Boot Camp setup program and it will automatically install the drivers for your Mac’s keyboard and Trackpad.
You’ve now installed Windows on an external drive to use on your Mac without the need for Boot Camp.
You may notice that Windows runs a little slow on your external hard drive, even on an SSD drive. This is because the read-write speeds of external drives aren’t as good as internal drives but it’s still more than usable.