If your desktop is full of screenshots, here we show you how to easily change where screenshots are saved on a Mac including on the latest version of macOS Tahoe.
Although there are many ways to take screenshots on a Mac you might start to become frustrated at how quickly they clutter your Mac’s desktop.
The default setting on the screenshot app is set to save all screenshots on the desktop and changing it is not as clear as it should be, even when taking screenshots on the latest versions of macOS.
On Windows PCs, screenshots are saved to the Clipboard (or Pasteboard) by default but to change the screenshot save location on a Mac or save them directly to the Clipboard, you have to change it manually.
You May Also Like:
Table of Contents
Where Are Screenshots Saved On A Mac?
By default, all screenshots taken are saved to your Mac desktop with the file name screenshot and the timestamp such as “Screen Shot 2023-22-03 at 16.33.11”.
If you’re using macOS Mojave or later then it is the macOS screenshot tool that saves them on the Mac desktop.
If you are using macOS High Sierra or earlier then it is the Grab tool that saves them on your Mac desktop.
How To Change Where Screenshots Are Saved
If you’re using macOS Mojave or later including Catalina, Big Sur, Monterey, Ventura or Sonoma to change the default save location for your screenshots you first need to open the screenshot app by following these instructions.
- To open the screenshot app, either press Command + Space and type Screenshot in the search bar that appears to locate the app. Alternatively, you can open the screenshot app directly by pressing Shift + Command + 5 on your keyboard. You can also find it in the Utilities folder by going to Applications > Utilities > Screenshot.app.
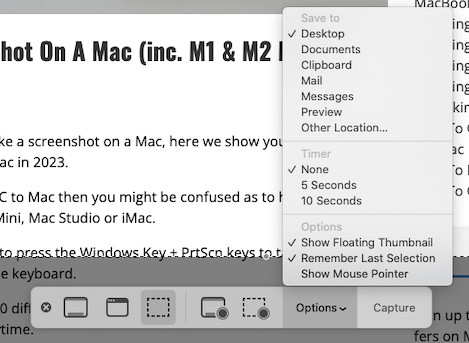
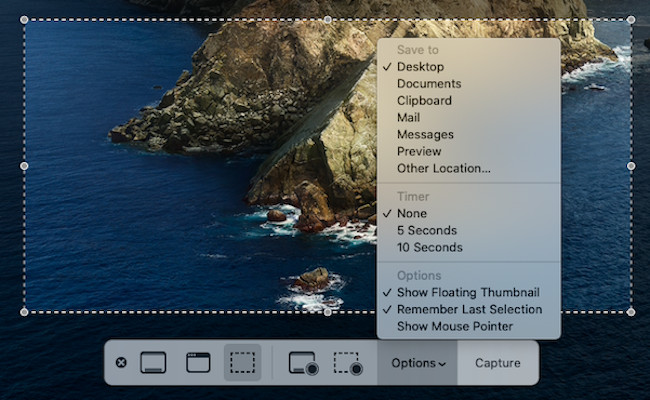
- Once you have opened the screenshot app you will see the screenshot toolbar with different tools you can use to snip or select portions of what you want to capture.

- Next click on Options in the toolbar which opens a pop-up menu with a long list of locations you can save the screenshot to. You can choose Desktop, Documents, Clipboard, Mail, Messages or Preview by default. If your preferred location is on that list, simply click on that option to change the default location.

- If you want to choose another location which is not on the list, you will need to click on “Other Location”. There you will be able to specify any location on your Mac to save screenshots.
- If you want to copy screenshots directly to clipboard, you can simply by using the keyboard shortcut
⌘+Control+Shift+3for full screen shots.
Once the new default location for your screenshots is set, all screenshots you take from now on will be saved there instead of on your desktop, whether you take them directly using the screenshot app or by using a keyboard shortcut.
⚠️ Some users may experience a bug in macOS Tahoe where the screenshots are not saved despite selecting a “Save to” location. This is a glitch with the “Show Floating Thumbnail” option in Tahoe that only happens if you try and drag or interact with the thumbnail when it appears. We recommend disabling the “Show Floating Thumbnail Issue” if you are having issues with this. Alternatively, do not move your cursor anywhere over the floating thumbnail when it appears and it should save correctly to your defined save location after a few seconds.
How To Change Where Screenshots Are Saved On High Sierra or Earlier
On macOS High Sierra or earlier versions of macOS, screenshots are saved by the Grab tool which was replaced by the macOS screenshot tool in Mojave or later.
However, it’s a bit more complicated to change the default save location of screenshots in older versions of macOS as you need to use Terminal .
Here’s how to change where screenshots are saved in High Sierra and earlier versions of macOS.
- Create a new folder on your Mac where you want to save the screenshots. You can do this by right-clicking on your Mac and selecting New Folder. Can it whatever you want (such as “Screenshots”).
- Open Terminal in macOS by going to the search magnifying glass in the top right of your screen and searching for “Terminal”.
- In Terminal write the command:
defaults write com.apple.screencapture location
- Note that you must leave a space after the word “location” otherwise the following step won’t work.
- Now drag and drop the folder you created earlier into the Terminal window. You will see the folder’s location appear in Terminal next to the command you have just written:

- Press Enter.
- Finally in Terminal type the following to make the changes take effect:
killall SystemUIServer
- Press Enter.
Screenshots taken in older versions of macOS will now be saved in the folder you created.
Important Note: Do not move or delete the folder you have created to save screenshots in without instructing Terminal to change the save location first. To change the location back to your desktop, simply follow the procedure above but instead of “location” put “~/Desktop”:
defaults write com.apple.screencapture ~/Desktop
How To Save Screenshots To The Clipboard
If you don’t want to save the screenshots on your Mac but want them to go directly to the Clipboard (or Pasteboard as it’s sometimes known) so that you can paste the screenshot in another application, it’s easy to do so.
- The easiest way to make all screenshots go to the Clipboard is to access the Options menu in the macOS screenshot tool as described earlier and select Clipboard in the Save To location.

- Alternatively, to save selected screenshots to the Pasteboard simply press Command + Shift + 4 to reveal the screenshot crosshair.
- Drag the crosshairs to take the screenshot while holding down the Ctrl key and then take the screenshot by releasing the trackpad or mouse.
- The screenshot will now be saved directly to your Mac clipboard instead of in your designated screenshots folder.
For more on this and ways to do it on older versions of macOS, check out our guide on how to copy screenshots to clipboard on a Mac.


