

If a screenshot seems to disappear on your Mac, it may still be going somewhere — to the Clipboard, a different folder, or a floating-thumbnail workflow — rather than being lost altogether.
The quickest fix is to press Shift + Command + 5, select Options, and set Save to to Desktop. Then take a test screenshot with Shift + Command + 3 and wait a few seconds without clicking the thumbnail.
This guide explains how to fix screenshots that are not saving on any recent version of macOS, including Golden Gate, Tahoe, Sequoia and Sonoma. It also covers the less obvious cases where the screenshot has been created but is not where you expect it to be.
If you need a refresher on every capture method, see our full guide to how to take a screenshot on a Mac.
1. Check where screenshots are being saved
The most common explanation is simply that your Mac is saving screenshots somewhere other than the Desktop.
Open the Screenshot app by pressing Shift + Command + 5, then click Options. Under Save to, choose Desktop for now and take another screenshot.
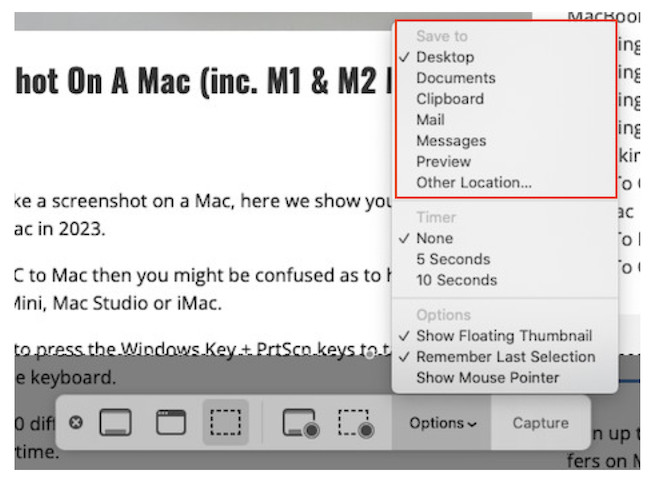
If this solves the problem, the previous destination may have been:
- A folder you do not normally look in
- An external drive that is no longer connected
- A network, cloud or removable location that is temporarily unavailable
- Clipboard, which creates no image file at all
Once screenshots are working again, you can choose a more suitable permanent folder. Our guide to changing where screenshots are saved on a Mac explains the options in more detail.
How to find a screenshot that has already gone missing
Open Finder, click in the search field and search for Screen Shot. Switch to This Mac rather than the current folder if necessary. Recent screenshots normally use a name similar to Screen Shot [date] at [time].
You can also look in Finder’s Recents view. If the file appears there, select it and choose File > Get Info to see exactly where it was saved.
2. Make sure you are not saving screenshots to the Clipboard
If Clipboard is selected under Options > Save to, your screenshot is not meant to appear as a file. It is ready to paste straight into Mail, Messages, Word, Slack, Preview or another app instead.
You can also accidentally copy a screenshot to the Clipboard by holding the Control key while using a screenshot shortcut. For example:
- Control + Shift + Command + 3 copies the whole screen to the Clipboard
- Control + Shift + Command + 4 copies a selected area to the Clipboard
Try pressing Command + V in Preview, Notes or a new email. If the image pastes in, the screenshot worked — it was just copied rather than saved.
To create a normal image file again, do not hold Control and make sure Desktop or another folder is selected under Shift + Command + 5 > Options > Save to.
3. Turn off the floating thumbnail temporarily
After you take a screenshot, macOS normally shows a small preview in the bottom-right corner. Apple calls this the floating thumbnail. It is designed to let you mark up, share or drag the image before it is saved.
It should work normally, but if screenshots vanish only when the thumbnail appears or when you click or drag it, disable the option temporarily to rule it out:
- Press Shift + Command + 5.
- Click Options.
- Untick Show Floating Thumbnail.
- Take another screenshot and check the Desktop or the folder selected under Save to.
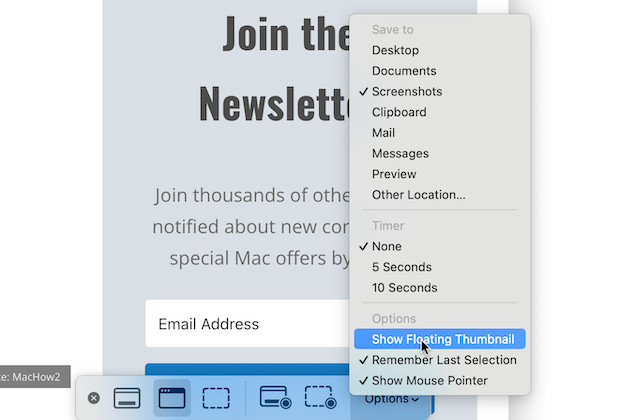
Alternatively, leave the option enabled but do not interact with the thumbnail. Wait for it to disappear, then check the save location.
This is particularly worth trying after a macOS update or if the problem started suddenly. Do not present it as an expected behaviour of macOS: Apple documents clicking, dragging and marking up the floating thumbnail as supported actions. It is simply a quick, harmless way to isolate a possible glitch in that workflow.
If you keep the thumbnail enabled, you can also swipe it to the right to save it immediately, or drag it into a Finder folder if you deliberately want it stored elsewhere. If you click it to edit, complete the normal save or share flow rather than dismissing it as discarded.
4. Check that the screenshot shortcut has not been changed or disabled
If you do not see a screen flash, cursor change or floating thumbnail when you use a shortcut, the screenshot may not be taken in the first place.
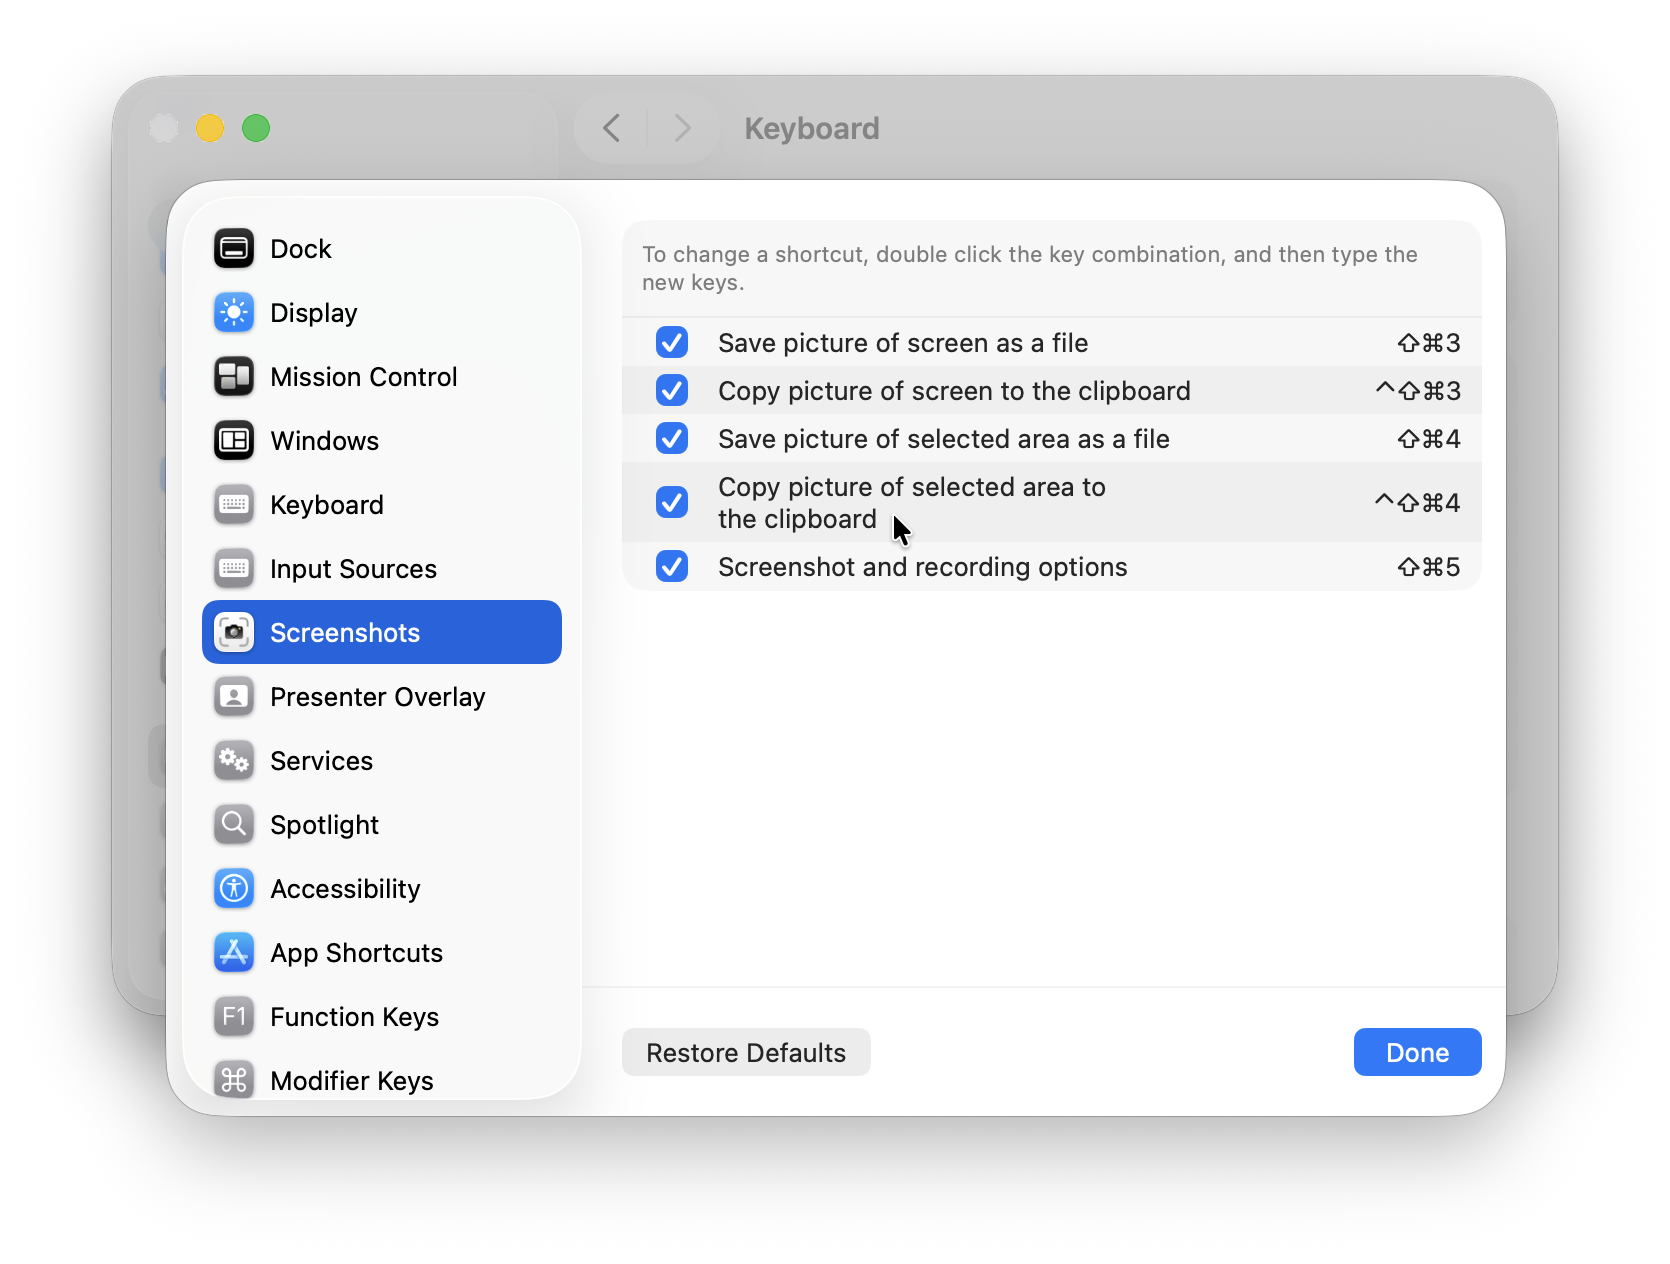
Go to Apple menu > System Settings > Keyboard > Keyboard Shortcuts > Screenshots and check that the screenshot shortcuts are enabled. You can restore or change them there if another app is using the same key combination.
The main shortcuts are:
| What you want to capture | Shortcut |
|---|---|
| Entire screen | Shift + Command + 3 |
| Selected area | Shift + Command + 4 |
| A window | Shift + Command + 4, then press Space |
| Screenshot toolbar | Shift + Command + 5 |
On a MacBook, make sure the Command, Shift and number keys are registering correctly. A quick test is to use the Screenshot toolbar with Shift + Command + 5 and click Capture rather than relying on one of the shorter shortcuts.
5. Save to a simple local folder and check free storage
If you have chosen an external drive, shared folder or a location inside a cloud-storage service, change Save to back to Desktop and test again. A destination can fail if it has been renamed, disconnected, is not mounted or does not have enough available space.
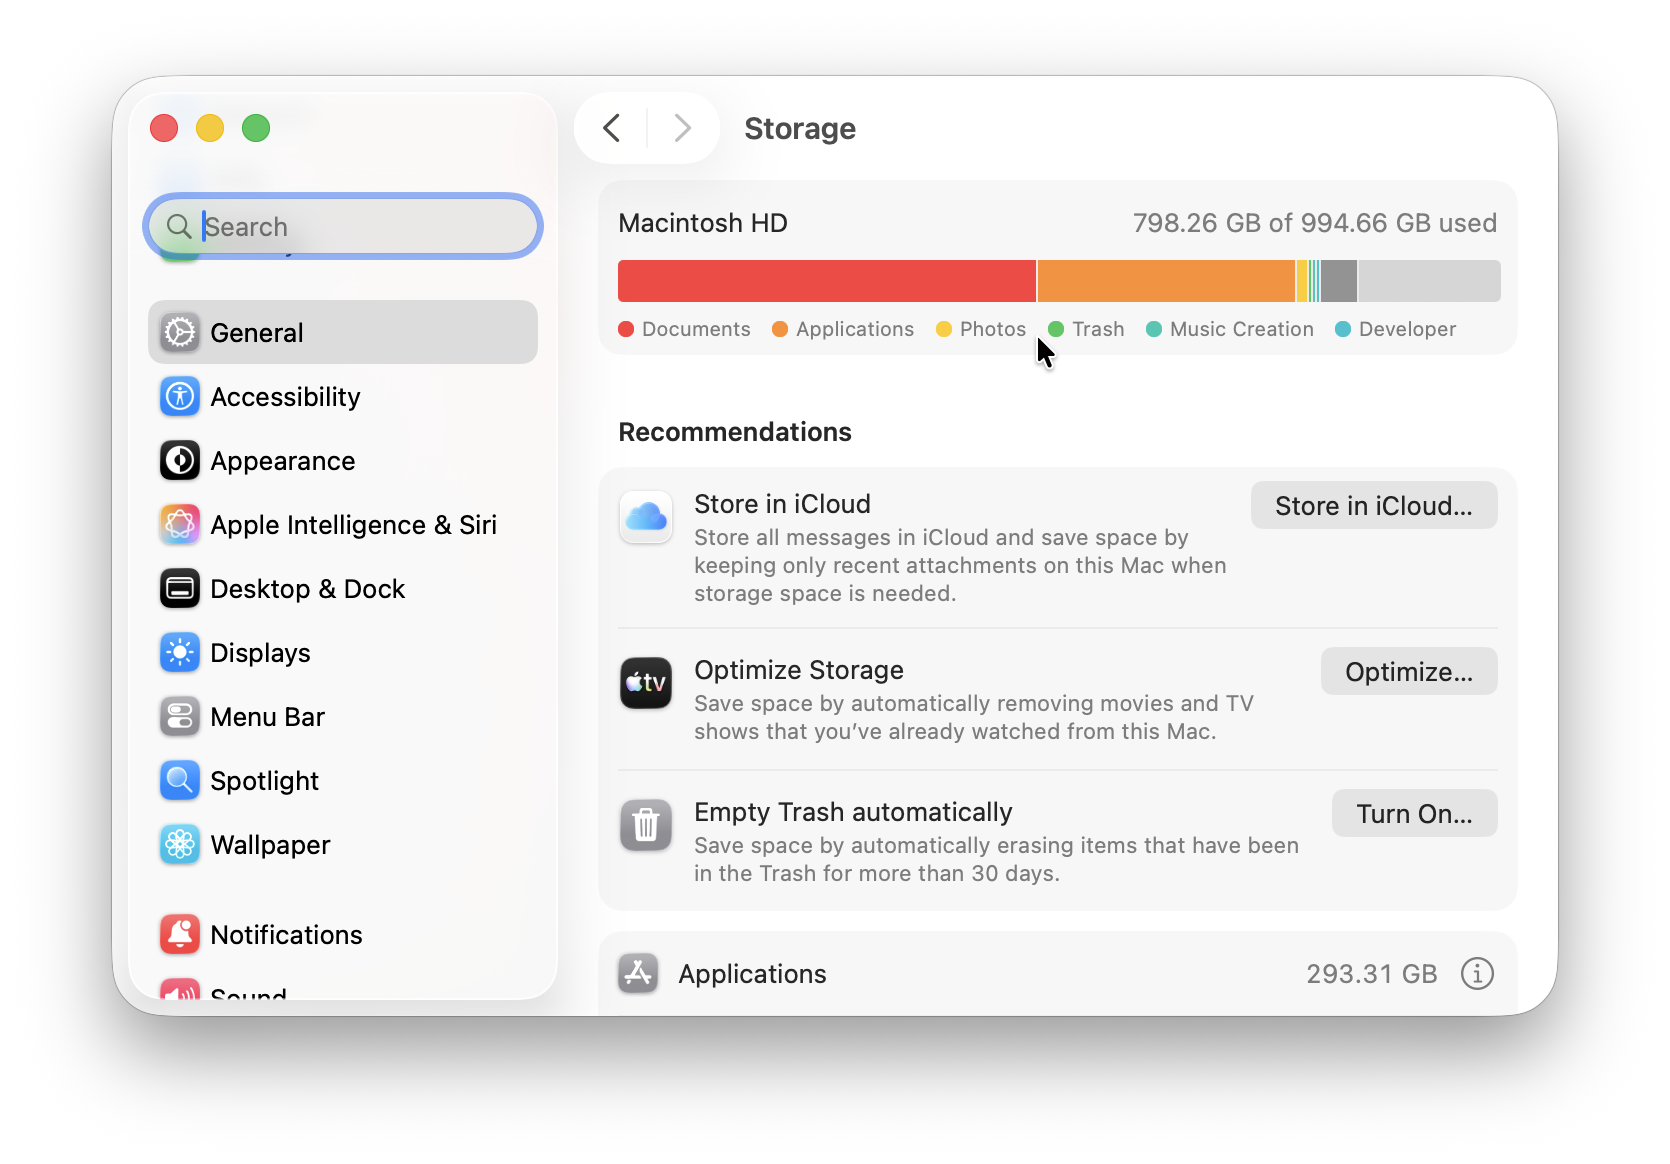
It is also sensible to check that your Mac has free storage. Open System Settings > General > Storage. If the drive is almost full, clear some space, restart your Mac and try another screenshot.
A good diagnostic is to choose Other Location in the Screenshot app and create a new folder inside your Home folder, such as Screenshots Test. If screenshots save there, the issue is with the old destination rather than screenshot capture itself.
6. Restart your Mac and install the latest macOS update
The Screenshot app is built into macOS, so a temporary system process problem can occasionally stop files being written correctly. Restarting your Mac is a worthwhile next step once you have confirmed the save location.
After restarting:
- Press Shift + Command + 5.
- Set Save to to Desktop.
- Turn off Show Floating Thumbnail for the test.
- Take a full-screen screenshot with Shift + Command + 3.
If that works, re-enable the floating thumbnail or restore your preferred save folder one setting at a time. Also install any available macOS updates, especially if the issue appeared immediately after upgrading macOS.
7. Try taking a screenshot from Preview
Preview gives you a useful workaround and helps identify whether the issue is limited to the normal screenshot workflow.
- Open Preview.
- Choose File > Take Screenshot.
- Choose From Entire Screen, From Selection or From Window.
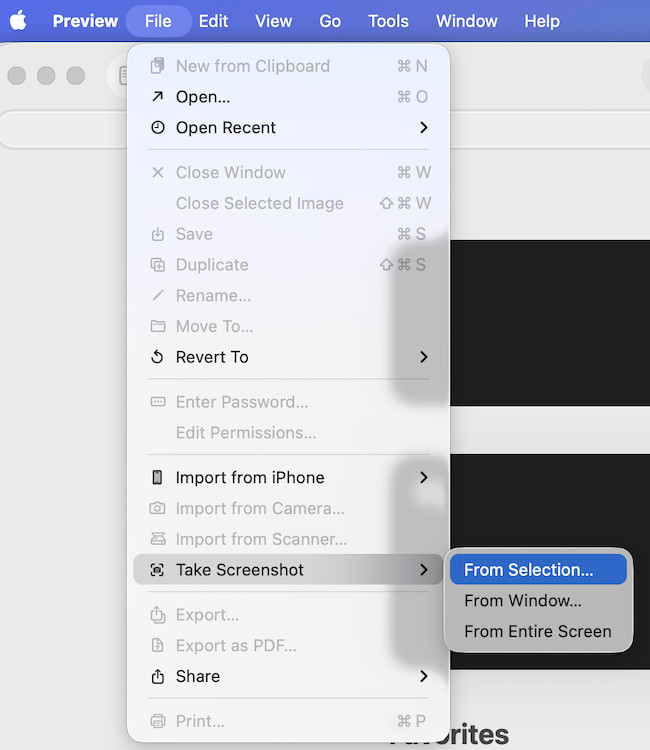
The image should open in Preview as an unsaved document. Choose File > Save and select a local folder.
If Preview works but the usual shortcuts do not, revisit the Screenshot app’s Options and the Keyboard Shortcuts settings. If neither method can save an image to a local folder, test in another macOS user account or contact Apple Support, as the problem is likely wider than screenshot settings.
8. If the screenshot exists but will not open or upload, switch to SDR
This is not strictly a saving problem, but it can look like one. On supported Macs running macOS Tahoe 26 or later, the Screenshot app can capture in HDR using the HEIF image format. Some older apps, websites and devices may not handle that file as smoothly as a standard PNG.
Press Shift + Command + 5, choose Options, then set Capture Format to SDR (Most Compatible). This saves a standard PNG screenshot and is the best choice when you need to upload, email or edit the image widely.
If you can see the file in Finder but it looks black, the app or website you were capturing may have blocked the content. Streaming and protected-video apps, including Apple TV in some cases, may not allow normal screenshots of their windows. That is different from a screenshot failing to save.
Why are my screenshots not saving on a Mac?
In most cases, one of these is the cause:
- The save location has been changed from Desktop to another folder or to Clipboard
- You held Control while taking the screenshot, which copies it instead of creating a file
- An external, network or cloud-based save destination is unavailable
- The floating thumbnail workflow is misbehaving after an update
- The screenshot keyboard shortcut has been disabled or changed
- Your Mac is low on free storage or needs a restart
FAQ
Where do screenshots save on a Mac by default?
By default, macOS saves screenshots to the Desktop. You can change this with Shift + Command + 5 > Options > Save to.
Why does my screenshot disappear after I take it?
First check whether Clipboard is selected as the destination or whether you held the Control key while using the shortcut. If not, search Finder for Screen Shot, then test with the floating thumbnail turned off and the save location set to Desktop.
How do I stop screenshots saving to the Clipboard?
Press Shift + Command + 5, click Options, and choose Desktop or another folder under Save to. When using keyboard shortcuts, do not hold the Control key.
Why is my screenshot black instead of missing?
Some apps deliberately prevent screenshots of protected video or other restricted content. The file may save normally but show a black image. Switching screenshot settings will not override that protection.
Does this fix apply to macOS Golden Gate and Tahoe?
Yes. The Screenshot toolbar, Options menu and main keyboard shortcuts are the same on current versions of macOS. On supported Macs with Tahoe or later, you may also see the HDR/SDR capture-format setting described above.
The reliable fix in short
For a fast reset, open the Screenshot app with Shift + Command + 5, set Save to to Desktop, untick Show Floating Thumbnail, and take a test screenshot with Shift + Command + 3. If the image appears, reintroduce your preferred folder or thumbnail setting one at a time to find the cause.
For Apple’s current description of the built-in capture controls, see Apple’s guide to taking screenshots on a Mac.