
RoomSketcher is a popular floor plan and home design tool aimed at homeowners, real estate professionals, interior designers, and small businesses that want professional‑looking plans without the complexity of traditional CAD software.
I’ve used RoomSketcher extensively and also researched the experiences of others to show you where it excels, where it falls short, and who it’s really best for.
Table of Contents
What Is RoomSketcher?
RoomSketcher is a web‑based floor plan and 3D visualization tool that allows you to draw rooms, add walls, insert furniture, and generate both 2D and 3D views of a space.
The Norwegian based product has actually been around since 2007 when it was known as Viseno but in 2011, evolved into what is now RoomSketcher.
Today it claims to have around “10 million users worldwide” and a look around the website suggests that its particularly popular with Estate Agents, Real Estate Photographers, Interior Designers and General Contractors that need to create floor plans of homes, offices and apartments.
It’s designed to be user friendly for non‑professionals while still offering enough professionalism for client presentations.
Unlike full CAD or BIM tools, RoomSketcher focuses on speed, ease of use, and good-looking visuals, rather than architectural level precision.
Getting Started: First Impressions & Learning Curve
RoomSketcher is very easy to get started with and the great thing is, much of it is free to use although there’s a lot of up-sell of the premium features which require a Pro subscription.
You also need to pay for high-resolution exports although you can pay per export without having to subscribe if you prefer.
First impressions are, RoomSketcher’s interface is clean, modern, and far less intimidating than professional design software.

Drawing walls, resizing rooms, and dropping in furniture is easy, even if you’ve never used a floor‑planning tool before.
That said, I did run into a few problems straight-away.
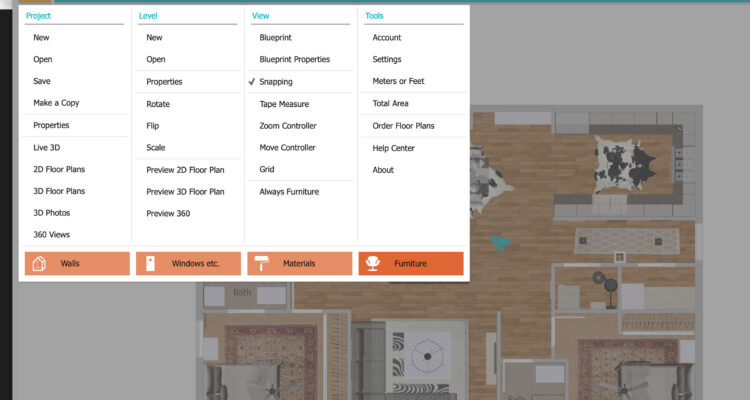
- Some controls (wall heights, precise measurements, material editing) are not immediately obvious although most are revealed by clicking on the three lines in the top left of the screen.

- Advanced edits often require digging into menus or watching tutorials
- Grouping and batch‑editing of objects is limited (at least in the free version)
Overall, I’d still say it’s easy to get to grips with although expect to spend an hour or two learning where all the tools are if you want to go beyond basic layouts.
Floor Plan Creation
2D Floor Plans
Creating 2D floor plans is where RoomSketcher stands-out. Walls snap neatly, rooms stay to scale, and the resulting plans look clean and professional.
What I liked is that RoomSketcher gives you multiple ways to create floor plans: scanning via mobile, manually drawing, ordering one from RoomSketcher (more on this below), tracing and AI generation.

Note that the Scan feature using LiDAR is currently in Beta and you have to apply to test it out. It also requires an iPhone 12 Pro or iPad Pro 2020+ or later with a LiDAR camera to work. The first two scans are free but after that, pricing is on a credits basis which you must purchase.
Strengths of creating 2D floor plans with RoomSketcher are:
- Fast layout creation
- Scaled drawings suitable for renovations or planning
- Easy to revise and duplicate layouts
I’d say there are some limitations however, namely:
- RoomSketcher is not ideal for technical drawings (electrical, plumbing, or construction details)
- Some measurement adjustments don’t “lock” as rigidly as you get with professional CAD apps
- Advanced annotation is locked behind paid plans
For homeowners or real estate agents, I’d say that RoomSketcher is still more than sufficient but for architects or engineers, it will feel restrictive.
2D Floor Plan Ordering Service
One things that makes RoomSketcher stand out from similar floor planners is that it offers its own 2D floor plan service.
So for example, if you sketch a rough floor plan of a design you want to create or a building you are renovating, you can upload it to RoomSketcher and they will send you a professionally designed 2D and 3D floor plan which is fully editable and customizable by yourself.
This “Redraw Service” is quite unusual in floor planning software and pricing is around $20-38 per floor with plans ready the next business day.

Alternatively, if you’re confident enough you can also trace a blueprint in RoomSketcher by simply uploading it, setting the scale and then re-creating it in the platform.

Finally, you’ve also got an AI conversion option which takes any floor plan you upload and attempts to convert it into an editable layout in RoomSketcher. This also works on a credit based system with the first 2 conversions free.

You can of course also just start from scratch or use one of the many hundreds of templates available.

You can use RoomSketcher in any browser but there’s also a Mac desktop app.
I recommend downloading and using the Mac app as it was a bit easier to get up and running thanks to the huge range of templates it presented me with to get started.
The desktop app does feel a bit Windows inspired and not as slick as you’d expect from a Mac app but it’s not a big drawback.

There is an amazing choice of templates in RoomSketcher for everything from Bathroom and Bedrooms to Hotel and Restaurant plans.

One you’re in, RoomSketcher has a pretty straightforward interface with the ability to simply drag and drop furniture, walls and doors wherever you want.
There’s a massive selection of objects and furniture to choose from although it’s all generic with no branding.
Most of the controls stay out of the way unless you click on the three lines in the top left of the screen to give you all the options available.
3D Views & Visualization
Some of RoomSketcher’s 3D renderings are only available to subscribers so I was unable to try it out all of them in the free version.
However, in the free version, you can generate:
- Live 3D walkthroughs
- 3D photos
- 360‑degree views
These visuals are particularly effective for presenting ideas to clients, buyers, or contractors. While they’re not photo‑realistic in the way high‑end rendering software is, they’re clear, attractive, and easy to understand.

One thing I really liked is that, if you click in the bottom right of the screen, you can place a person (male or female) inside the design and then walk-through it which really brings your designs to life.

You can also switch to a first person view of this by clicking on the eye symbol in the bottom left of the 3D screen.

In researching RoomSketcher however, I noted that some users reported that in 3D previews:
- Lighting and textures could look more realistic
- Large projects can slow performance in Live 3D mode
I certainly noticed that lighting effects don’t seem to be taken into account (at least in the free version) and populating larger 3D visualizations takes time.
Even so, for communication and concept visualization, the 3D tools are useful to get an idea of how your floor plan would look in real life.
You can watch how I easily transformed a 2D floor plan into a 3D walk-through below:
Furniture & Material Libraries
RoomSketcher includes a decent sized furniture and decor library, covering most common residential and commercial needs.
However I’ve seen much better, especially in SketchUp’s 3D warehouse selection and in comparison, I found that in RoomSketcher’s furniture and material libraries:
- The styling of objects and furniture feels generic. I noticed that some objects were labelled as “Ikea” although it’s not clear whether these are genuine and available on the Ikea site.
- The region‑specific items are limited
- Custom objects are harder to create compared to advanced design tools

If you upgrade to the Pro version, you can customize fixtures and furniture with different colors, materials and textures but this isn’t possible in the free version.
For quick layouts and visuals, the default library is fine. If your work depends on exact branded furniture or highly specific fixtures, you may find it limiting.
Tutorial Videos
One thing I really liked is that RoomSketcher has some easy to follow tutorial videos to help you get started.
The tutorial videos are detailed often running more than 30 minutes and not AI generated although I did notice some of the feature demos seemed to sound very AI.
For tutorials, you’re guided through the product by an expert at RoomSketcher with topics covering everything from creating floor plans to 3D walkthroughs.
Pricing & Free Version: Is RoomSketcher Worth It?
RoomSketcher offers a free tier, but it’s best viewed as a trial, not a long‑term solution as it’s so limited.
Free Version
- Basic drawing tools
- Limited exports
- No high‑resolution or advanced 3D output
Paid Plans
Paid subscriptions start at $12/month if paid annually or $24/month paid monthly and unlock:
- High‑quality exports
- Professional 3D visuals
- Branding and presentation tools
- Advanced features and cloud access
For collaboration, there is also a Team version for $35/month paid annually or $70/month paid monthly.
I think that compared to other products, the pricing is fair if you use it regularly, but expensive for one‑off projects (see how it compares to a few other options pricewise below). Full access requires an active subscription, so long‑term project storage depends on continued payment.
Who Is RoomSketcher Best For?
I would say that RoomSketcher is ideal for:
- Homeowners planning renovations
- Real estate agents creating listings
- Interior designers needing fast visuals
- Small businesses planning layouts
It’s less suitable for:
- Architects needing technical drawings
- Engineers requiring exact specifications
- Users looking for a powerful free solution
RoomSketcher vs Alternatives
There are many alternatives to RoomSketcher and below are two of the most popular compared head-to-head, plus some mentions of other products worth considering.
Feature comparison
| Feature | RoomSketcher | SketchUp | SmartDraw |
|---|---|---|---|
| Platform | Browser + desktop apps | Browser + desktop apps | Browser + desktop apps |
| 2D floor plans | Yes | Yes | Yes |
| 3D visualisation | Yes | Yes (advanced) | Basic |
| Live 3D walkthroughs | Yes | Via extensions | No |
| Furniture / object library | Good | Very large (3D Warehouse) | Limited |
| Collaboration & sharing | Yes | Yes (paid plans) | Yes |
| Free version | Yes (limited) | Yes | Yes (limited) |
| Pricing | Free / Subscription starting at $12/month | Free + Go versions starting at $10.75/month | Free to start / subscription starting at $7.95/month |
RoomSketcher vs Planner 5D
Planner 5D focuses more on visual realism and decorative freedom, while RoomSketcher prioritises clean floor plans and presentation‑ready output. Planner 5D can look more impressive at first glance, but RoomSketcher is easier to use and better suited to real estate listings and renovation planning.
Best choice: RoomSketcher for professional floor plans; Planner 5D for visual experimentation.
RoomSketcher vs Floorplanner
Floorplanner is the closest competitor in terms of features and pricing. RoomSketcher generally produces more polished 3D visuals, while Floorplanner offers slightly more control for technical layouts.
Best choice: RoomSketcher for presentation quality; Floorplanner for detailed planning.
FAQ
Is RoomSketcher free?
RoomSketcher includes a free plan, but it’s very limited. High‑resolution exports, 3D visuals, and professional features require a paid subscription.
Is RoomSketcher good for Mac users?
Yes. RoomSketcher works well on macOS through the browser and performs best on Apple Silicon Macs. Chrome generally offers the smoothest experience although it also works in Safari.
Can RoomSketcher replace CAD software?
No. RoomSketcher is designed for visual planning and presentations, not technical drafting or construction documentation like professional CAD software.
Is RoomSketcher worth the money?
If you use it regularly for real estate listings, client work, or ongoing renovation projects, it offers good value. For one‑off projects, the pricing may feel high.