
We voted NoMachine one of the best remote desktop software for Mac and best of all, it offers a completely free version for personal use.
Although NoMachine is generally more popular with Linux users and DIY enthusiasts, it can also be used on a Mac for free, even if you have little experience.
Its ability to connect via IP or through NoMachine Network, combined with advanced features like file transfer, session recording, and USB forwarding give you full control over your remote setup unlike many remote desktop apps.
While general Mac users often prefer simpler plug-and-play solutions like RemotePC, TeamViewer or AnyDesk, NoMachine’s free tier make it a favorite among those who enjoy customizing and their remote desktop software.
In this review, I installed, tested and used it to connect to another Mac to see how it performs.
What Is NoMachine?
NoMachine is a cross‑platform remote desktop software that lets you access and control a Mac remotely – including Windows PCs, Linux machines, and mobile devices.
NoMachine uses a proprietary NX protocol designed for high performance across local and wide‑area networks.
There’s a free version (“NoMachine for Everybody”) that covers personal use without time limits (although there are limitations to this as I’ll explain) but there are also paid enterprise editions with advanced capabilities.
Is NoMachine Safe?
Considering how much access it requires on a Mac, one of the most important things to consider with any remote desktop software, is whether it is safe or not?
From the research and testing I have done, NoMachine appears to be legit and very safe for remote access on Mac. All connections are encrypted using TLS/SSL and NX protocols, keeping your screen, keyboard input, and file transfers secure. Network connections also use a Machine Id and optional Access Id, while system account credentials or guest approvals control access on the host machine.
NoMachine also supports firewall-friendly connections and optional two-factor authentication for extra protection. Your sessions remain private, and NoMachine does not share your activity with third parties.
The main risks come from misconfigured IP-based connections or sharing credentials with unauthorized users, so it’s important to keep the software up to date and only connect to trusted devices.
So basically, NoMachine appears about as safe as any other remote desktop software I’ve used. The company is also European based so it has to adhere to strict privacy laws.
Pricing
Arguably the biggest thing that draws Mac users to No Machine is the fact that it is completely free to use for personal use.
| Edition | Cost | Notes |
|---|---|---|
| NoMachine for Everybody (Free) | Free | Personal non commercial use only |
| NoMachine Personal (Paid) | From $84.50/yr or $8.50/m | Adds business features and commercial licensing. |
For most Mac users who want remote control for home or small business tasks, the free version is more than enough.
However, it’s important to be aware that unlike many free remote desktop apps, the free version of NoMachine only supports free remote access over the Internet when you know the IP address of the computer or device you want to connect to.
If you don’t know the IP address – for example, the machine is behind a firewall, behind NAT, or doesn’t have a static public IP – then the free edition cannot automatically locate and connect to that device on the internet by itself.
In this case you would need to subscribe to the NoMachine Network, which lets you connect by using a Machine ID instead of an IP address and bypasses the need to configure networks manually.
You do however get 7 days free when you open a No Machine account but after that you must pay with subscriptions starting at about $8.50 per month which is still very reasonable compared to most commercial remote desktop apps.
Setup & First Impressions
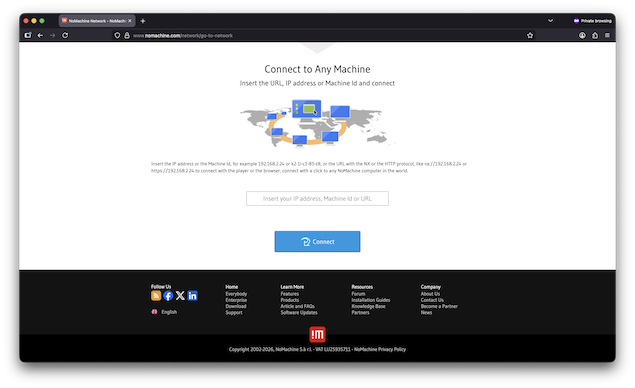
NoMachine gives you two distinct ways to connect to a remote Mac or PC:
- Direct connections using an IP address (completely free), and
- Cloud-assisted connections using NoMachine Network (via a Machine Id, which requires a Network subscription after a 7-day trial). This is incredibly easy and simply requires you to enter the IP address, Machine ID or URL of the computer you want to connect to

Here’s how the NoMachine Network works and how to set it up.
Step 1: Install NoMachine on Both Computers
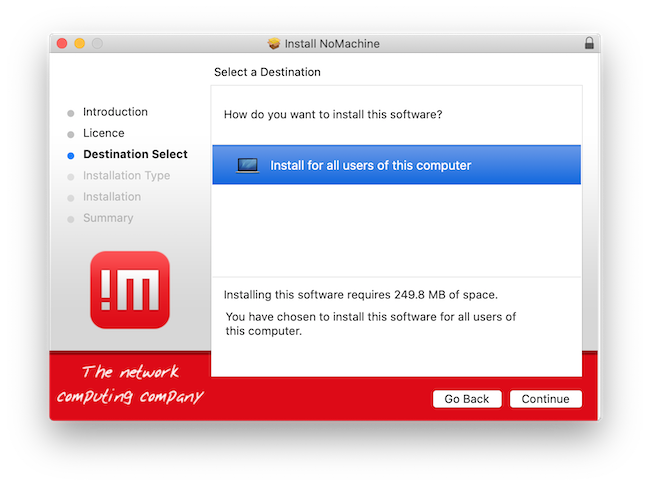
Start by downloading and installing NoMachine on:
- The computer you want to access remotely (the host), and
- The computer or device you’ll connect from (the client).
This applies to the free edition as well – NoMachine Network is supported across the entire NoMachine product family, even if you haven’t purchased anything yet.
The one thing that annoyed me here is that you can’t just restrict it to one user account on your Mac. It has to install for all users (probably for permissions reasons) but this seems a bit aggressive for me and it would be preferably to select which user accounts NoMachine installs itself on my Mac.
Step 2: Publish the Computer to NoMachine Network
To make a computer accessible via NoMachine Network, it needs to be “published”, which assigns it a unique Machine Id.
On the computer you want to access remotely:
- Open NoMachine
- Go to Settings > Network > Machine
- Click Add

At this point, NoMachine generates:
- A Machine Id (used to find the computer on the internet), and
- An Access Id, which acts as an extra security layer and is enabled by default.
Make a note of both IDs, including any dashes in the Machine Id – you’ll need them later.
Step 3: Confirm Who Can Access the Machine
Click OK to publish the computer on NoMachine Network.

By default, the machine is available to Everybody, meaning anyone with the correct Machine Id, Access Id, and login credentials can attempt to connect. Don’t worry, you’d still have to accept a connection to allow anyone to connect but if you want tighter control:
- You can manually restrict access to specific User Ids, or
- Add users from your personal Users Book (this requires a NoMachine account).
Step 4: Create a NoMachine Account
You do not need a NoMachine account to publish computers, but you do need one to connect to machines via NoMachine Network.
To create an account:
- Visit the NoMachine website, or
- Click Create a new account directly inside the NoMachine Player

Your account gives you a User Id, which you’ll use to:
- Log into NoMachine Network
- Access your Machines Book and Users Book from any device
If you’re already a paying customer, you don’t need to create a new account, you’re already registered.
Step 5: Network Subscription
To connect to a computer using its Machine Id, you need a NoMachine Network subscription.
The good news is:
- Every new account automatically gets a free 7-day Network evaluation
- No payment is required during the trial
If you don’t want to pay, you can still connect for free using:
- Local network (LAN), or
- A direct internet connection using the computer’s IP address
The subscription is only required if you want IP-free, NAT-friendly access via Machine Id
Step 6: Connect to the Remote Computer Using the Machine Id
On the device you’re connecting from:
- Install NoMachine
- Open the NoMachine Player
- Log in to NoMachine Network using your User Id and password

Once logged in, you can start a connection in two ways:
- Enter the Machine Id in the search field and click Connect to new Machine Id, or
- Click Add and paste the Machine Id into the Host field
You can name the connection anything you like — or let NoMachine name it automatically.
If prompted, enter the Access Id
Step 7: Authenticate and Connect
After the Access Id is verified:
- Log in using the system username and password of the remote computer
If you’re connecting to someone else’s machine and don’t have a system account:
- Choose Guest Desktop Sharing
- The desktop owner will need to approve the connection
Finally:
- Verify the host identification
- Approve the connection
Although this all sounds a bit long-winded, it’s actually very easy to setup although considerably slower than remote desktop apps like RemotePC for Mac.
Performance & Real‑World Use
I found NoMachine extremely responsive over both LAN and internet connections with smooth graphics rendering.
However, there was occasional sluggishness or lag, especially on the older Intel Mac I connected to but this could have been down to the Mac more than the software.
Controlling the remote Mac felt fluid, even when streaming audio/video or handling graphics‑intensive apps which isn’t always the case with free, basic VNC solutions.
No Machine Features
The main things you’re able to do with NoMachine on a Mac are:
- Remote Control & Screen Sharing: Control a remote Mac as if you’re in front of it, including keyboard, mouse, and desktop interaction.
- File Transfer & USB Forwarding: Drag‑and‑drop files, map drives, or even forward USB devices between a local Mac and a remote machine.
- Screen Recording: Capture sessions for tutorials, support records, or auditing.
- Remote Printing: Print documents from the remote desktop to your local printer.
- Security: Encrypted connections (OpenSSL, TLS/AES) plus optional two‑factor authentication keep sessions protected.
- Cross‑Platform Connection: Connect from Mac to Linux, Windows, another Mac, or even an Android/iOS device.
- Browser‑Based Access: No client app required – just log in through a web browser for remote access.
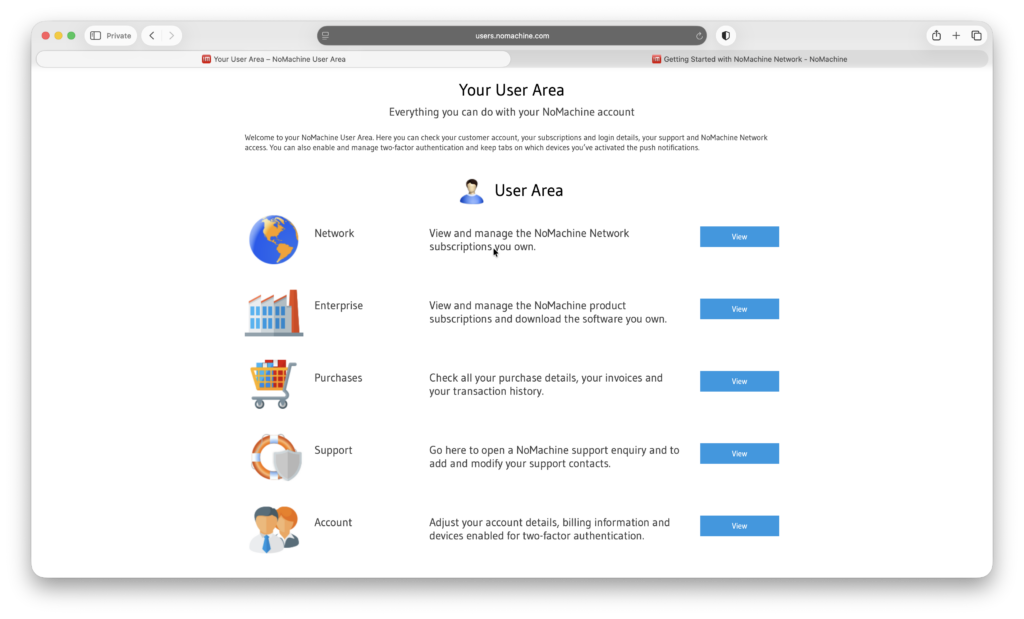
You can administer your NoMachine account in the user area including upgrading to an Enterprise plan and get Support.
How It Compares to Alternatives
Vs. Rustdesk
Rustdesk is completely open source and is the most popular alternative to NoMachine. NoMachine offers richer features like session recording, file transfer, and audio/video streaming, while RustDesk is open-source, free, and gives you more control over privacy and self-hosted servers. NoMachine is generally faster and more polished, but RustDesk may appeal to more tech-savvy Mac users who prioritize cost-free, secure remote access.
Vs. TeamViewer
NoMachine is free for personal use and often faster, but TeamViewer offers much easier setup, integrated meeting features, and wider mobile support.
Vs. VNC (e.g., RealVNC)
NoMachine generally offers better performance, file transfer, and session control than standard VNC.
Vs. AnyDesk
Both are fast; AnyDesk may be easier for beginners, while NoMachine’s free tier includes more advanced features.
For more options, check out our guide to the best remote desktop software for Mac. For more free options, our guide to free remote desktop software for Macs may be more useful.