
nanoCAD is a popular, professional-grade 2D and 3D free CAD application, widely used as a lower‑cost alternative to paid CAD software like AutoCAD for Windows. However, the bad news is that nanoCAD does not have a native macOS version – which means Mac users need to rely on workarounds to run it.
This guide walks you through all the practical ways to run nanoCAD on a Mac, explains which method works best depending on your Mac, and highlights the pros and cons of each approach.
Contents
- Can You Run nanoCAD Natively on macOS?
- Method 1: Run nanoCAD Using a Virtual Machine (Recommended)
- Method 2: Run nanoCAD with Boot Camp (Intel Macs Only)
- Method 3: Use nanoCAD via Remote Desktop
- Method 4: Run nanoCAD Using CrossOver or Wine (Not Recommended)
- Alternatives to nanoCAD That Run Natively on Mac
- FAQ
Can You Run nanoCAD Natively on macOS?
No. nanoCAD is Windows‑only software and there is currently:
- No macOS version
- No web‑based version
To run nanoCAD on a Mac, you must either:
- Run Windows on your Mac (virtually or natively), or
- Access nanoCAD remotely from a Windows PC
In my experience, using a virtual machine is by far the best and most reliable option as I’ll show you.
Method 1: Run nanoCAD Using a Virtual Machine (Recommended)
A virtual machine allows you to use Windows and macOS at the same time.
There are various virtual machines for Mac available but in our tests, Parallels is easily the most reliable way to run nanoCAD on a Mac – as you can see in my video above.
Why Parallels Is the Best Option
Parallels Desktop allows you to run Windows alongside macOS without rebooting. It offers:
- Excellent performance on Apple Silicon Macs (M-series chips)
- Strong DirectX and OpenGL support for CAD software
- Much better clipboard, file sharing, and drag‑and‑drop than any other VM
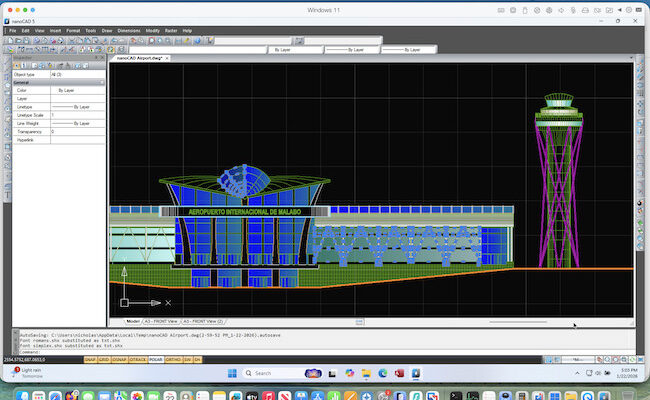
I found that nanoCAD runs very well in Parallels for most 2D drafting and light‑to‑moderate 3D work.
What You’ll Need
- A Mac with at least 16GB RAM recommended
- Parallels Desktop (Standard or Pro)
- Windows 11 (ARM version on Apple Silicon, x64 on Intel) – Parallels will download this automatically for you
- nanoCAD Free installer for Windows
Step‑by‑Step: Installing nanoCAD in Parallels
- Follow the instructions to install Parallels Desktop and Windows 11 on your Mac. You can use the free trial to test it first.
- Once Windows is running, open a browser in Windows
- Download nanoCAD Free from the official nanoCAD website. It’s important to download the free version and not the commercial paid version otherwise the free license number won’t activate it!
- Run the installer in Windows. If you don’t have it installed already, Windows will also request permission to install the latest Visual C++ framework which once done, will also require you to restart Windows.
- Run the nanoCAD Free installer and the installation completes in less than a minute.
- Even though it’s free, you’ll still need a license which you can get by registering at nanocad.com. You’ll also be asked to confirm the email that you registered the license with before nanoCAD will launch.
- If nanoCAD doesn’t automatically launch once you’ve done this, double click on the nanoCAD shortcut on your Windows desktop.
nanoCAD will now run within your Parallels Windows installation on your Mac.
Performance Tips
- Allocate at least 8GB RAM to Windows
- Enable Graphics > Best for Performance in Parallels
- Use an external mouse rather than a trackpad as it’s much easier for CAD work
- The free version of nanoCAD cannot open DWG files later than AutoCAD 2013. If you need to open a newer version, I recommend using a DWG viewer for Mac (I used DWG TrueView in Parallels) to convert it to the AutoCAD 2013 DWG format.
Method 2: Run nanoCAD with Boot Camp (Intel Macs Only)
Boot Camp allows Intel Macs to boot directly into Windows, which dedicates all of your Mac’s resources to running nanoCAD.
However, the big disadvantage is that Boot Camp is not available for modern Apple Silicon Macs so unless you are using an older Intel chip Mac, this is not an option for you.
Pros:
- Native Windows performance
- Full GPU access
- Ideal for heavy 3D CAD workloads
Cons:
- Requires rebooting to switch OS
- No longer supported on newer Apple Silicon Macs
- Intel Macs only
Steps (Intel Macs):
- Follow these instructions to install Windows 11 using Boot Camp Assistant in macOS.
- Boot into Windows
- Install nanoCAD normally as if you were using a Windows PC
This is still a viable option if you rely heavily on nanoCAD and use an older Intel Mac but bear in mind you will only be able to boot in Windows or macOS – not run both at the same time as you can with a virtual machine.
Method 3: Use nanoCAD via Remote Desktop
If you already have access to a Windows PC, you can consider run nanoCAD remotely using remote desktop software.
This of course requires being able to access a Windows PC with nanoCAD installed on and a fast internet connection, otherwise there will be a lot of lag.
How It Works
- nanoCAD runs on a Windows machine
- You access it from your Mac using Remote Desktop software
Popular Options
- Windows App (formerly Microsoft Remote Desktop)
- AnyViewer
- RemotePC
Pros:
- No Windows installation on your Mac
- Works on all Macs
Cons:
- Requires fast, stable internet
- Reduced graphics performance
- Not ideal for precision drafting
Method 4: Run nanoCAD Using CrossOver or Wine (Not Recommended)
CrossOver and Wine can run Windows apps without Windows. However, we don’t recommend using these compatibility layers for running CAD software like nanoCAD.
Why This Is Problematic
- nanoCAD relies heavily on Windows graphics APIs
- Frequent crashes and UI glitches
- Poor compatibility with newer nanoCAD versions
Some older versions of nanoCAD may launch, but this method is unreliable and not suitable for professional work.
Alternatives to nanoCAD That Run Natively on Mac
If you’d prefer to avoid Windows entirely, check out our guide to the best CAD software for Mac for paid options and best free CAD software for free apps.
An example of some alternatives you can use are:
- AutoCAD for Mac – Industry standard, but expensive
- DraftSight – Strong 2D drafting support
- LibreCAD – Free and open source (2D only)
- FreeCAD – 3D parametric CAD
These options may be worth considering if you primarily work on macOS.
FAQ
Can you install nanoCAD directly on macOS?
No. nanoCAD is a Windows-only application and cannot be installed directly on macOS. There is no native Mac version, web version, or official macOS compatibility layer.
Does nanoCAD work on Apple Silicon Macs (M-series chips)?
Yes, but only inside Windows virtualization software such as Parallels Desktop. nanoCAD runs under Windows 11 for ARM, which Parallels translates efficiently on Apple Silicon Macs. Performance is generally very good for 2D drafting.
Is nanoCAD free to use on a Mac?
nanoCAD itself offers a free version for Windows, but you will still need:
- Virtualization software (usually paid, e.g. Parallels Desktop although free options like VMware Fusion are available.)
- A Windows license (Windows 11 ARM) – although you can use it for free unless you want to customize it and remove watermarks.
So while the CAD software may be free, running it on a Mac is not entirely cost-free.
Does nanoCAD run well in Parallels Desktop?
Yes. nanoCAD performs reliably in Parallels for:
- 2D drafting
- DWG file editing
- Light-to-moderate 3D work
Very complex 3D models or GPU-intensive workflows may benefit more from a native Windows setup.
Can you run nanoCAD on a Mac without Windows?
Not reliably. Tools like Wine or CrossOver may launch older versions, but stability, graphics support, and licensing issues make this unsuitable for professional use.
Is Boot Camp better than Parallels for nanoCAD?
On Intel Macs, Boot Camp offers better raw performance because Windows runs natively. However:
- Boot Camp does not work on Apple Silicon Macs
- You must reboot to switch between macOS and Windows
For most users, Parallels is the more practical option.