
If you have an all-in-one printer, document scanner or photo scanner, you don’t need any additional software to scan on a Mac.
You Mac can setup and perform scans on its own without needing to use any other software.
Alternatively, you can use the free Image Capture tool in macOS to scan documents or images.
As long as your multifunction printer or scanner supports TWAIN connections, it can connect to Image Capture or any third party software to scan so you don’t have to use the manufacturer software that came with it.
Digitizing a document or photo by scanning it has many advantages such as allowing you to upload and sign documents on a computer or mobile including legally binding agreements or contracts.
It also enables you to go go paperless in your office or home for better document management.
Scanning a document also allows you to run it through OCR software if you want to make the text searchable by keyword or editable.
It’s also an essential first step if you want to send a fax from your Mac without the need for a fax machine.
You May Also Like:
- Best OCR Software For Mac
- Best Document Scanners For Mac
- Best Photos Scanners For Mac
- Best All In One Printers For Mac
- How To Scan To PDF on a Mac
With this in mind, here’s how to scan a document on a Mac.
1. Setup Your Scanner
If you haven’t already done so, you’ll need to setup your scanner to work on your Mac. To setup a scanner on a Mac, follow these instructions:
- Connect the scanner or multi-function printer to the USB-C or Thunderbolt port on your Mac on the side of your MacBook or on the back of your iMac, Mac Mini or Mac Pro. USB-C and Thunderbolt ports are the same size and shape the only difference is that Thunderbolt is an Apple standard that delivers faster data between devices. Most scanners don’t support Thunderbolt 3 or 4 speeds and will usually come with either USB-C cable although some may come with older USB-B cables which connect to any standard USB port.

- There’s no need to install the software that came with the scanner or all-in-printer as macOS will automatically download the latest scanner drivers for it.
- Go to Apple Menu > System Preferences > Printers & Scanners.
- If your printer or scanner does not appear, click the “+” symbol on the left to add the printer or scanner.
- Select your model of scanner or printer and click Add.
If the scanner does not appear for any reason, make sure the scanner is plugged in and the USB-C cable is securely connected.
If you previously added the scanner and it stopped working, try removing it with the “-” symbol and add it again.
2. Scan Your Documents
You’re then ready to scan your documents or photos.
If you have a scanner with a document feeder like the Fujitsu fi-7160 then the process is slightly different from if you use a flatbed scanner like the Epson Perfection V550.
Scanning With a Document Feeder
If you have a scanner with a document feeder, follow these instructions to scan on your Mac.
- Place the pages of the document in the document feeder
- Go to Apple Menu > System Preferences > Printers & Scanners. If you’re using an All In One Printer, you may need to select Scan instead of Print to bring up the scan preferences.
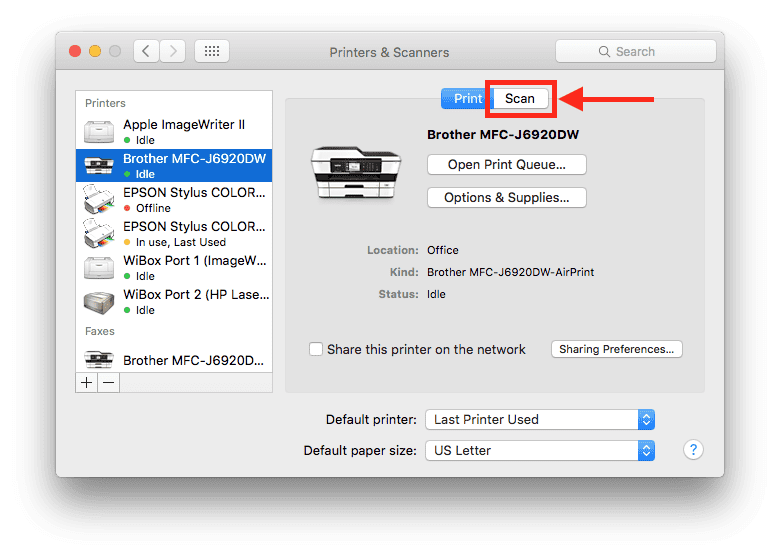
- Select your scanner and then click on Open Scanner on the right.
- Select Use Document Feeder.
- You then need to set the scanning preferences and you can click on Show Details to show more print options. Options include:
Type Of Image: Select Text for black and white, Black & White for greyscale images and Color for color photos or images
Duplex: Scans both sides of the page (if your scanner supports this)
Size: Select the dimensions of the photo or document
Scan To: Selects where the image will be saved which can be either a folder or you can select an app to open them directly
Image Correction: Adjust the colors and exposures of the scanned image
- Finally, click Scan to scan the documents or photos.
Scanning On A Flatbed Scanner
The process for scanning on a flatbed scanner with a Mac is very similar except the following procedures change:
- Deselect Document Feeder if it is selected
- Define the size of the document or photo or if placing multiple photos on the flatbed scanner you can choose between Detect Separate Images which will save each item placed on the scanner separately. Alternatively, Detect Enclosing Box will save all the items placed on the scanner in one file or image.
When you click Scan, your flatbed scanner will do a preview scan to detect how many items are on the scanner and then it will scan each object separately if you selected Detect Separate Images earlier.
If you have scanned lots of pages and want to combine them into one PDF document, you can also combine PDF documents on a Mac.
If you don’t have a scanner, there are also ways to scan without a scanner although the quality and resolution will not be as good as using a scanner.