

AirDrop on Mac allows you to seamlessly send and receive files from Apple devices such as iPhones, iPads and other Macs.
AirDrop was first introduced to Apple devices in 2011 and provides a quick, secure and convenient way to transfer files within the Apple ecosystem.
Although there are now many Cloud solutions that allow you to send files between devices, Apple has improved AirDrop in the latest releases of macOS with faster, more secure transfers and quicker recognition of nearby devices.
If you’re having trouble turning on and using Airdrop, we’ve taken a look at everything you need to know.
Contents
- What Is AirDrop?
- How To Turn On AirDrop
- How To Turn On AirDrop On An iPhone Or iPad
- How To AirDrop From Mac To iPhone Or iPad
- How To AirDrop From iPhone or iPad To Mac
- Where To Find AirDrop Files on your Mac
- Where To Find AirDrop Files On iPhone
- How To AirDrop Word, Powerpoint and Excel Office Files
- What To Do If Airdrop Is Not Working
What Is AirDrop?
AirDrop is a built-in functionality within iOS and macOS that allows you to transfer files and data wirelessly over the same WiFi network.
So instead of using a messaging app such as WhatsApp or sending files via email, you can use AirDrop for faster and more secure file sharing if you have an Apple device.
Since it is specifically designed for the Apple ecosystem, the data transfer speed between iDevices is higher than a standard Bluetooth connection.
Note that Airdrop doesn’t work for sending files to Android devices which use Nearby Share instead although there are ways to use Nearby Share on a Mac too.
You May Also Like:
How To Turn On AirDrop
Turning on AirDrop is a relatively straightforward process. Here’s what you need to do:
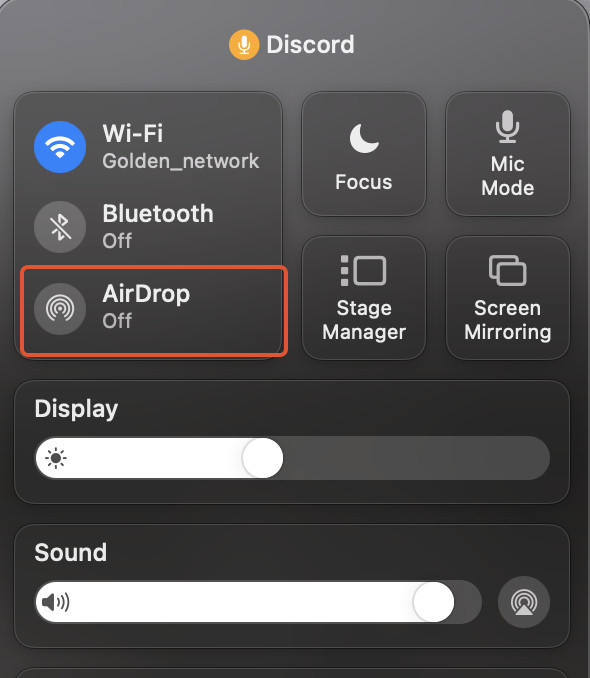
- Open the Control Centre by clicking its icon on the top right side of the menu bar.

- Once open, you’ll see some icons appear before you. To enable AirDrop, you will need to click on its icon.
How To Turn On AirDrop On An iPhone Or iPad
Turning on AirDrop on an iPhone or iPad is almost the same process as on a Mac.
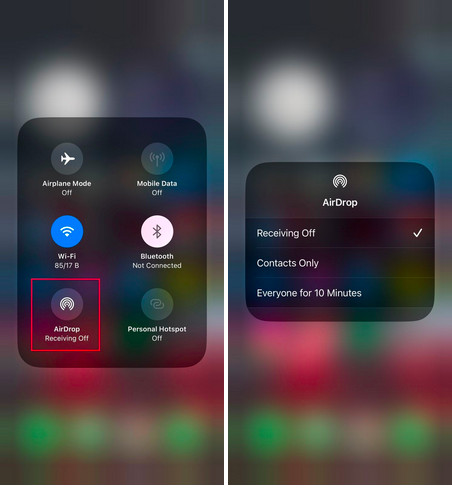
- Go to the Control Center on your iPad and iPhone to turn on AirDrop. The Control Center will appear before you if you swipe down from the top-right corner of the screen. If your iPhone has iOS 10 or earlier, you’ll need to swipe up from the bottom of the screen to reveal the Control Center.
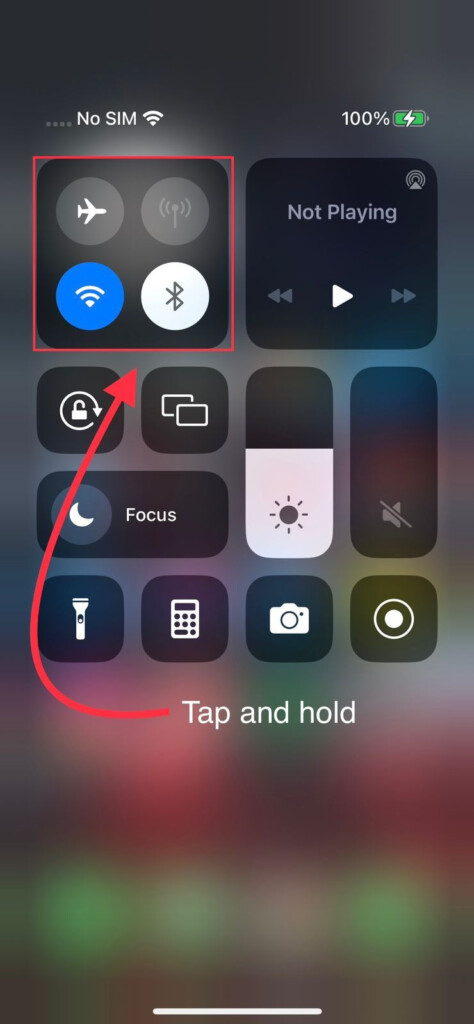
- Look for the AirDrop icon once it opens. It is usually located within the connectivity panel or may require swiping left to reveal additional options.
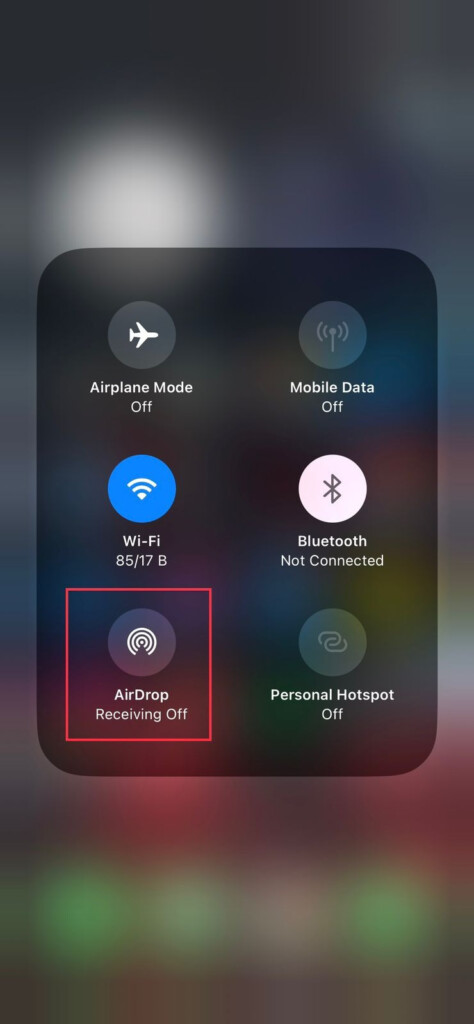
- Once you find it, tap on it. You’ll then see a menu appear before you with three options: Off, Contacts Only, and Everyone. Choose the relevant option to enable your AirDrop.
- Off: This setting disables AirDrop.
- Contacts Only: This option allows only your contacts to see and send files to your iPhone or iPad through AirDrop.
- Everyone: This enables all nearby Apple devices to see and send files to your device.

How To AirDrop From Mac To iPhone Or iPad
macOS allows various ways to AirDrop files to your iPhone or iPad.
Here we show all the different ways to AirDrop files from Mac to iOS devices so you can choose which one suits you best.
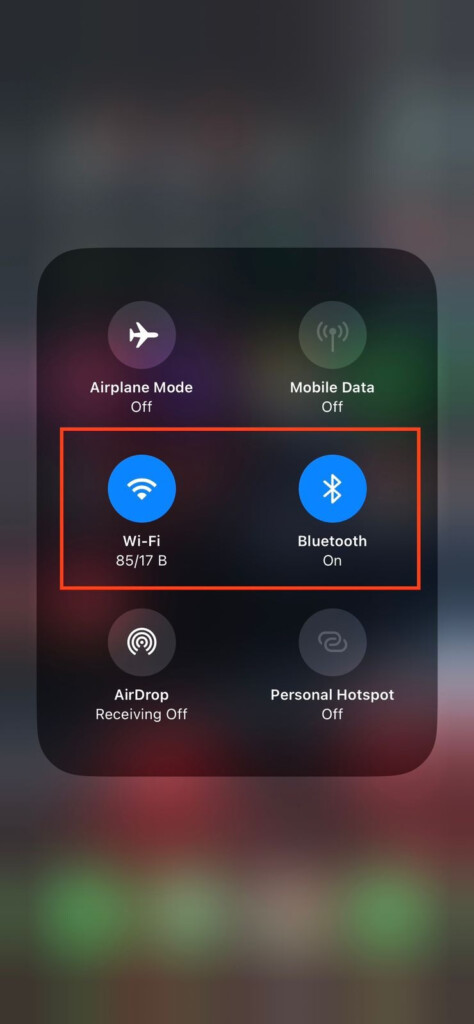
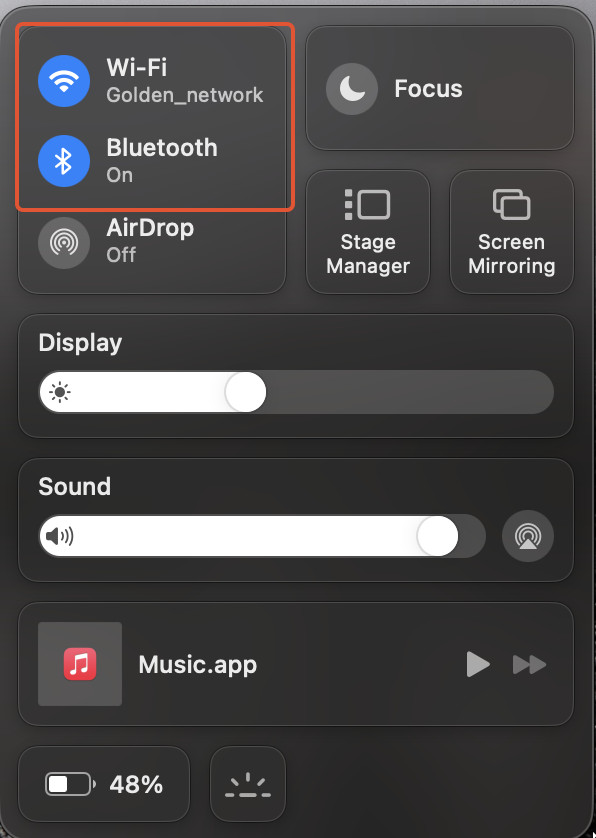
Important: Before you start, make sure your Mac’s Bluetooth and Wi-Fi are turned on along with AirDrop since you won’t be able to transfer files without all 3 of these options being turned on at the same time. You’ll also need to do this on the device you’re sending to.
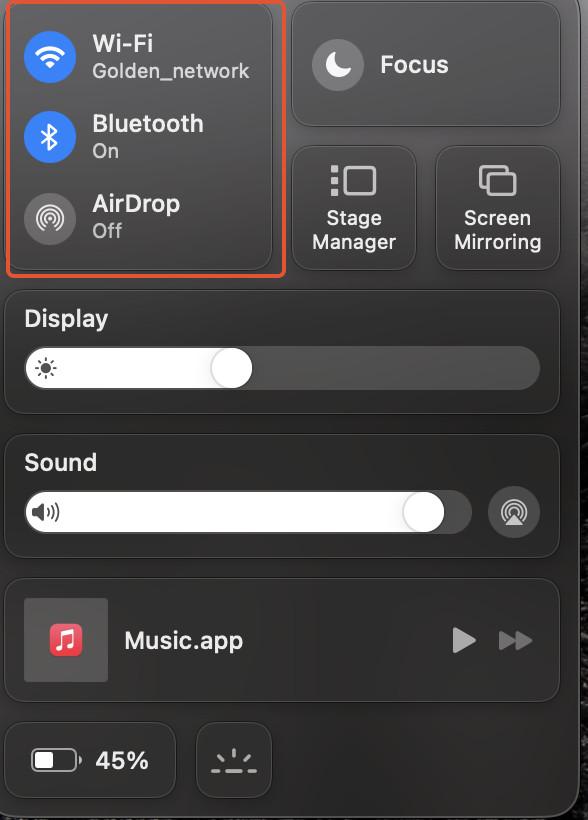
- Go to Control Center and then turn on WiFi, Bluetooth and AirDrop.
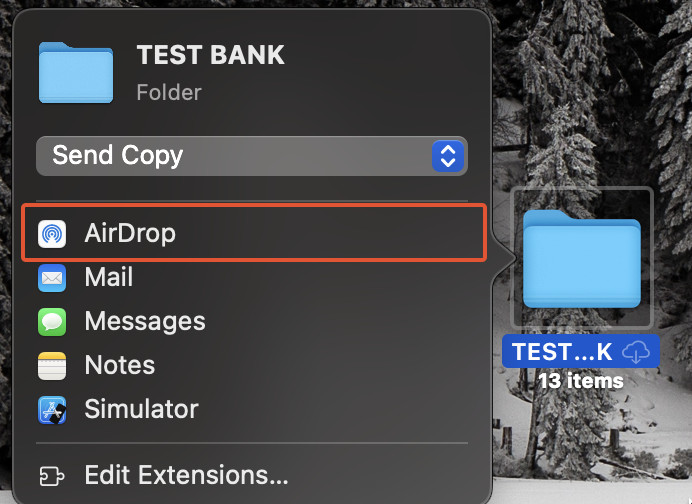
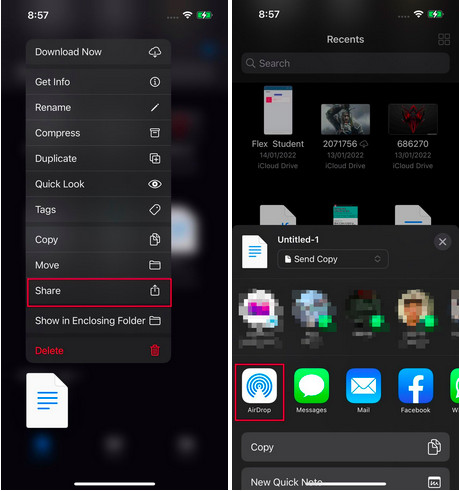
- Right-click and then tap the Share button on the document or app that you want to AirDrop and then select AirDrop.
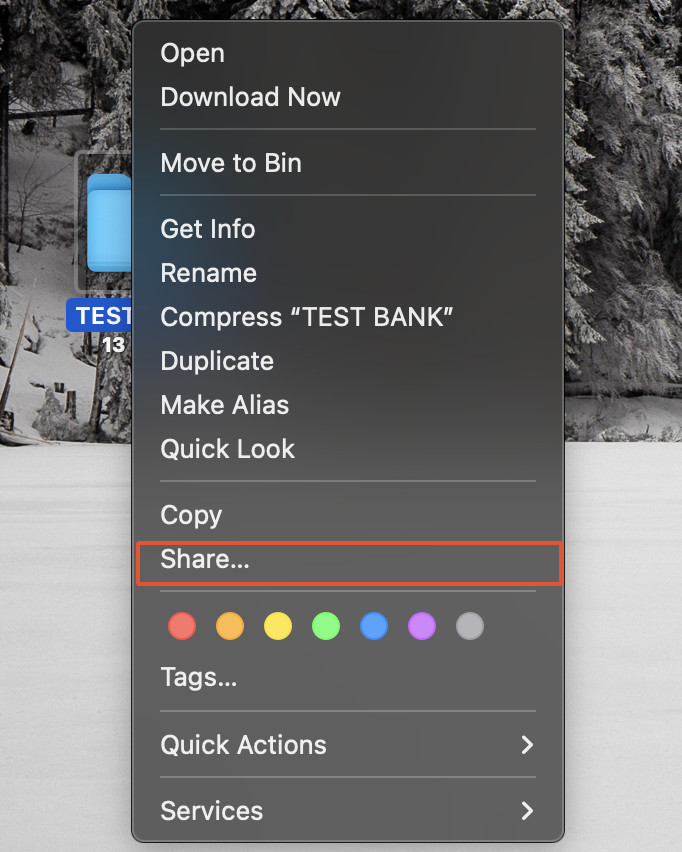
- Select the device you want to send the item to.
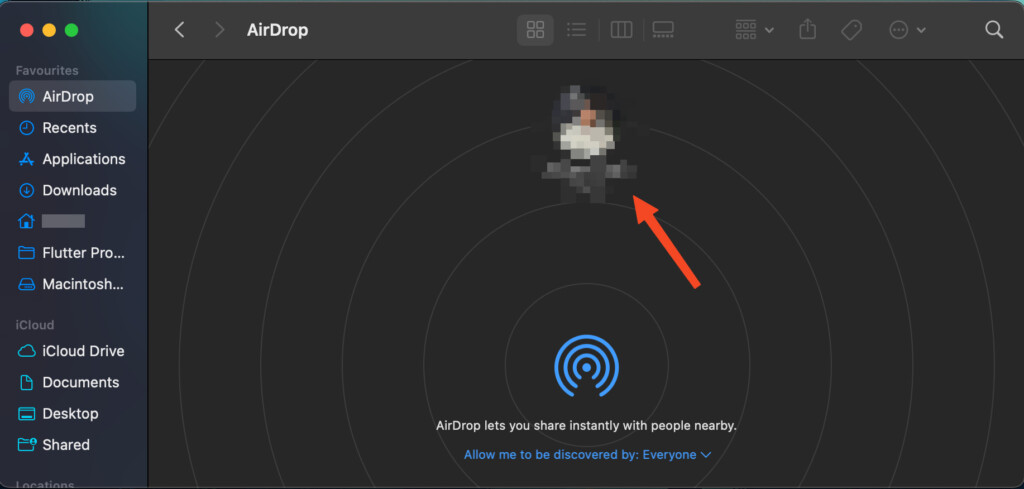
- Alternatively, you can also AirDrop by using the Finder window. Click AirDrop in the Finder sidebar and then drag the item you want to send to the device to which you want to send it.
When someone sends an item to your Mac using AirDrop, you can choose whether to accept or save the data sent to you.
An item is automatically accepted and saved if you’re signed into iCloud with the same Apple ID on both devices to make the process quicker.
To allow others to send items to your Mac using AirDrop, follow these steps:
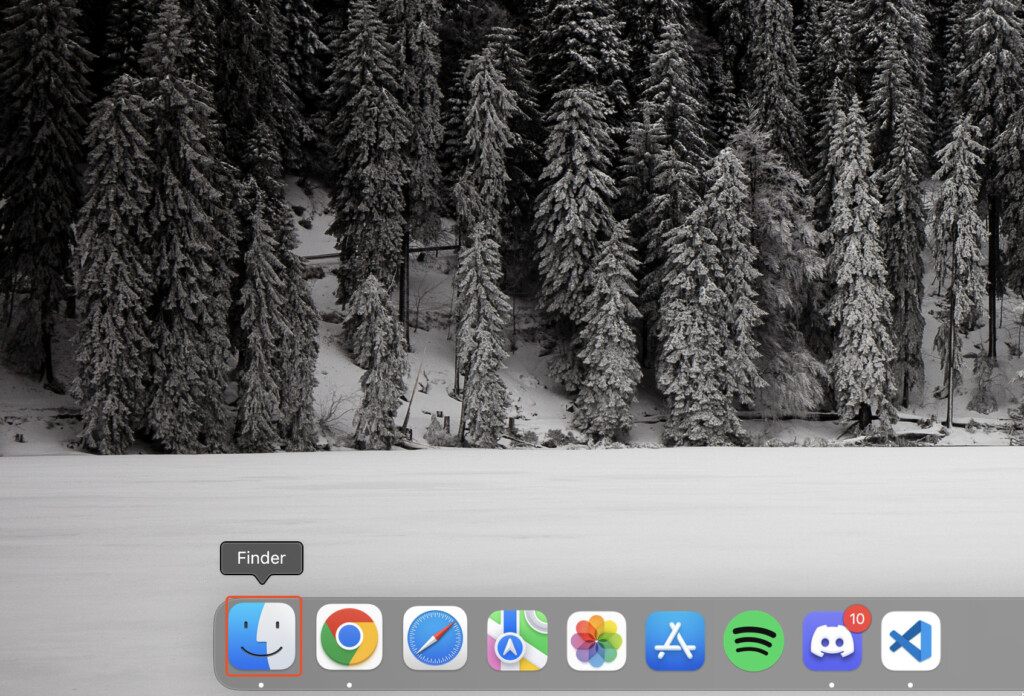
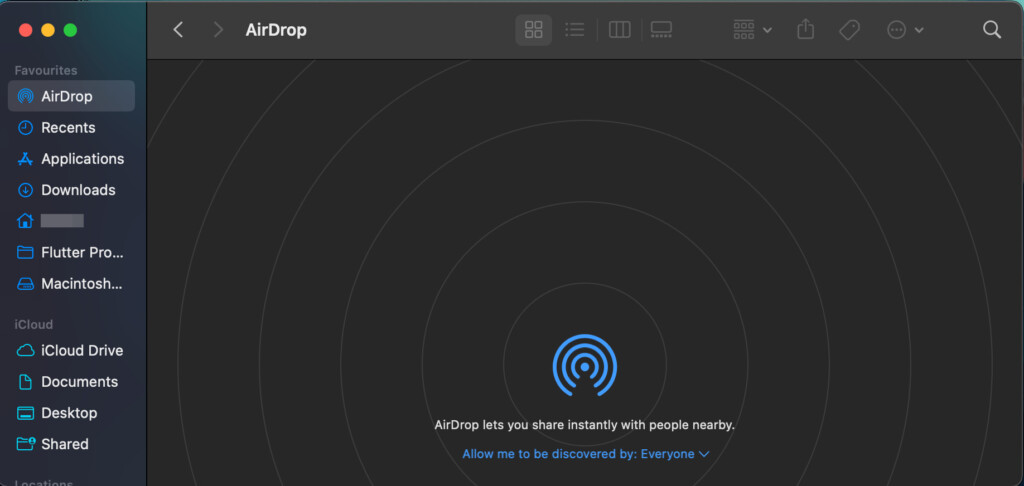
- Open a Finder window by clicking the Finder icon in the Dock.
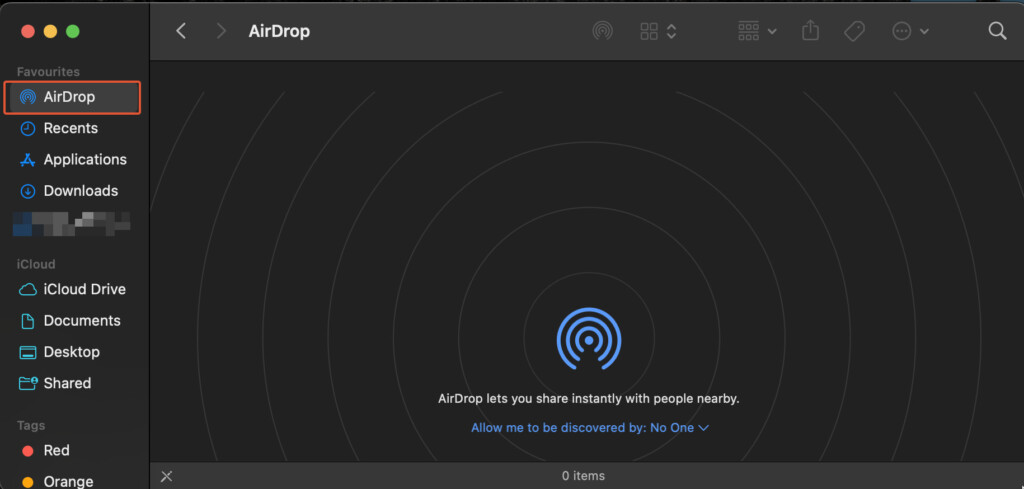
- Click AirDrop in the Finder sidebar.
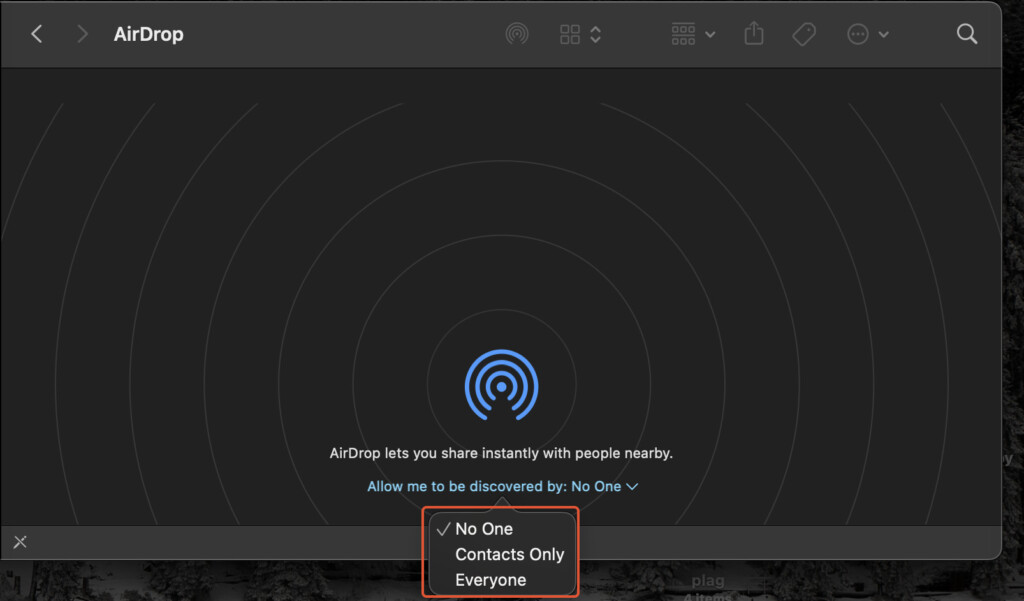
- In the AirDrop window, click the “Allow me to be discovered by” pop-up menu, and then choose an option. No one means you are hidden, Contacts only are users in your macOS Contacts list and Everyone means any Mac or iOS device.
How To AirDrop From iPhone or iPad To Mac
AirDropping files from your iPhone or iPad to your Mac is handy, especially if you’re looking to backup an iPhone or iPad to a Mac.
Here is how you do it:
- Swipe down from the screen’s top-right corner to open the Control Center. If you have an iPhone 8 (iOS 10) or earlier, you’ll need to swipe up from the bottom of the screen instead.
- Then, tap and hold the network settings box in the top-left corner, where you can find options like Wi-Fi, Bluetooth, etc. From there, ensure that Wi-Fi and Bluetooth are turned on.
- Next, make sure that your AirDrop is enabled by clicking on the AirDrop icon and selecting a relevant option (Everyone or Contacts Only).
- Then go to your Mac and click the Finder icon to open a new Finder window. In the Finder window, click AirDrop in the left sidebar.
- Make sure your AirDrop, Wi-Fi and Bluetooth are turned on on your Macbook as well. To do so, go to the Control Center and toggle all of these options on.
- Then, on your iPhone, locate the file(s) you want to AirDrop. Tap on the Share icon in your app to open the file. From there, you’ll see the option of AirDrop. Click on it.
- Your iPhone will then start scanning for nearby devices. Wait for your Mac’s icon to appear in the AirDrop section.

- You should then see a notification on your Mac prompting you to accept the incoming file from your iPhone. To receive the file, click on Accept. Alternatively, if the person you’re receiving the AirDrop from is in your contacts, the file will automatically be added to your downloads folder.
Where To Find AirDrop Files on your Mac
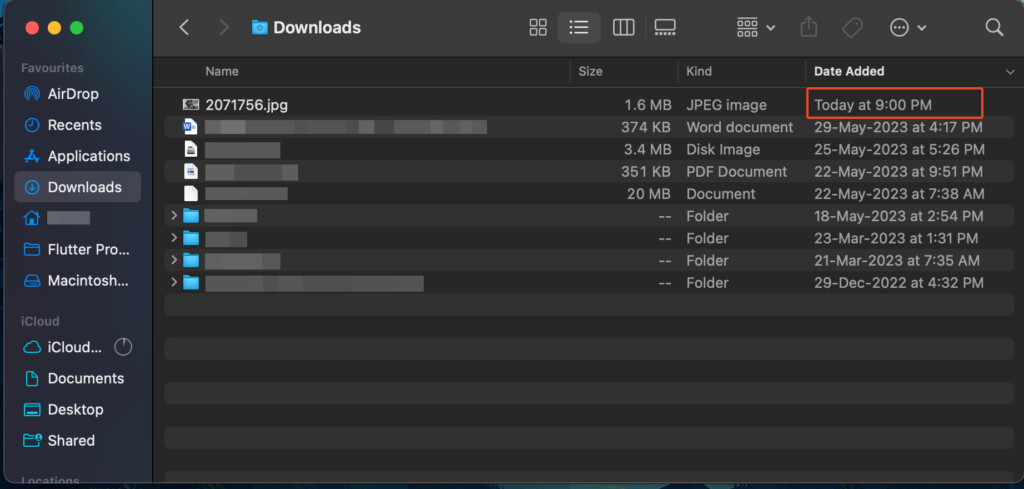
The files that you receive through AirDrop are saved in the Downloads folder by default on your Macbook.
- To access the Downloads folder, click on the Finder icon at the bottom of your screen and then tap on the Downloads option in the left sidebar of your screen.

- You can easily sort the files inside the folder by Date Added to locate the ones that have been recently received via AirDrop. Once you sort them by their latest date, your transferred files will come out on top of the list.
Where To Find AirDrop Files On iPhone
AirDrop files sent to your iPhone can be found in the app that they corresponding to. For example:
- Photos: Pictures received via AirDrop will be saved in the Photos app.
- Keynote, Pages, Numbers: Their respective apps will save presentations, documents, and spreadsheets.
- Contacts: Contact information shared through AirDrop will be saved in the Contacts app.
- Files: General file types that don’t have a dedicated app will be saved in the Files app.
After receiving an AirDrop file, you can open the relevant app to ensure it has been saved and opened correctly.
If you’re unable to locate the file in the corresponding app, try the AirDrop process again and make sure your iPhone has enough storage space to accept downloads.
How To AirDrop Word, Powerpoint and Excel Office Files
If you want to AirDrop a Microsoft Office files such as Word, Powerpoint or Excel, follow these instructions.
- Select File > Share in Word, Powerpoint or Excel.
- Select Send a Copy from the options that appear.
- Choose AirDrop.
- Select the device that you want to AirDrop the Microsoft Office file to in the window that appears.
What To Do If Airdrop Is Not Working
Sometimes you may find that AirDrop doesn’t work as expected or you can’t find a device.
However, resolving this issue is usually relatively simple and shouldn’t take too much time.
The first thing you need to do is see if AirDrop is enabled on your Mac. To do so, follow these steps:
- Open Finder and select AirDrop from the sidebar.
- Then choose the Everyone option for access.
This is one of the most common reasons for AirDrop not working and should fix any issues you are having.
However, Ii that doesn’t work, try turning your WiFi and Bluetooth off and then back on again by doing the following:
- Click on the Control Center on the top right of your menu bar
- From there, click on the Bluetooth and Wi-Fi options twice to restart both of these settings.
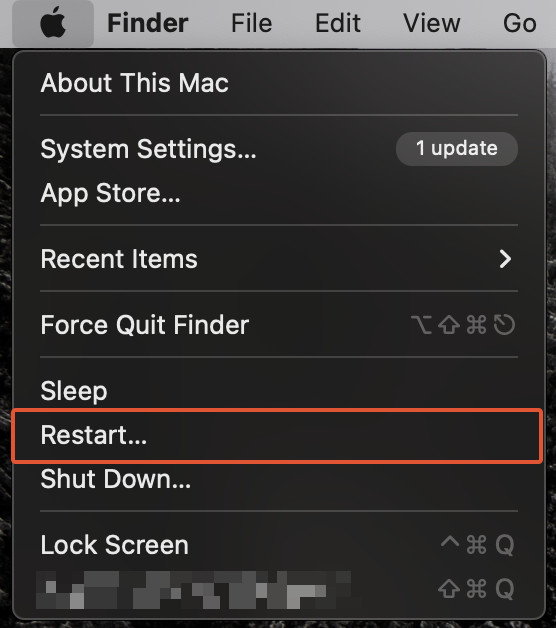
If the issue persists, restarting your Mac might clear out any software conflicts that may cause AirDrop to malfunction.
- To restart your Mac, click on the Apple logo in the top left of the menu bar.

- From there, click on Restart
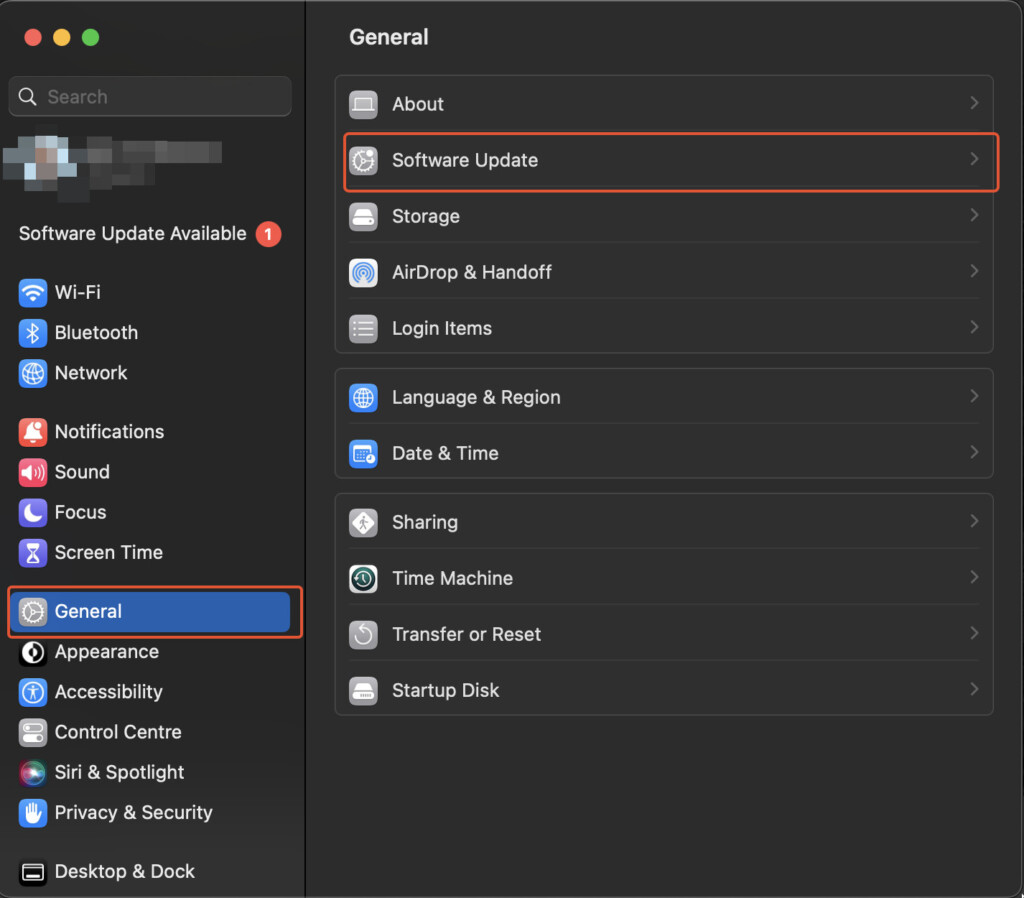
The next step you can try is updating macOS.
You can check for a software update by clicking on the Apple logo and heading over to System Settings.

- If an update is available, you’ll see an option which reads as Software Update Available below your iCloud profile. Click on it and then click Update Now to update your Mac.

- However, sometimes you might have to manually check for an update. Once you’re in System Settings, go to General → Software Update and from there, see if an update is available.
- If there is one, click on Update Now to update your Mac to its latest version.
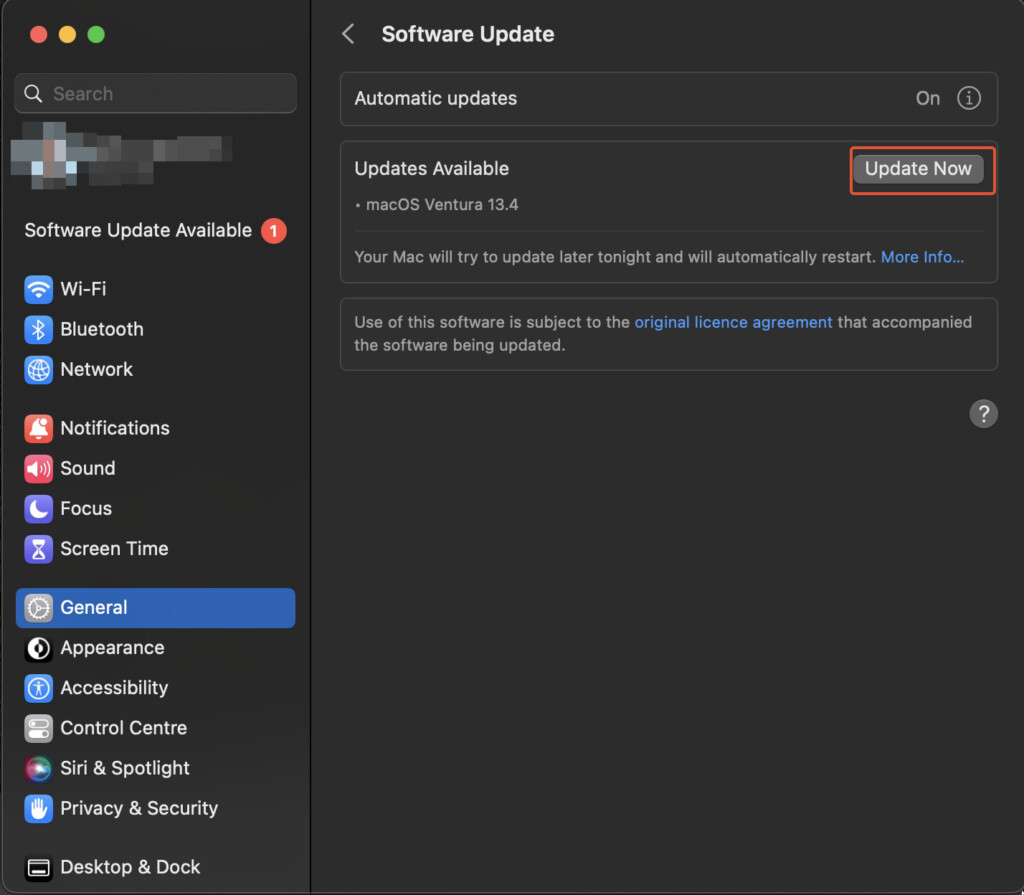
If an update is available, install it, as updating your software might steer clear of any bugs or glitches that are affecting AirDrop.
If this doesn’t fix AirDrop not working on your Mac, it may be because:
- You have an older Mac that’s using an older version of macOS. Especially if you’re using a version of macOS older than Yosemite, you will find that you can’t AirDrop to iOS devices.
- Make sure that your Mac or iOS device is set to receive files from “Everyone” for maximum discoverability if you can’t find a device using AirDrop.
- You may be using a VPN on your Mac in which case AirDrop will not work.
- Something is corrupted in macOS which is blocking AirDrop in which case you can try doing a factory reset of your Mac.
If none of these steps get AirDrop working on your Mac, you can also try contacting Apple customer care for a solution.