
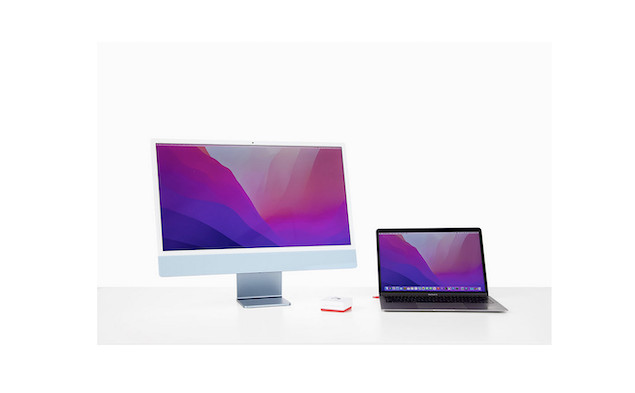
Apple’s iMacs are known for their stunning 4K and 5K Retina displays which in theory, make them the ideal external display for other models such as MacBooks, Mac Minis and Mac Studios.
However, unfortunately Apple discontinued Target Display Mode years ago, making it impossible to natively use an iMac as an external monitor with another Mac.
There are however several other ways to use an iMac as an external monitor and the best in terms of image quality, is Luna Display.
Whether you’re running a MacBook Pro, MacBook Air, Mac Studio, or Mac mini (including Apple Silicon models), Luna Display lets you transform your iMac into a true external monitor at full 4K or 5K resolution with minimal lag.
Note that, we wouldn’t recommend Luna Display as a solution for video editing, video playback, graphic design or gaming due to technological limitations that mean you’ll experience a lot of pixelated graphics.
For that, we’d strongly recommend using a 5K monitor, ideally the Apple Studio Display or at least, a cheaper alternative to it.
For most other external monitor needs however, Luna Display is an excellent little gadget.
Below is a complete guide on what Luna Display is, how it works, step-by-step instructions to set it up and a look at the drawbacks.
What Is Luna Display?
Luna Display is a small hardware dongle from the makers of Astropad, which specializes in Apple software and accessories.
The dongle plugs directly into a Thunderbolt or USB-C port on your primary Mac and allows you to transmit video and audio to an iMac over:
- Wi-Fi (for wireless flexibility)
- Thunderbolt/USB-C cable (for maximum quality and near-zero lag)
- Ethernet (for the most stable wired connection when using a Mac mini or with a Thunderbolt-to-Ethernet adapter)
Unlike Apple’s AirPlay or third-party apps like Duet Display, Luna Display is the only option that supports full 4K and 5K Retina resolution, making it ideal for anyone who wants to take full advantage of the iMac’s display capabilities.
Why Use Luna Display Instead of AirPlay?
Apple’s built-in AirPlay feature can also mirror or extend your iMac’s display to another Mac, but it has several drawbacks as you can see below.
| Feature | Luna Display | AirPlay |
|---|---|---|
| Resolution | Full 4K & 5K Retina | Limited to 1080p (with compression) |
| Lag | Minimal (especially wired) | Noticeable |
| macOS Compatibility | Works with macOS El Capitan (10.11) or later | Requires macOS Monterey (12) or later |
| Wired Option | Yes (Thunderbolt/USB-C or Ethernet) | No |
| External Display Support | Counts as a true external display | Often limited to mirroring |
As you can see, if you need a sharp, color-accurate Retina display for tasks like photo editing, design, or even gaming, Luna Display is far superior to AirPlay.
What You Need Before You Begin
- Port Requirements: Luna Display requires one Thunderbolt/USB-C port for the dongle. For best performance, you’ll also need a second port to connect your iMac directly with a Thunderbolt/USB-C cable.
- External Display Limits: Some base-model Apple Silicon Macs (like the M1/M2 MacBook Air) only support one external display. If this applies to your Mac, Luna Display will count as that single display when connected via Thunderbolt.
- macOS Updates: Because Luna Display is a third-party solution, it may require updates after major macOS version releases. Apple’s own AirPlay is less prone to breaking with updates.
- Performance: Wired connections (Thunderbolt or Ethernet) provide the best image quality and lowest lag. Wi-Fi works, but it’s not ideal for graphics-heavy tasks.
Instructions: How to Use an iMac as an External Display with Luna Display
Follow these steps to connect your iMac as a second monitor using Luna Display.
1. Plug In the Luna Display Dongle
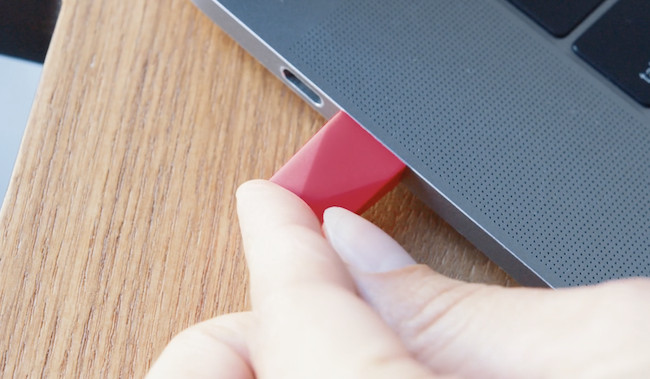
Insert the Luna Display dongle into a Thunderbolt/USB-C port on your primary Mac (the one you want to use as the source).
If you’re using a Mac mini, you can also connect over Ethernet for even lower latency.
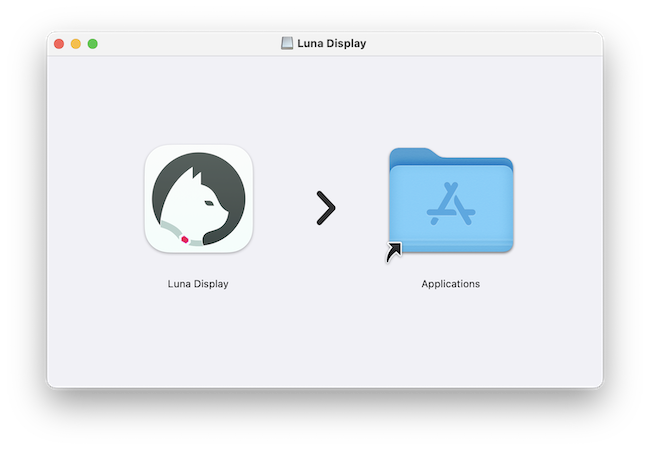
2. Install the Luna Display Apps
- On your primary Mac, download the Luna Primary app.
- On your iMac, download the Luna Secondary app (Mac-to-Mac mode).
Drag both apps into the Applications folder.
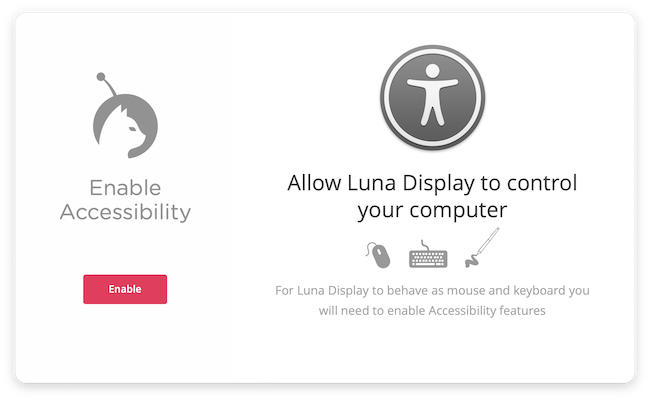
3. Set Up the Primary Mac
- Open the Luna Display app on your main Mac.
- When prompted, click Enable Accessibility, open System Settings, and enter your admin password to allow screen sharing.
- Click Next once permissions are granted.
4. Set Up the iMac (Secondary Mac)
- Launch the Luna Display app on your iMac.
- Click Setup and grant any required permissions.
- You’ll also be asked whether you want to use your iMac’s keyboard and mouse to control your primary Mac (optional but useful).
5. Connect Your Macs
Once permissions are granted on both machines, Luna will automatically detect your iMac and establish the connection.
If you’re using a wired Thunderbolt/USB-C cable or Ethernet, performance will be near-instant with Retina-quality resolution.
If you’re connecting an older iMac, you’ll need a USB-C to USB-A cable. If you’ve got a newer iMac, then you’ll need a USB-C to USB-C cable.
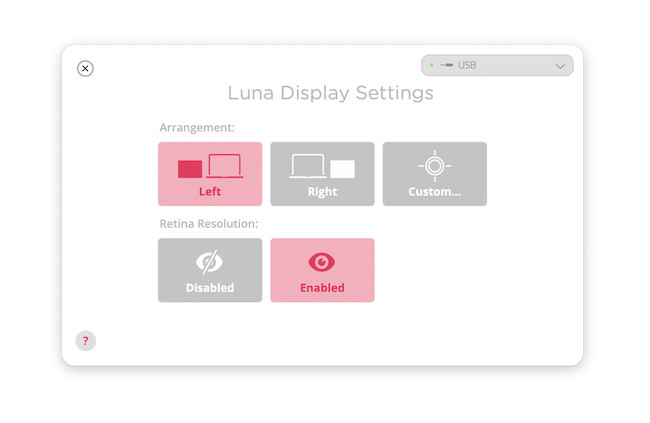
6. Configure Display Settings
Open Luna Display Preferences (or macOS Display Settings) to:
- Arrange monitors (drag and drop to position the iMac relative to your primary Mac)
- Enable Retina resolution for crystal-clear text and graphics
- Adjust scaling and color profiles for your workflow
7. Disconnect When Finished
To stop using your iMac as an external display, simply press the Escape (Esc) key on the iMac keyboard or quit the Luna Display app.
Tips for Best Performance
- Use a Thunderbolt Cable: For 4K/5K, a direct Thunderbolt/USB-C connection delivers the sharpest image and lowest input lag.
- Ethernet for Mac mini Users: If you’re using a Mac mini, Ethernet is an excellent alternative to Wi-Fi for stable performance. Annoyingly, I found that if you put your Mac to sleep, the connection between Luna Display and the Mac mini reverts back to WiFi meaning you have to restart Luna Display to get it to use the Ethernet. However, the simple solution to this is to turn-off the WiFi on your iMac which forces it to go via Ethernet instead.
- Close Background Apps: To reduce latency, quit unnecessary apps running on both Macs during use.
- Keep Software Updated: Luna Display updates frequently to maintain compatibility with the latest macOS versions.
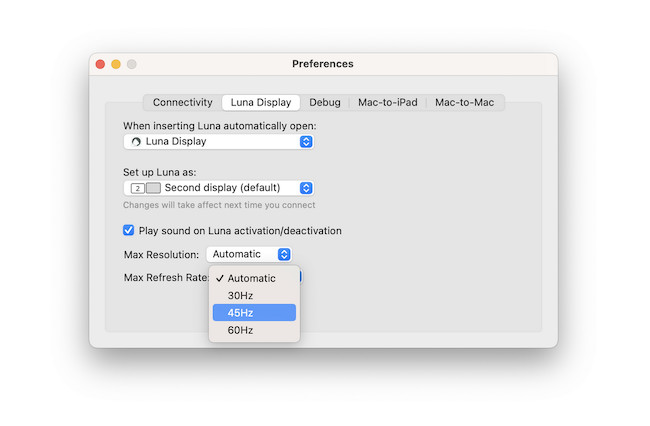
- Lower Resolution: If you’re seeing a lot of pixelated images or stuttering, you may find lowering the resolution helps. By default, it’s set to “Automatic”.
- Increase Refresh Rate: If the image isn’t as sharp as you’d hoped, you can try increasing the refresh rate. By default, this is also set to “Automatic”.
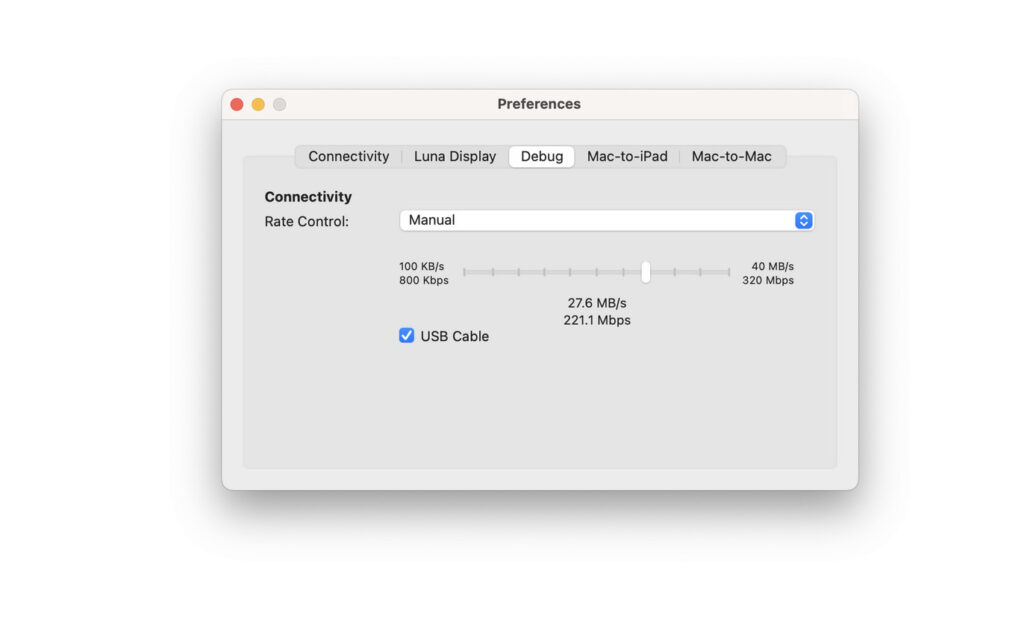
Adjust Rate Control: If you’re having any other display issues, a last resort is to adjust the Rate Control. This is a manual overide which controls the bandwidth with which Luna Display transmits data. To access it, select the Debug tab and then adjust the slider up and down for slower and faster bandwidths.
Luna Display Downsides
While Luna Display is the best way to reuse an iMac as an external display, there are a few caveats:
- Cost: The dongle typically costs around $89.99 (£66.99) making it more expensive than software-only solutions. You’ll also need to factor in the cost of a Thunderbolt or Ethernet cable if you need one.
- Latency: Whichever connection method you use, there will always be a certain amount of latency or lag although cabled connections make this almost unnoticeable.
- macOS Updates: Apple macOS updates can sometimes disrupt third-party display solutions, requiring you to wait until Luna issues an update to restore functionality.
- Pixelation: Luna Display is not suitable for fast moving footage due to the way it has to transfer 5K resolution along a USB cable. If you’re using it for video editing or gaming, this could be an issue.
- iMac Webcams Not Supported: You won’t be able to use the webcam on your iMac via Luna Display.
- iMac Brightness Controls: You can’t change or control the brightness on your iMac via Luna Display. You’ll have to disconnect it and set the brightness on your iMac first before reconnecting.
- No Speaker Support: Your iMacs speakers will not be connected to your primary Mac using Luna Display.
- No MacBook Charging: Most modern 5K displays connected via Thunderbolt can also charge your MacBook while in use. This is not possible when connecting an iMac to your MacBook via Luna Display and as a result, you may find the connected iMac drains your MacBook battery quickly.
- Limitations in headless or user-switching modes: Some users report issues when using Luna Display in “headless” setups (i.e. as a secondary Mac without a monitor) or when switching user accounts. For example, logging out or switching users on the secondary Mac can break the Luna connection. Luna support has suggested workarounds – e.g. scripts/shortcuts to quit and relaunch the Luna apps – but these are imperfect and sometimes require rebooting
Summary
If you have an iMac with a gorgeous 4K or 5K Retina screen that you don’t want to waste, Luna Display is hands down the best way to get 5K resolution out of it.
Its ability to provide true Retina resolution, wired performance, and wide macOS compatibility makes it a far better choice than AirPlay or other software-only options.
Whether you’re using a MacBook Pro, Mac Studio, or Mac mini, Luna Display can give your iMac a second life as a stunning, high-resolution external monitor.
However, if 5K isn’t important to you and you’re on a budget, there are other ways to use your iMac as an external display.