
One of the most common frustrations when using a Mac with an external monitor is scaling and resolution problems.
Typical issues include:
- Text that appears too small or too large
- Blurry or soft-looking UI elements
- Displays that don’t match macOS Retina clarity expectations
- Inconsistent scaling across multiple monitors
While Apple’s own displays (like the Apple Studio Display) are optimized for macOS, most cheaper alternatives to the Studio Display – especially 4K monitors, ultrawide, and some budget displays – require manual tuning to look their best.
This is where BetterDisplay comes in.
In this guide, we’ll show you how to easily use BetterDisplay with your external monitor and make sure everything looks sharp and properly scaled on your Mac.
You May Also Like:
- Best 5K Monitors For Mac
- Best Apple Studio Display Alternatives
- Best 4K Monitors For Mac
- How To Use an iMac as an External Monitor
Why Do External Monitors Look Blurry on Macs?
Apple designs macOS primarily around Retina displays.
A Retina display works by rendering the interface internally at a much higher resolution before scaling it down, producing exceptionally sharp text and graphics.
Many third-party monitors don’t fit neatly into Apple’s preferred scaling system.
For example, a standard 27-inch 2560 × 1440 monitor often looks noticeably softer on macOS than it does on Windows.
Likewise, some 4K monitors default to scaling modes that either make everything too small or introduce slight blurring.
What Is BetterDisplay?
BetterDisplay is a free display management utility for macOS that unlocks additional scaling and resolution options that Apple normally hides.
It allows you to:
- Enable proper HiDPI scaling.
- Access additional display resolutions.
- Fine-tune scaling for individual monitors.
- Create virtual displays for advanced setups.
- Improve mixed monitor configurations.
For most users, the HiDPI feature alone is enough to dramatically improve image quality.
Is BetterDisplay Safe?
Yes.
BetterDisplay does not modify macOS system files or alter your monitor’s firmware.
It simply uses Apple’s own display APIs to expose additional display options.
During installation, macOS may ask you to grant Accessibility permissions and, for some advanced features, Screen Recording permissions.
The latter is only required for features like virtual display mirroring and can be revoked at any time from:
System Settings > Privacy & Security
Before You Start: Check Your Cable
Before changing any software settings, make sure your monitor is connected properly.
For best results, use:
- USB-C
- Thunderbolt
- DisplayPort
Older HDMI connections and some inexpensive USB-C hubs can limit available resolutions and HiDPI modes.
Simply switching from HDMI to DisplayPort can sometimes solve scaling problems by itself.
How To Fix Blurry Scaling With BetterDisplay
For most monitors, this takes less than a minute.
Step 1: Install BetterDisplay
To get started with BetterDisplay, follow these steps:
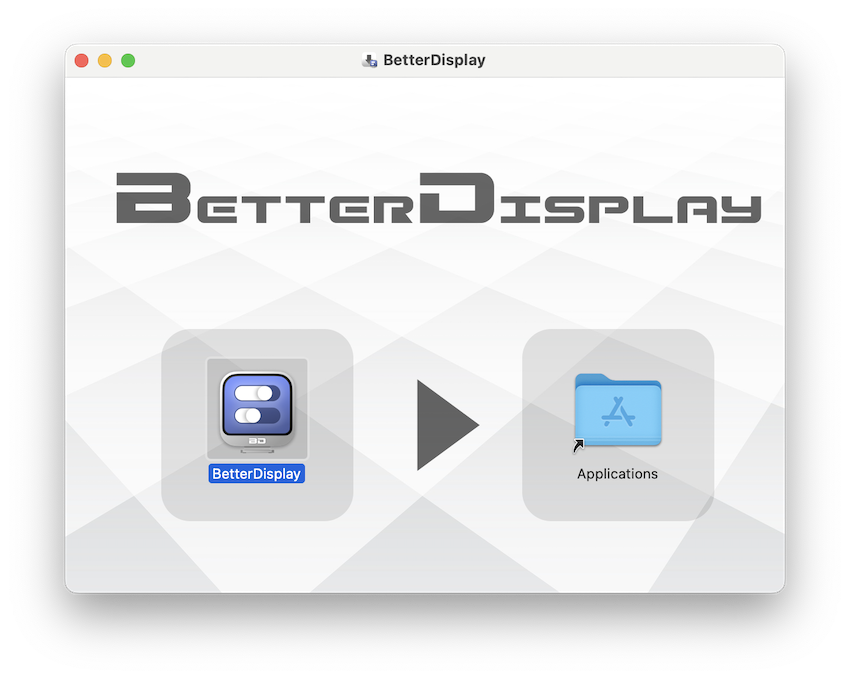
- Download BetterDisplay from the official website or GitHub repository.
- Open the downloaded file and drag it into your Applications folder on your Mac. You will have to grant permissions for BetterDisplay to access your macOS settings so when prompted “Open System Settings” and then toggle the slider to to the right next to BetterDisplay in the Accessibility window. You’ll be prompted to grant permissions in Accessibility, and in some cases Screen & System Audio Recording, depending on which features you use.
- Once installed, launch BetterDisplay from your Applications folder or search for it via Spotlight.
BetterDisplay now has access to macOS to give you more control over your external monitor’s resolution and scaling.
It will also automatically detect your monitor and add a BetterDisplay icon to your Menu Bar with some shortcuts to the most popular settings.
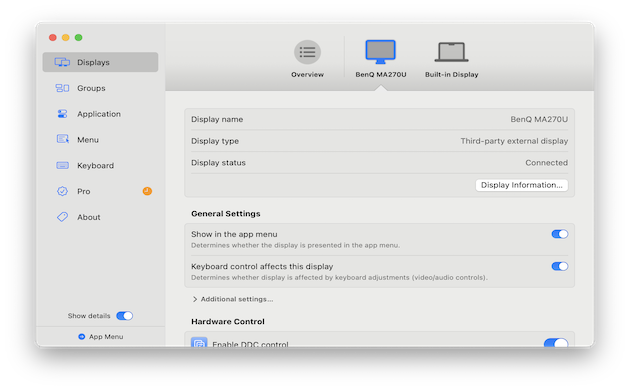
In our case, we had the excellent Mac friendly BenQ MA270U connected to an M3 MacBook Pro and BetterDisplay detected it immediately.
Step 2: Open the BetterDisplay Menu
Click the BetterDisplay icon in the macOS menu bar and select your external monitor.
Step 3: Enable HiDPI
Expand the Features section. If available, simply enable: High Resolution (HiDPI)
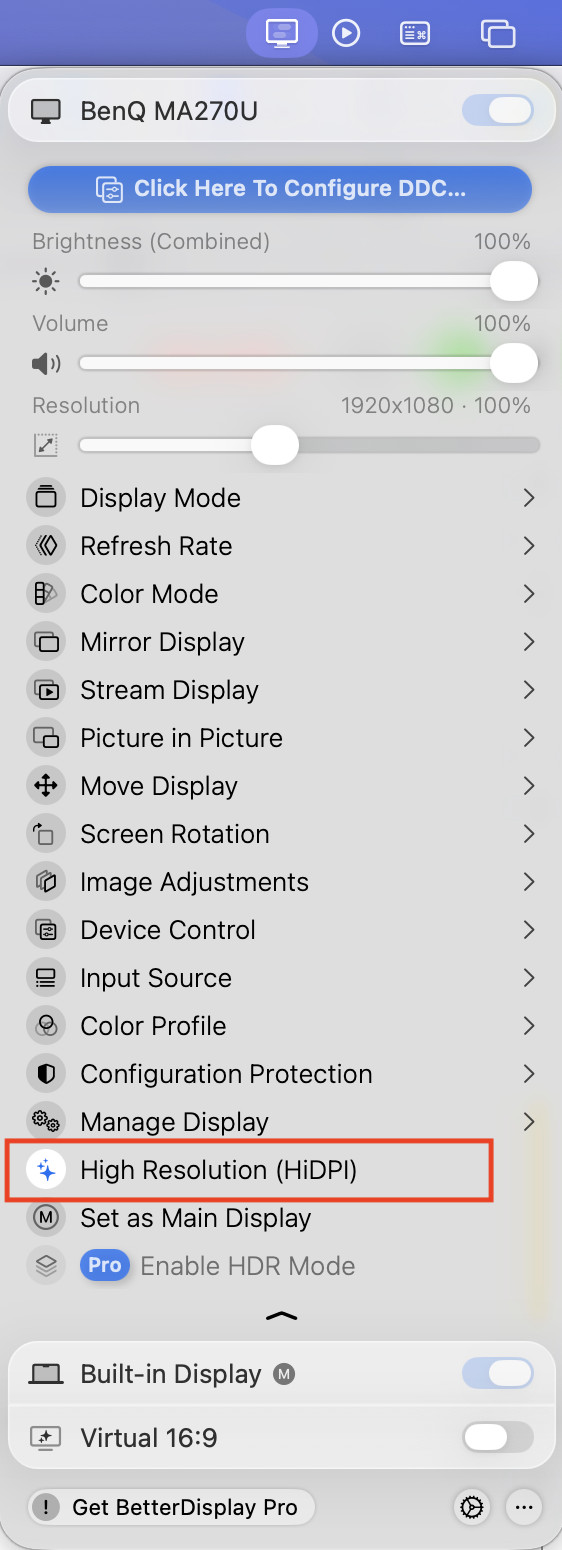
BetterDisplay will automatically apply an optimized Retina-style scaling mode for your display.
In our testing with the BenQ MA270S connected to an M3 MacBook Pro, BetterDisplay detected the monitor correctly and enabled the appropriate HiDPI configuration automatically as you can watch below.
For many users, this is all that’s required.
You should immediately notice:
- Sharper text.
- Cleaner UI elements.
- More natural scaling.
- Less eye strain during long sessions.
How HiDPI Actually Works
HiDPI doesn’t change your monitor’s physical resolution.
Instead, macOS renders the interface internally at a much higher resolution before displaying it on your screen.
For example, a 4K monitor may appear to run at a workspace similar to 2560 × 1440 while internally rendering at full Retina quality.
On a true 5K display, such as the BenQ MA270S or Apple’s Studio Display, macOS can use the panel’s full 5120 × 2880 resolution while maintaining perfectly sharp scaling.
This is why HiDPI mode often produces such a dramatic improvement.
Need More Control? Enable Flexible Scaling
If simply enabling HiDPI doesn’t produce the result you want, BetterDisplay also includes Flexible Scaling.
Open the BetterDisplay settings.
Select your monitor and use the resolution slider to change the resolution of the screen.

You can then experiment until you find the best balance between desktop space and readability.
This is particularly useful for ultrawide monitors or unusual display sizes.
If HiDPI Doesn’t Work: Create a Virtual Display
If enabling HiDPI from the BetterDisplay menu solves the problem, there’s usually no reason to create a virtual display.
However, creating a Virtual Displays in BetterDisplay is useful if:
- Your monitor doesn’t expose proper HiDPI modes.
- You’re using an unusual ultrawide resolution or 4K TV as a display.
- Standard HiDPI scaling doesn’t give satisfactory results.
You can watch the video above to see how to do it or follow the instructions below:
Step 1
Install and launch BetterDisplay.
Step 2
Select your physical monitor from the sidebar.
Step 3
Create a new virtual display by clicking on “Create New Virtual Screen…”
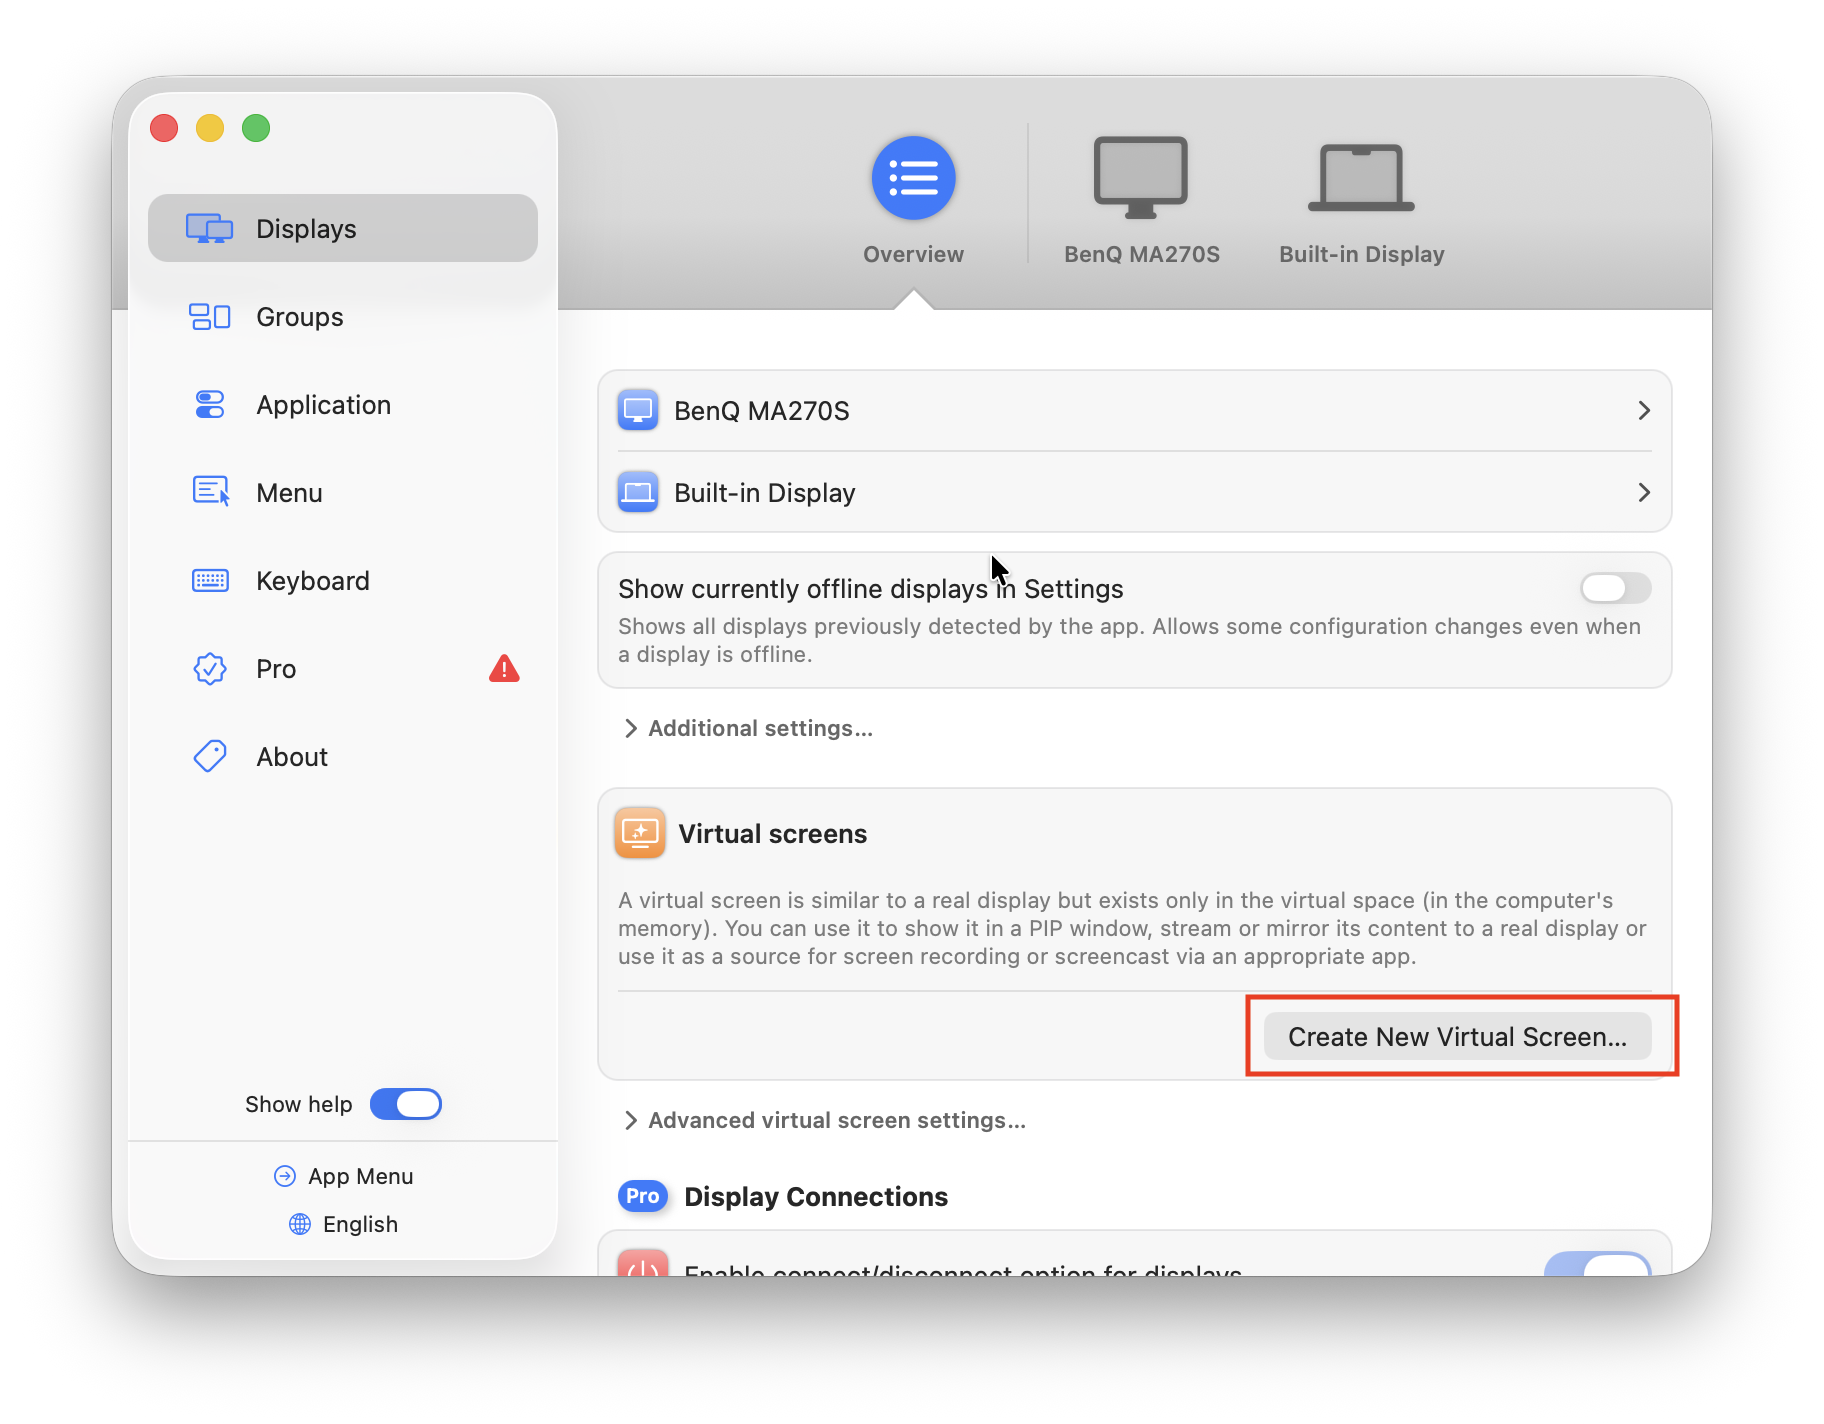
You can keep the recommended settings.

BetterDisplay will then generate a Retina-style virtual monitor.
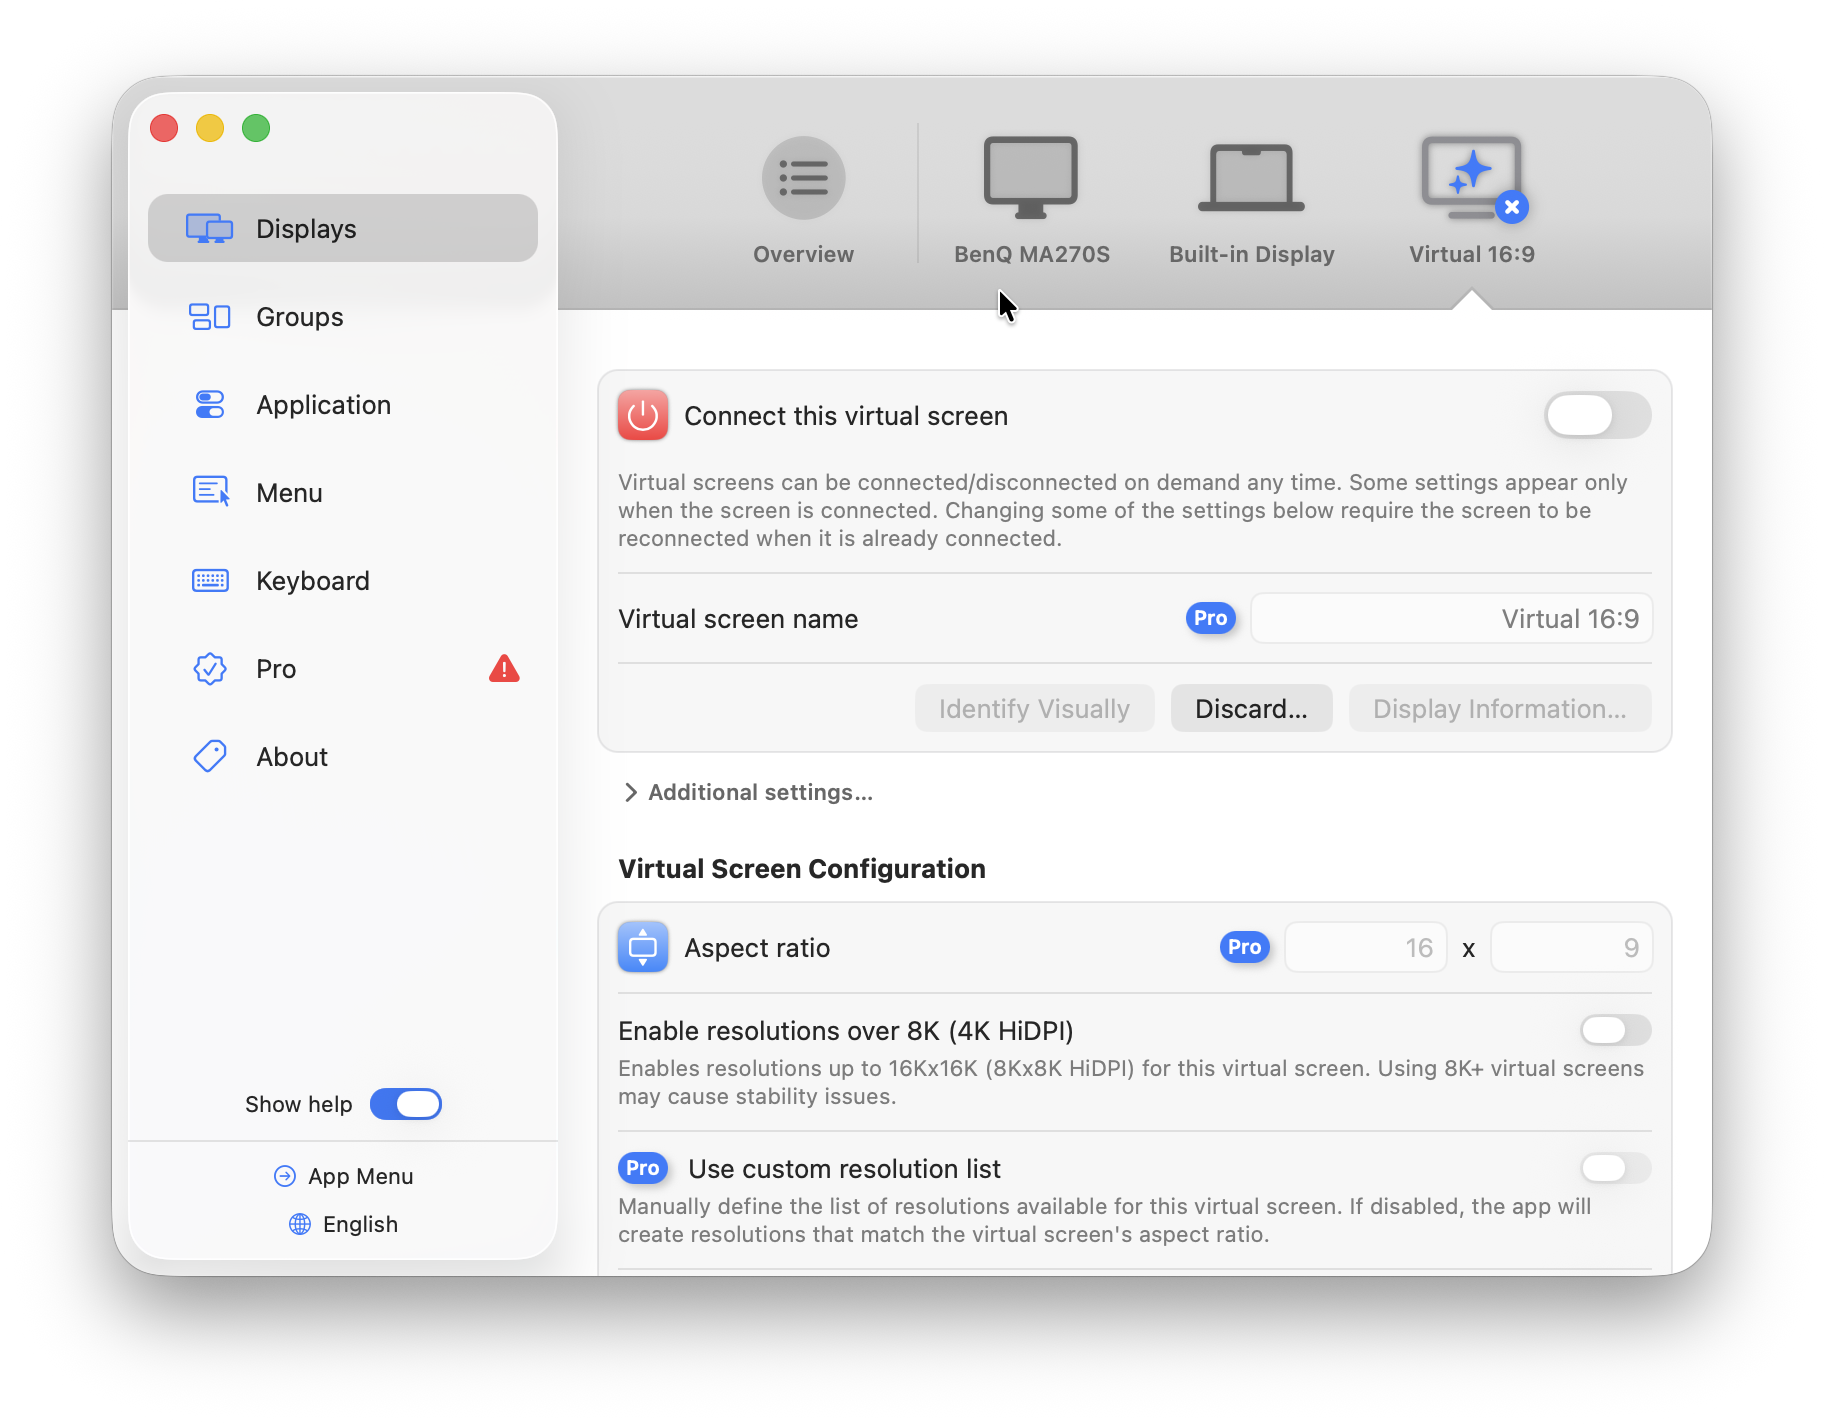
Step 4
Click the slider to activate “Connect this virtual screen” and then go to the Apple logo in the top left of your screen and select System Settings > Displays and you will see the Virtual Display available as a connected monitor.
Select your physical monitor (in my case the BenQ MA270U) and then in the Use as field select “Mirror for Virtual 16:9” to mirror that to the virtual display.
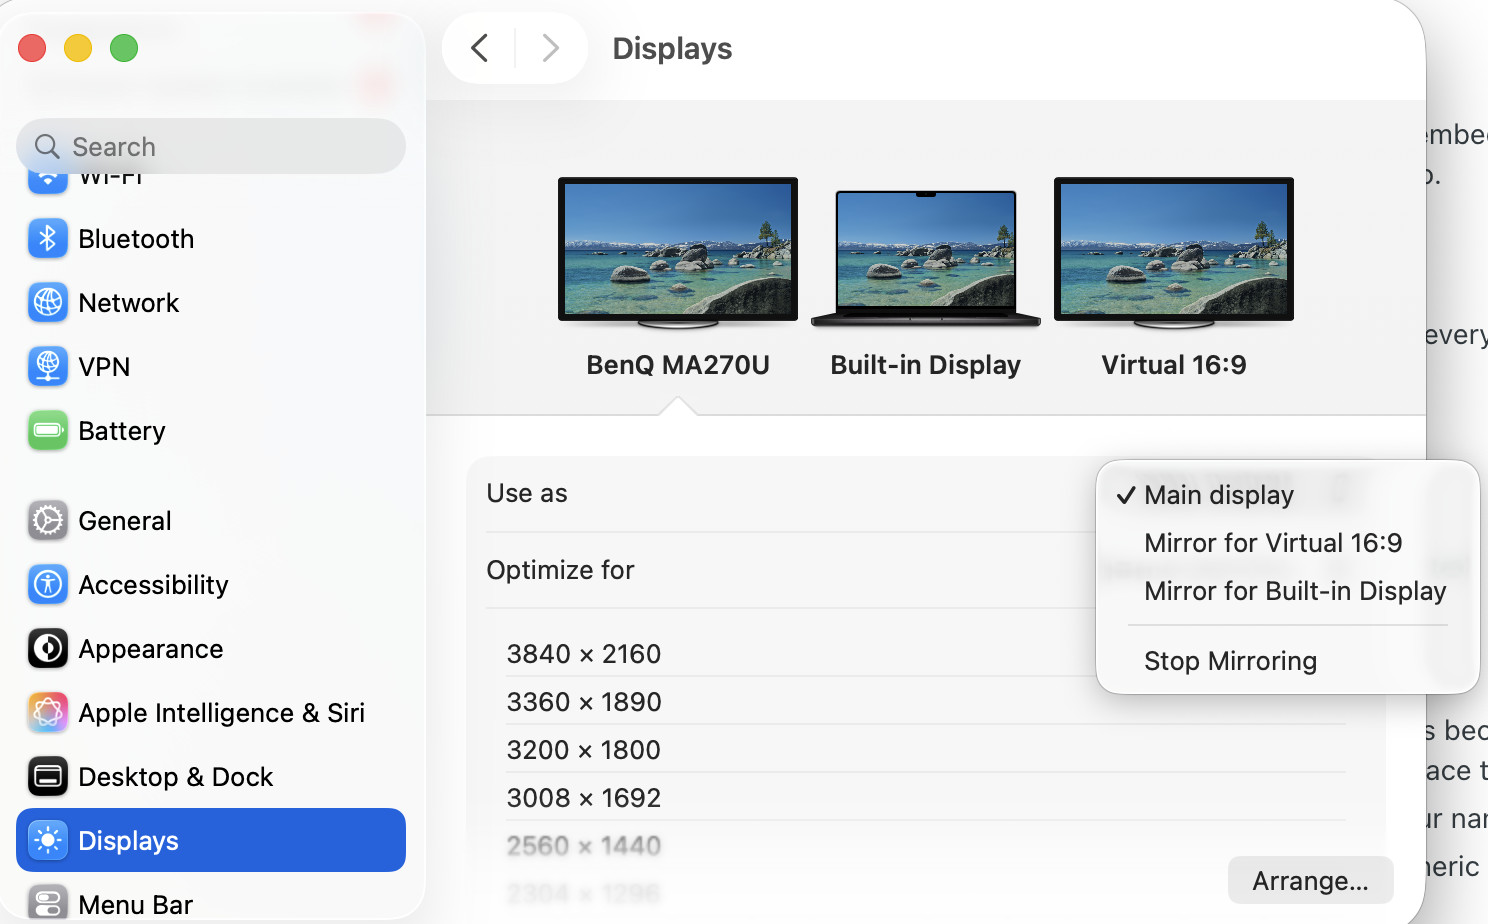
When you do this, you’ll notice the external display will adjust to a 16:9 screen resolution and the text/images will appear much sharper.
Essentially, your Mac renders everything to the virtual Retina display first, and your actual monitor simply displays that higher-quality image.
Why BetterDisplay switches to 16:9
When you create and mirror a virtual display, BetterDisplay often creates a standard Retina-compatible canvas, commonly 16:9, because that’s what macOS handles most predictably for HiDPI scaling.
If your external monitor is also 16:9 (for example, a 2560×1440 or 4K monitor), this usually works perfectly.
If you’re using an ultrawide (3440×1440), you’d generally want the virtual display to also be 21:9, otherwise the image may be letterboxed or stretched.
The key thing isn’t necessarily the 16:9 aspect ratio itself. It’s that the virtual display is probably being rendered at a 2× HiDPI scale, very similar to how your MacBook’s built-in Retina display works.
Basically, BetterDisplay is tricking macOS into thinking it’s drawing to another Retina screen, which is why the text suddenly looks much sharper.
Step 5
If you want to try higher resolutions, simply go to the Menu Bar, select BetterDisplay and use the resolution slider to slide up and down the available HiDPI scaled resolutions.
Usually 100% is the sweet spot but you may want to try a few different options until you find the one that offers the best balance between sharpness and desktop space.
Using Multiple Monitors
BetterDisplay is also useful if you use your MacBook alongside one or more external displays.
It allows you to apply different scaling settings to each monitor, reducing common issues like:
- Different UI sizes between displays.
- Blurry windows after dragging them between monitors.
- Inconsistent cursor scaling.
For more, check out our guide on how to use multiple displays with a Mac.
Apple Silicon vs Intel Macs
Display scaling works significantly better on Apple Silicon Macs (M1 and later) compared to older Intel-based models.
Apple Silicon Macs handle HiDPI scaling more efficiently, offer better GPU performance at high resolutions, and are generally less prone to blurry UI elements when using external displays.
If you’re using an Intel Mac, BetterDisplay can still help unlock additional scaling options, but results may be more limited depending on your hardware and macOS version. For the best experience – especially with 4K, 5K, or ultra-wide monitors – Apple Silicon Macs deliver noticeably better results.
Drawbacks to Using BetterDisplay
There are a few minor drawbacks to be aware of when using BetterDisplay.
Advanced features: Can feel complex at first but for most users, the trade-off is worth it for the clarity gain.
Performance impact: Higher resolutions and Retina scaling can be more taxing on your Mac’s GPU, especially on lower-powered machines. Performance impact is minimal on Apple Silicon Macs, though base-model M-series chips may see increased GPU load when driving multiple high-resolution displays.
Scaling artifacts: Certain scaled resolutions may introduce slight blurring compared to native resolutions, though Retina scaling minimizes this.
Is BetterDisplay Worth It?
If you regularly use an external monitor with your Mac, especially a 1440p display or ultrawide monitor, BetterDisplay is one of the most useful utilities available.
The free version alone can significantly improve text clarity and make third-party monitors feel much closer to Apple’s own Retina displays.
While there can be a small amount of trial and error finding the ideal scaling option for your particular hardware, most users find the improvement well worth the effort.
If you’ve been frustrated by blurry text on your Mac, BetterDisplay is one of the first tools we recommend trying.
Summary
Apple’s built-in display settings work perfectly for Retina displays, but they often fall short with third-party monitors.
BetterDisplay fills that gap by exposing better scaling options and allowing macOS to render external displays much more effectively.
For most people, the entire process is surprisingly simple:
- Install BetterDisplay.
- Enable HiDPI.
- Enjoy a sharper display.
Only if that doesn’t work should you move on to Flexible Scaling or the more advanced virtual display features.
That’s one of the reasons BetterDisplay has become one of our favorite Mac utilities for improving external monitor quality.
BetterDisplay Troubleshooting
Text is still blurry
Confirm that HiDPI mode is enabled and that your monitor is running at its native resolution. Alternatively, try setting-up a virtual display.
Everything looks too small
Try a different scaled resolution or enable Flexible Scaling.
The monitor isn’t detected
Try reconnecting the cable or using DisplayPort or USB-C instead of HDMI.
FAQ
Should I use a virtual display?
Only if standard HiDPI scaling doesn’t solve the problem.
What Are The Best BetterDisplay Settings For 1440p Monitors?
Standard 27-inch 1440p monitors are among the most common displays used with Macs. Unfortunately, they are also among the most likely to exhibit blurry text.
Using BetterDisplay’s virtual display system often provides a significant improvement. Don’t worry too much about matching the monitor’s native resolution exactly.
The sharpest option is often one of the available HiDPI scaled modes rather than the default setting.
What Are The Best BetterDisplay Settings For Ultrawide Monitors?
Ultrawide displays such as 3440 × 1440 models work extremely well with BetterDisplay.
The setup process is identical:
- Create a virtual display.
- Mirror it to the physical monitor.
- Select an appropriate HiDPI resolution.
It may take a little experimentation to find the ideal scaling option, but you should get much sharper text once configured correctly.
Can You Use BetterDisplay With Large 4K TVs?
Many users now use 42-inch or 48-inch OLED TV as a monitor with a Mac.
These displays offer excellent image quality but can sometimes produce oversized or slightly soft-looking interface elements.
BetterDisplay allows you to use Retina-style scaling while preserving a comfortable amount of desktop workspace.
Again, the setup process is identical:
- Create a virtual display.
- Mirror it to the physical monitor.
- Select an appropriate HiDPI resolution.
If text appears too large or too small, simply experiment with different HiDPI scaling options until you find the best balance.
Does BetterDisplay Work With High Refresh Rate Monitors?
Yes. You can use BetterDisplay with 120Hz, 144Hz and even 180Hz displays.
After completing the setup, simply check your monitor’s refresh rate in:
System Settings > Displays
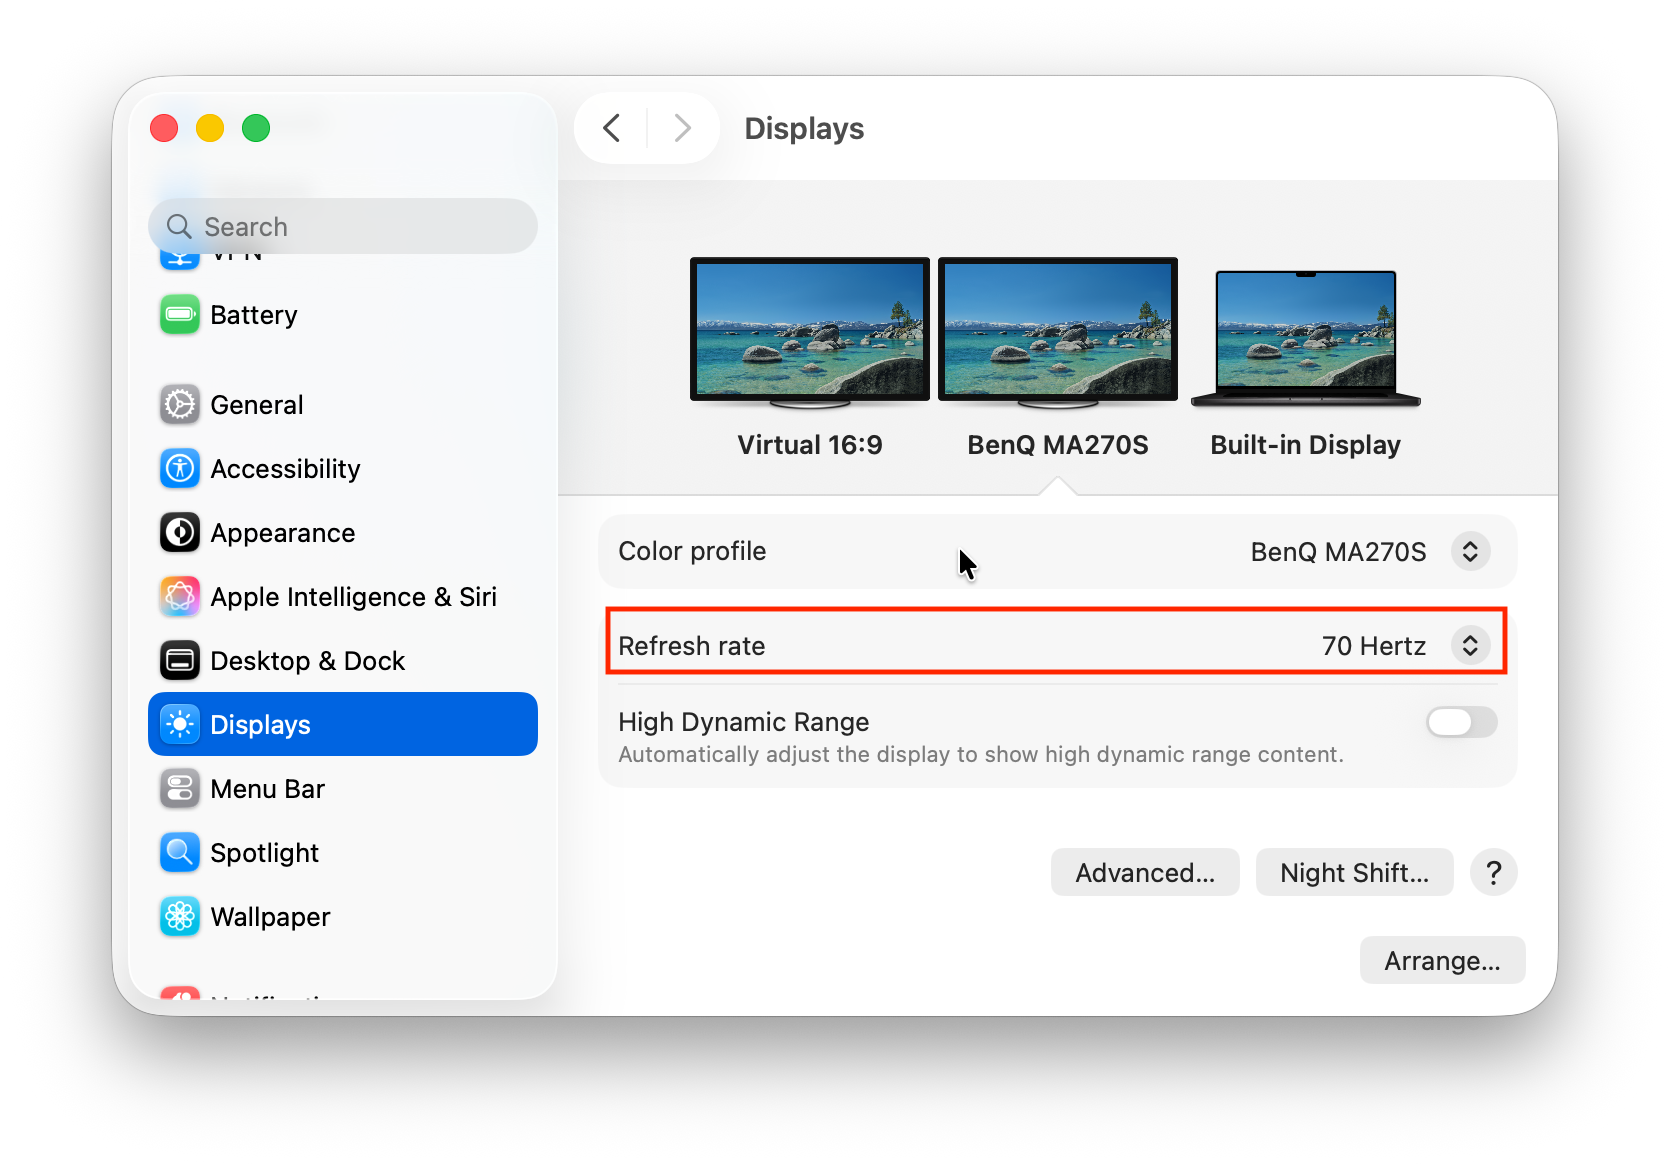
If macOS has reverted to 60Hz, manually re-select your preferred refresh rate. In my case, the MA270S supports a maximum refresh rate of 70Hz.
In most cases, HiDPI scaling and high refresh rates work perfectly together.